• When you click on links to various merchants on this site and make a purchase, this can result in this site earning a commission. Affiliate programs and affiliations include, but are not limited to, the eBay Partner Network.

My 1971 Road runner

I worked on getting the steering column apart yesterday.
First, get the main shaft out.
March 27th (1).jpg


And some of the bits...
March 27th (2).jpg


Next clean up the main shaft.
March 27th (3).jpg


I have the power steering column that came with the car.
March 27th (4).jpg

I'm going to take the mounting flanges from it for this manual steering column.
 
Man, it sure is great having a neighbor who has an industrial sand blasting cabinet at his house.
April 4th (2).jpg
April 4th (3).jpg


I was able to get the column pieces blasted and ready for paint.
April 3rd (25).jpg
April 3rd (24).jpg
April 3rd (23).jpg
 
I finally got a chance to get some satin black on the parts.
April 24th (3).jpg
April 24th (4).jpg
April 24th (5).jpg
April 24th (6).jpg

Well except the coupling which got some cast paint.
Next step....putting it all back together.
 
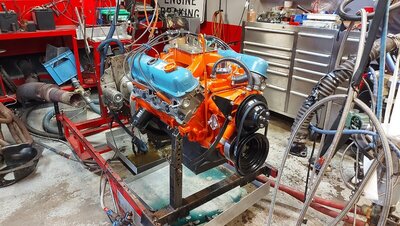
So I finally got some time this Mothers day weekend to get my engine broken in on a dyno.
Friday night I took the engine off the stand.
20220506_191200.jpg

And loaded into the minivan.
20220506_193839.jpg

Saturday morning it's off to the engine shop.
My buddy Al who I went to high school with owns a engine shop in Fonthill, Ontario (about 20 minutes from Niagara falls).
Here's the name of his place.
20220508_114543.jpg

We unload the engine from the van and get it ready to go on the dyno.
Here's the dyno room.
20220507_144118.jpg

Here she is on the dyno.
20220507_153335.jpg

Here is Al setting the rocker arm clearance. .012" on the intakes and .014" on the exhaust.
Next is to prime the oil pump - here's the reading.
20220507_181918.jpg

Next is firing it up and running thru the heat cycles and doing the break in & that was it for Saturday.

Sunday I'm back up there in the morning and Al has already put the inner valve springs back on the heads.
They were left out by the engine builder (not Al) who said it'll be easier on the valve train during break in as it has a solid cam in it.
BUT......
Al finds a problem.
The underside of the rocker arms hit the valve retainer.
20220508_103001.jpg
20220508_103008.jpg

So take the rockers off and go next door to the shop where Al grinds a relief in the area where it was touching.
20220508_111611.jpg

Back to engine and I assemble the rocker shafts and arms and shim them to align with their respective valves. 20220507_153342.jpg
 
Al does the clearance thing once again then fire up the engine and get some heat into it and get ready for the first pull.
First pull.......423 horse at a touch over 5000 RPMs....I'm lovin it!
20220508_135519.jpg

Next, Al puts a thin phenolic carb spacer under the 800 Holley - it's about 1/4" thick.
Next pull...... 441 horse...almost a 20 horse gain....Awesome!
20220508_140933.jpg

Last thing to try is to tweak the timing to get 37 degrees total timing & check the plugs for any detonation.

Final pull....460 horses and 480 ft lbs of torque.......I'm smilin ear to ear!
20220508_144555.jpg
20220508_144625.jpg


By the way, if any members here read RPM magazine Al's shop was featured in their June 2021 edition.
Al and his brother Andrew do great work.
20220507_133810.jpg
20220507_133817.jpg
20220507_133826.jpg
 
Thanks CT - considering its not a stroker engine I'm very happy with the results.
And with the current gas prices up here in Canada the engine will still be a thirsty one!!! :eek:
 
I thought it was a stroker!! Feeding it will not be cheap!!
 
No sir, its just a 0.030 over 360 with Scat H-beam rods & KB107 pistons.
Block is zero decked.
Hughes solid cam (0.534/0.543 lift on 237/242 duration) with Hughes lifters installed on at 104*
Shaved 'J' heads with a 60cc chamber and has 2.02/1.8 valves.
Air Gap intake with a 800 Holley.
Compression is approx 10.9:1
 
Thanks Chris.
Today I had a chance to put the steering column back together.
May 15th (2).jpg
May 15th (1).jpg
May 15th (3).jpg
May 15th (4).jpg

Put new turn signal switch in as the old one was broken.
May 15th (5).jpg
May 15th (6).jpg

The turn signal stalk cleaned up well with some Mothers polish.
May 15th (8).jpg

All in all not too hard of a job to do.
May 15th (7).jpg
 
I got the pot coupler installed today. I bought some parts quite a while ago along with a new coupler.
May 28th (1).jpg
May 28th (2).jpg
May 28th (19).jpg
May 28th (20).jpg

Put everything together (with grease inside too).
May 28th (21).jpg
May 28th (22).jpg

Finally done & on to the next thing.
May 28th (23).jpg
 
So I got a start on the dash cluster assembly.
First I had to make a new gasket.
May 28th (4).jpg

And put it in its place.
May 28th (8).jpg

I bought a used glove box at a local Mopar swap meet.
May 28th (5).jpg

Got the proper screws ready.
May 28th (6).jpg

And put it all together.
May 28th (9).jpg
May 28th (10).jpg
May 28th (13).jpg
 
So today I was going to try and install the wiring harness on the back of the cluster.
I thought I better inspect the harness first.
Since my original harness was hacked up by the previous owner when he turned it into a drag car I better buy another one.
I bought one from a member on Moparts who assured me that there was nothing wrong with it......:mad:
Oh yes there was something wrong with it.
June 12th (3).jpg
June 12th (7).jpg

Looking at the back of the fuse panel it looks like some excessive amperage went thru that wire.
The heat made the surrounding plastic so brittle that when I tried to take out the fuse it pulled thru the connector.

Also it looks like an additional wire was added and then cut out.
June 12th (11).jpg


So I dug out the original fuse panel and it looked to be in better shape.
June 12th (8).jpg

Here's the damaged fuse panel after the connections were removed.
June 12th (21).jpg
June 12th (22).jpg

And here's the original one.
June 12th (20).jpg

In much better shape.

So the rest of the afternoon was spent taking multiple pics of the wiring arrangement then proceed to switch fuse panels.
I decided to go this way as I looked on Year One for a wiring harness and they list one at $650 bucks!!!! :eek:

So here's the end result.
June 12th (25).jpg
June 12th (26).jpg
June 12th (27).jpg

I'll try again next weekend.
 
So today I was going to try and install the wiring harness on the back of the cluster.
I thought I better inspect the harness first.
Since my original harness was hacked up by the previous owner when he turned it into a drag car I better buy another one.
I bought one from a member on Moparts who assured me that there was nothing wrong with it......:mad:
Oh yes there was something wrong with it.
View attachment 1298025View attachment 1298026
Looking at the back of the fuse panel it looks like some excessive amperage went thru that wire.
The heat made the surrounding plastic so brittle that when I tried to take out the fuse it pulled thru the connector.

Also it looks like an additional wire was added and then cut out.
View attachment 1298030

So I dug out the original fuse panel and it looked to be in better shape.
View attachment 1298028
Here's the damaged fuse panel after the connections were removed.
View attachment 1298032View attachment 1298033
And here's the original one.
View attachment 1298034
In much better shape.

So the rest of the afternoon was spent taking multiple pics of the wiring arrangement then proceed to switch fuse panels.
I decided to go this way as I looked on Year One for a wiring harness and they list one at $650 bucks!!!! :eek:

So here's the end result.
View attachment 1298036View attachment 1298037View attachment 1298038
I'll try again next weekend.
If you take your time and patient, you can fix anything. Great job, persistence paid off. Chances are the seller didn't notice that.
 
Auto Transport Service
Back
Top