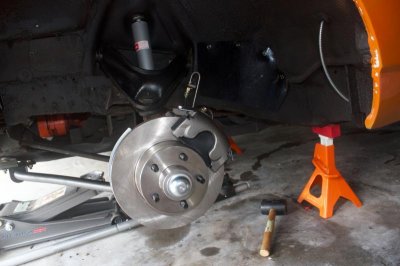
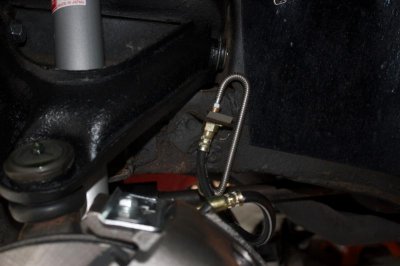
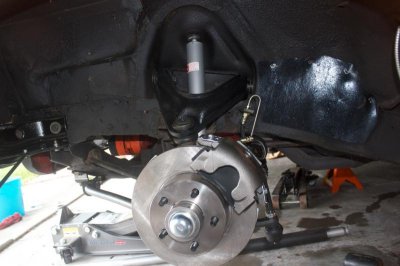
SoFar so good ! Keep it up as you ALOT closer to the pavement then I am !!
You are using an out of date browser. It may not display this or other websites correctly.
You should upgrade or use an alternative browser.
You should upgrade or use an alternative browser.
My $300 a month budget 69 RR project (AKA, Wholly crap, what did I get myself into)
- Thread starter GearAddict
- Start date
Vonzy797
Active Member
Nice car! I too am on a similar budget...but there is always plenty to do that doesn't require much $. Im guessing your car doesn't have power brakes... where did you get that front disc brake kit and how much does it cost? I don't think I want to switch to power brakes and am curious if manual front disc brakes are worth it for the money?
GearAddict
Well-Known Member
Nice work GearAddict!
I have the same disk brake upgrade. Did you install the anti-rattle rubber bands and clips on the brakes? Any pictures of how the bands go on the brake pads? I saw the anti-rattle stuff but haven't yet started to ponder how it fits.
...and yours looks a lot better since your is actually attached to a car!!! :yes:
Thanks Hawk...no I haven't installed the "anti-rattle" rubber bands yet... can't figure out how they attach from the instructions. I left it off since it said it was optional and the calipers come off pretty easy so I figured I could throw them on at a later point if needed.
- - - Updated - - -
SoFar so good ! Keep it up as you ALOT closer to the pavement then I am !!
Thanks Wedge... I feel like I can see the light at the end of the tunnel for this project (the suspension/brakes).
- - - Updated - - -
Nice car! I too am on a similar budget...but there is always plenty to do that doesn't require much $. Im guessing your car doesn't have power brakes... where did you get that front disc brake kit and how much does it cost? I don't think I want to switch to power brakes and am curious if manual front disc brakes are worth it for the money?
Amen to there being lots you can do for little or no money.. but unfortunately this project has been a costly one, but I believe it will be worth it.
Yes the car is manual brake setup. I bought the kit from Right Stuff Detailing... everything for around $600. I had read some earlier reviews with issues on their power booster and one from another member on their adjustable pedal rod, being differrent from the correct factory shape that works with the brake light switch... I can't comment on the booster, but it looks like they corrected the pedal rod problem.
All in all, their kit has gone on nicely so far.
Can't comment on how much the stopping power improvement will be yet..stay tuned.
GearAddict
Well-Known Member
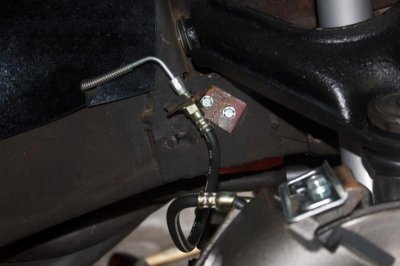
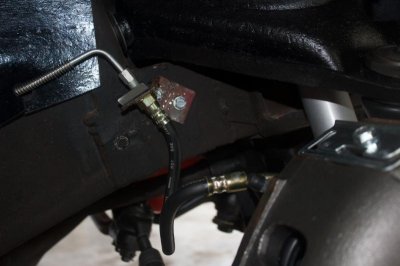
Ok.. Ran into a snag on the brake hoses. The ones provided don't seem right.. I have the calipers rear hung as is listed on the website and instructions (I have stock sway bar mounts on the LCA). The hoses provided are only about 12" long and have a banjo fitting at one end with a 2.5" piece of hard line off of it.
The hard line section seems to be part of the problem, but the length looks like an issue as well.
Any suggestions? This set looks to be the same, single piston, slider type caliper used by pirate jack, MP brakes and Right Stuff Detailing.
The hard line section seems to be part of the problem, but the length looks like an issue as well.
Any suggestions? This set looks to be the same, single piston, slider type caliper used by pirate jack, MP brakes and Right Stuff Detailing.
Capt-Culver
Well-Known Member
So...having never seen one of those disc break conversion up close and personal, have a few questions. Are the bearings installed with the rotors? Are they all one unit? Did you have to remove the lower ball joint from the LCA....or can that just be unbolted from the backing plate? I assume the upper ball joint (control arms) needs to be removed.
Thanks! Looking great!
Thanks! Looking great!
GearAddict
Well-Known Member
So...having never seen one of those disc break conversion up close and personal, have a few questions. Are the bearings installed with the rotors? Are they all one unit? Did you have to remove the lower ball joint from the LCA....or can that just be unbolted from the backing plate? I assume the upper ball joint (control arms) needs to be removed.
Thanks! Looking great!
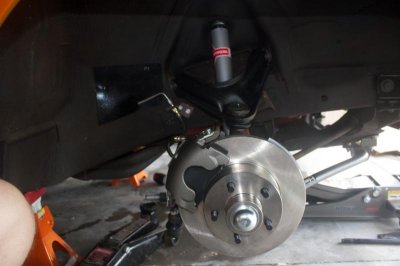
Capt.. The bearings are in the rotor, I liked this over some other kits that attempt to keep the drum spindles by using a seperate hub with bearings and a rotor that attaches to the hub... Not sure why I was adverse to that... I'm sure it would work fine. SSBC make a kit that way, which would prevent having to deal with the ball joints at all.
Yes. You could just unbolt the lower ball joint/steering knuckle, but mine were shot so I replaced them. You will have to seperate the upper ball joint from the knuckle. Hope that helps.
If I had a fresh suspension setup and didn't want to tear into good ball joints I would probably have gone with the "drum conversion" type setup like ssbc. But also a little more costly.
GearAddict
Well-Known Member
Weekend update... Finally feeling like I'm close to doe with this Brakes/suspension/steering project.
1. New master cylinder bench bled and mounted... man what a tight spot for those mounting nuts! the ones on the left aren't to bad but the ones behind the column had me cursing. I ended up buying a 1/2" nut setter which helped.
2. New brake lines run to the rear (did fronts a couple of weeks ago). This was not too bad, but working under the car was a little tight. Unfortunately the old fittings at the junction block on the diff we're rounded off. I feel like I have found the perfect solution for getting these off....hack off the brake line close to the fitting, then pound a 5 point deep well socket onto the fitting with a mallet... works like a charm.
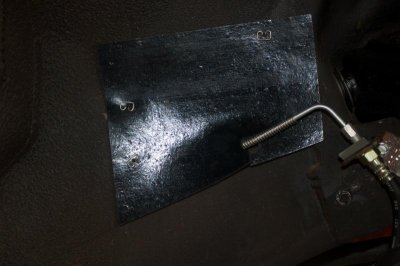
3. Installed new splash sheilds (the ones that cover the access to the cam bolts). Torqued everything down, mounted wheels and set the initial ride height.
When I hooked up the master lines and walked away, I came back to a pool of brake fluid/ it was coming from the banjo fitting seals. I torqued down on it and re-filled the MC...after a few hours, looks like it's holding. We'll see how it does when I pressurize it during bleeding.
Anyway, it was great to see the car back on all four tires.
GearAddict
Well-Known Member
Looking good GearAddict! I'll be checking back here to compare when I work to put mine back together. My K Member is mostly done except for my steering box, so now I am working on the engine and tranny. Hopefully soon I'll be doing some of the same work on mine!
Keep up the good work so I can keep copying off of you!!! (smile)
Keep up the good work so I can keep copying off of you!!! (smile)
GearAddict
Well-Known Member
Also, I picked up this 1968 C body console from a forum member for $300! Seemed like a steal and fit my budget perfectly, how could I pass. It is complete minus the lock, carpet and light bulb sockets. I know it's not the correct top plates for a 69, but to be honest I think the metal tops look better in the RR interior than the woodgrain, so I'm happy.
Looks a little rough in the pics, but it's actually in really good shape. only 1 crack to repair, paint, new shift boot, carpet and a whole lot of brightening and she'll be ready to mount. If anyone has any tips on plastic repair or console resto, please let me know.
I will also be on the prowl for one of those badass console vacuum gauges... those things are sweet.
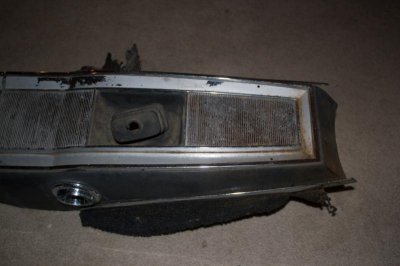
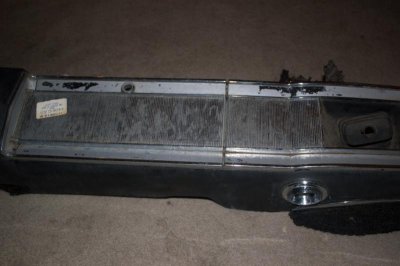
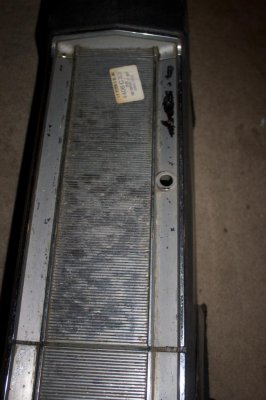
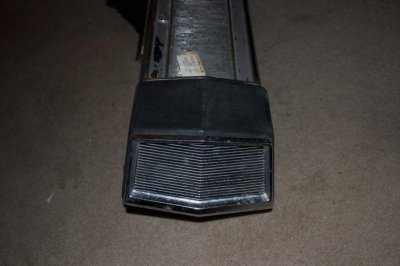
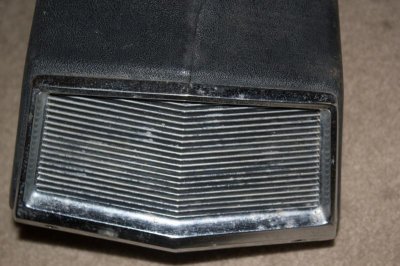
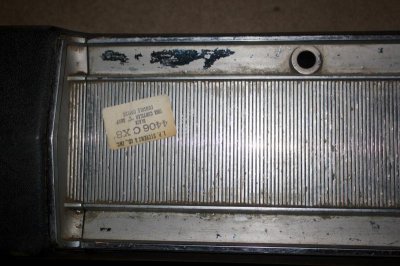
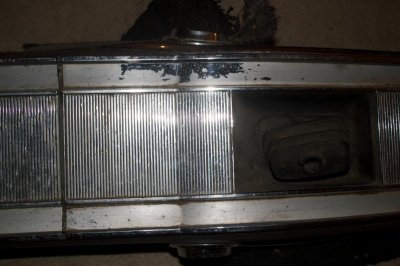
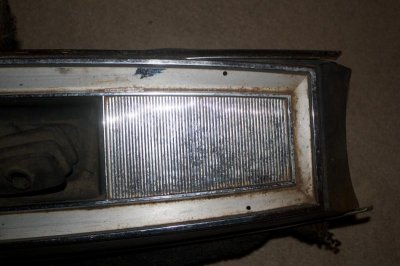
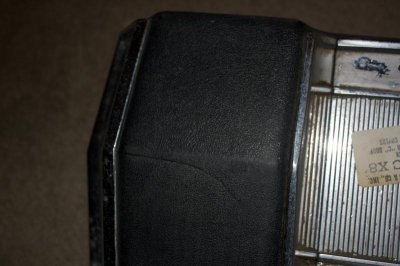
- - - Updated - - -
Thanks Hawk... If I had it to do over, I'd disassembly everything first, then buy the parts. I lost a lot of time, just waiting on parts to come in that I never knew I would need until I was smack in the middle of the teardown.... shouldn't be a problem for you, considering you're starting from a pristinely sweet clean frame.
Also, big thanks to Propwash for photo's on the brake soft line routing. Once I had it installed it made perfect sense, but the Right Stuff Detailing instructions left a few gaps.
Looks a little rough in the pics, but it's actually in really good shape. only 1 crack to repair, paint, new shift boot, carpet and a whole lot of brightening and she'll be ready to mount. If anyone has any tips on plastic repair or console resto, please let me know.
I will also be on the prowl for one of those badass console vacuum gauges... those things are sweet.


- - - Updated - - -
Looking good GearAddict! I'll be checking back here to compare when I work to put mine back together. My K Member is mostly done except for my steering box, so now I am working on the engine and tranny. Hopefully soon I'll be doing some of the same work on mine!
Keep up the good work so I can keep copying off of you!!! (smile)
Thanks Hawk... If I had it to do over, I'd disassembly everything first, then buy the parts. I lost a lot of time, just waiting on parts to come in that I never knew I would need until I was smack in the middle of the teardown.... shouldn't be a problem for you, considering you're starting from a pristinely sweet clean frame.
Also, big thanks to Propwash for photo's on the brake soft line routing. Once I had it installed it made perfect sense, but the Right Stuff Detailing instructions left a few gaps.
I see the console has the girlfriend crack, or at least that's how mine got cracked back in the day
Basket case
Well-Known Member
lookin good! nice score on the console.
MT_Mopar
Well-Known Member
Looking good GearAddict! Gives a guy a good feeling with all that new hardware under there don't it? I see all that hard work paid off for you.
Nice job. Interested to see how the center console turns out.
Any idea when you might be driving her?
Keep up the good work!
Nice job. Interested to see how the center console turns out.
Any idea when you might be driving her?
Keep up the good work!
GearAddict
Well-Known Member
I see the console has the girlfriend crack, or at least that's how mine got cracked back in the day
Thanks GTX.... I will now make sure to wear gloves while washing the console off
- - - Updated - - -
Looking good GearAddict! Gives a guy a good feeling with all that new hardware under there don't it? I see all that hard work paid off for you.
Nice job. Interested to see how the center console turns out.
Any idea when you might be driving her?
Keep up the good work!
thanks MT, feels real good to know it was done. I've owned a variety of muscle cars over the years but have always neglected the suspensions, patched together braking systems and let someone else worry about tired brake lines... I was young and only cared that it was fast. Feels great knowing everything is new and I know exactly how it was done.
Should be driving her in the next 2 weeks. I'm headed to St Paul, MN for work next week, but will bring her in for alignment when I get back and she'll be good to drive while I finish the interior resto and other smaller projects (like that 440 6bbl I have my eye on). goal was to get the dangerous stuff out of the way, then drive it while I work on the rest.
GearAddict
Well-Known Member
Been out of town, spent the week in St Paul, MN. Great town, weather was a little crappy.
Back at the RR, had a little snag with the new adjustable rod that came from Right Stuff. The hole for the bolt that attaches it to the pedal was too small. Couldn't get the bolt to drop in. Pissed me off and I sent Right Stuff an email about it and they never responded. According to another forum member, Mopar has 2 different size bolts? Anyway, it was only off by .5mm so I used a small dremmel barrel, soft grinding stone and was able to open it up pretty easily.
Mounted up the rod this morning... only concern is that the instruction tell you to adjust it 1/8" up from the "stop"... as far as I know there is no bottom stop for the brake pedal travel...without the rod on mine, it can be pushed all the way to the floor.
Other issue is that it never seems to bottom out the MC... If I adjust the rod out to the extreme (as far as it can go until bottoming out the brake light switch) The pedal rides wayyy to high.. even then, I don't think the MC piston would bottom out with the pedal depressed...
For the moment I just set it where the brake light switch is barely engaged which seems to be a reasonable pedal height. we'll see if that works.
GearAddict
Well-Known Member
Sunday update... Brakes bled, had to tighten up a few of the fittings on the new lines to get it done. Tried using one of those vacuum style bleeder tools, but it was a pain in the but. Ditched it and got the wife to pump the pedal old skool. Good to go.
I'll take it to the alignment shop this week...anyone got recommendations on alignment specs for the shop that are better than what's in the FSM?
I'll take it to the alignment shop this week...anyone got recommendations on alignment specs for the shop that are better than what's in the FSM?
Last edited:
Mstone68440RR
Well-Known Member
Great thread GearAddict, thanks for documenting all your work and research. I can see it saving me a lot of time in the future, I just subscribed to it.
Sunday update... Brakes bled, had to tighten up a fee of the fittings on the new lines to get it done. Tried using one of those vacuum style bleeder tools, but it was a pain in the but. Ditched it and got the wife to pump the pedal old skool. Good to go.
I'll take it to the alignment shop this week...anyone got recommendations on alignment specs for the shop that are better than what's in the FSM?
Nice going with the brake job. My wife will help as well, but it is much better to have my son do it because he is actually into cars...
As far as alignment, you may want to check out one of my old threads:
http://www.forbbodiesonly.com/moparforum/showthread.php?42038-Help-Needed-On-Alignment-Issues
Good Luck!
Hawk
GearAddict
Well-Known Member
Great thread GearAddict, thanks for documenting all your work and research. I can see it saving me a lot of time in the future, I just subscribed to it.
Thanks Mstone... Welcome to the site. BTW, I grew up in Vista, CA and worked in Escondido when I was in my early 20s..... If only I could find a decent Carne Asada Burrito outside of SoCal, life would be good.
- - - Updated - - -
Nice going with the brake job. My wife will help as well, but it is much better to have my son do it because he is actually into cars...
As far as alignment, you may want to check out one of my old threads:
http://www.forbbodiesonly.com/moparforum/showthread.php?42038-Help-Needed-On-Alignment-Issues
Good Luck!
Hawk
Thanks for the Link Hawk!
I see the console has the girlfriend crack, or at least that's how mine got cracked back in the day
Mine has the same crack, One member said laughing but i think true, its a factory defect made to be after 25+ years lol.. Most ive seen have the same one in the same place, I like your idea better, it reminds me of days long gone, I asked my wife just a couple weeks ago if she wanted to sit next to me like the old days (in the 73) she looks at the console and starts laughing, "i think ill pass" I don't blame her its been some 40 years ago such things as we did, at least that way!
GearAddict, good to hear your brake work went well, ive never tryed one of those helper brake bleeding, my wife works well for the same! Good luck and i do hope you are enjoying the upgrades and everything you are doing, i think its going to be some great improvement with it all and you'll have a bigger smile then before with the cruising!
Similar threads
- Replies
- 43
- Views
- 6K
- Replies
- 5
- Views
- 934
- Replies
- 6
- Views
- 2K

