Everyone around here uses that green fiber strand stuff over these joints. I've never used All-Metal, I'll have to check it out.I believe most use USC ALL-METAL to fill those joints
You are using an out of date browser. It may not display this or other websites correctly.
You should upgrade or use an alternative browser.
You should upgrade or use an alternative browser.
My 69 Road Runner
- Thread starter hunt2elk
- Start date
Sounds like you got a very hood bodyshop. I don't know of any around here that would offer to do that job without being told, and then they would still complain. Kind of a big job. Back end of the interior would have to be taken out as well as dropping the headliner to prevent a fire.I know when I had Fred in the body shop, he already had one c-pillar that had bubbled up
from the previous owners' dubious painting/prep work, so they asked me if I wanted them
to fix it while they had the car.
I said "sure", not knowing what they actually meant....
when I went out to check on things, they handed me a big wad of (cooled off obviously)
molten lead - they had done BOTH sides, melting out the original lead and redoing the joints
with weld, then filler. They matched paint perfectly, too - it looks fantastic now.
Last edited:
- Local time
- 5:24 PM
- Joined
- May 14, 2011
- Messages
- 18,917
- Reaction score
- 38,147
- Location
- On the Ridge, TN
Yes sir, I agree. They did the same thing down at that joint under the doors in the rockers, too - another siteSounds like you got a very hood bodyshop. I don't know of any around here that would offer to do that job without being told, and th hen they would still complain. Kind of a big job. Back end of the interior would have to be taken out as well as dropping the headliner to prevent a fire.
of some preliminary bubbling on Fred. They removed the lead, welded, filled and repainted.
Now mind you, we didn't get crazy with the thing - Fred still has all sorts of imperfections around the back window,
chips along the edge of the drivers' door (all happened before I got him) etc. - but if I ever get some loose
change, they're willing to tackle those, too.
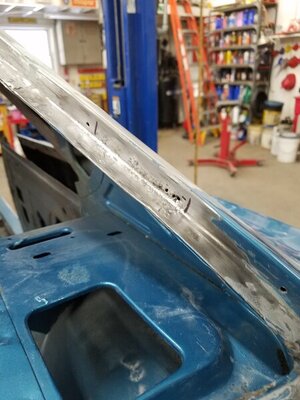
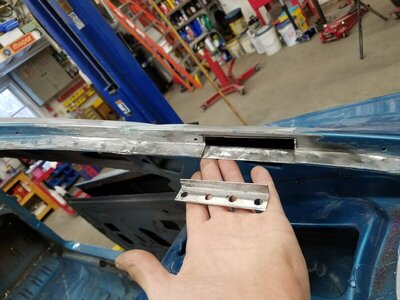
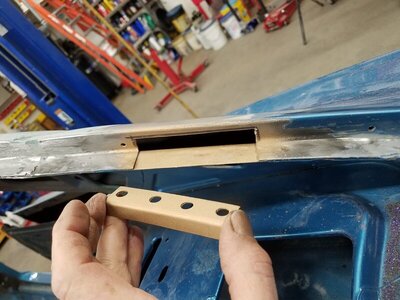
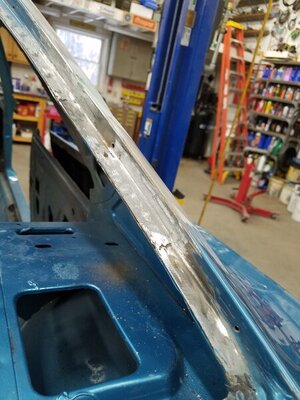
Cleaned out the front and rear window channels, and was surprised (well not really after seeing some of the other stuff that was done to the car at the bodyshop) to find a weak spot just down from the lead joint on the c-pillar. Drove a pick though in 2 spots, so it had to be fixed. This is the kind of stuff that drives me nuts if you take your car somewhere to get painted. I spent probably 1/2 hour making the repair, good as new now. I'm certain it looked the same 15 years ago, so why wouldn't the shop fix it then? Oh yeah, because they only want to do collision work.


Last edited:
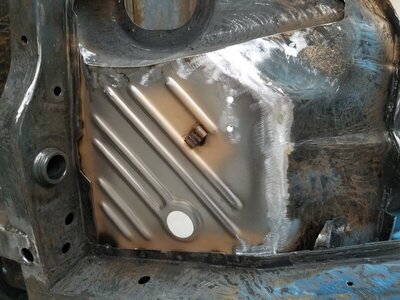
Next up, I found a suspect area at the drivers side floorpan. Sure enough, I was able to stick a awl through in a couple of spots. I debated just welding up the holes, but their was some heavy pitting in the general area around the drain hole as well. It would look better and give me piece of mind to cut out the bad spot. Not that I needed a full 1/2 AMD pan, but for some reason they are out of stock everywhere. Only other option I know of it a Sherman piece. I was kind of nervous about Sherman as I had to use one of their lower quarter patches on my Duster, because AMD was out of stock at the time. There was a huge difference in the stamping between that and the AMD I was able to get for the other side. It worked, but definitely not as smooth of an install. Best price I found was through Summit and it was shipped directly to me from Sherman. I was skeptical at first, but for what I needed it was just fine. The thickness of the metal was exactly the same as original. You can see that the Sherman patch panel does not go to the firewall seam or up top of the rocker like an AMD part would for some reason, but covered what I needed perfectly. Also the hole is not punched out.
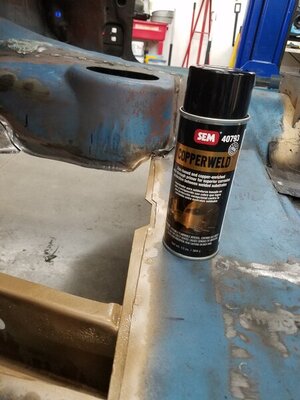
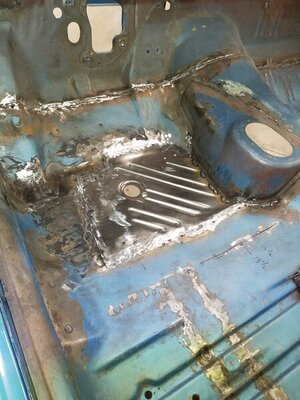
Took some good measurements of the gas pedal holes as well as the speedometer cable clip. Left and rear side is butted to original metal on top of frame flanges, and the right side goes into my 4-speed hump area. Only seam that will show is the front edge. I used the piece I cut out as a template for final positioning before welding. On another note, I think I have used just about every brand of weld through primer out there in the past. I hated everyone of them because if you had just a speck of the primer showing, your weld would splatter and look like crap. I am using SEM on this car for the first time and have to say that I love it. Works very well and will be what I use going forward.
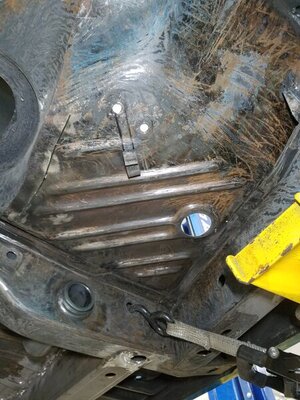
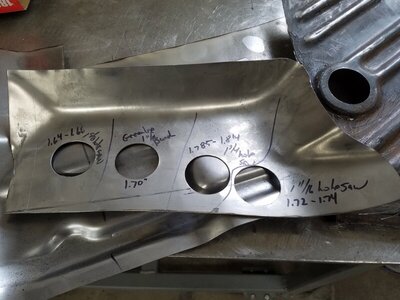
Did some experimenting with different hole saws and electrical conduit punches to get the correct 1 3/4" hole for the plug. Ended up using a 1 11/16" saw for the perfect diameter. Turned out nice imo and the front seam will disappear during sandblasting. Nice weekend project.
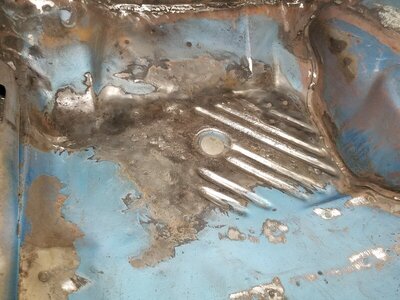
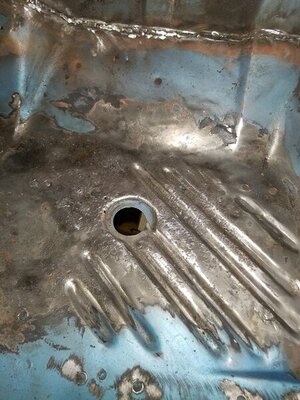
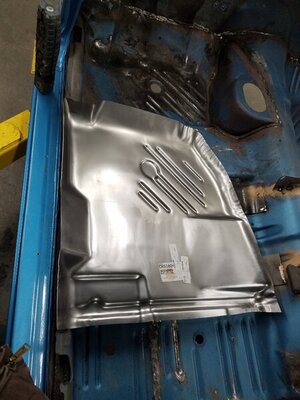
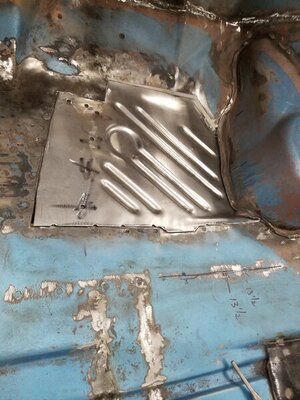


Nice work, repairs look excellentNext up, I found a suspect area at the drivers side floorpan. Sure enough, I was able to stick a awl through in a couple of spots. I debated just welding up the holes, but their was some heavy pitting in the general area around the drain hole as well. It would look better and give me piece of mind to cut out the bad spot. Not that I needed a full 1/2 AMD pan, but for some reason they are out of stock everywhere. Only other option I know of it a Sherman piece. I was kind of nervous about Sherman as I had to use one of their lower quarter patches on my Duster, because AMD was out of stock at the time. There was a huge difference in the stamping between that and the AMD I was able to get for the other side. It worked, but definitely not as smooth of an install. Best price I found was through Summit and it was shipped directly to me from Sherman. I was skeptical at first, but for what I needed it was just fine. The thickness of the metal was exactly the same as original. You can see that the Sherman patch panel does not go to the firewall seam or up top of the rocker like an AMD part would for some reason, but covered what I needed perfectly. Also the hole is not punched out.
Took some good measurements of the gas pedal holes as well as the speedometer cable clip. Left and rear side is butted to original metal on top of frame flanges, and the right side goes into my 4-speed hump area. Only seam that will show is the front edge. I used the piece I cut out as a template for final positioning before welding. On another note, I think I have used just about every brand of weld through primer out there in the past. I hated everyone of them because if you had just a speck of the primer showing, your weld would splatter and look like crap. I am using SEM on this car for the first time and have to say that I love it. Works very well and will be what I use going forward.
Did some experimenting with different hole saws and electrical conduit punches to get the correct 1 3/4" hole for the plug. Ended up using a 1 11/16" saw for the perfect diameter. Turned out nice imo and the front seam will disappear during sandblasting. Nice weekend project.
View attachment 1080895 View attachment 1080896 View attachment 1080897 View attachment 1080898 View attachment 1080899 View attachment 1080900 View attachment 1080901 View attachment 1080902 View attachment 1080903

mopar4don
Well-Known Member
Hmmmm I don't remember making any holes for the pedal or speedo clip when I patched that area of my floor pan. Thanks for the reminder.Took some good measurements of the gas pedal holes as well as the speedometer cable clip.
Nice job on the patch!
And like you I had a lot of trouble with a weld threw primer until I tried what they use at the AMD installation center. Medallion etch weld primer. Its a weld thru primer and/or etch primer in one.
https://medallionrefinish.com/products/refinish-products/primers/aerosol-primers/etch-weld-primer
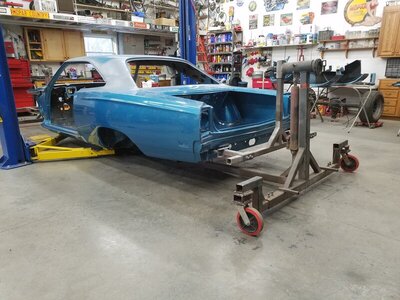
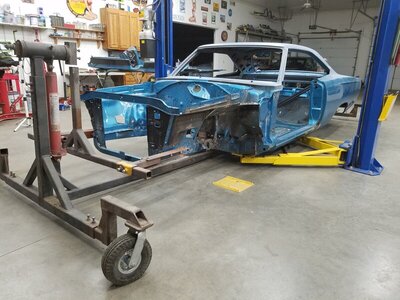
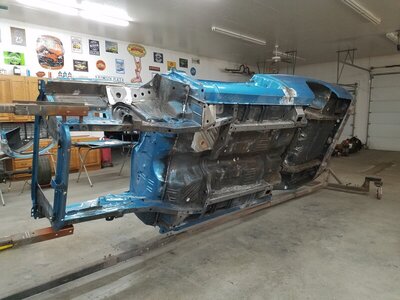
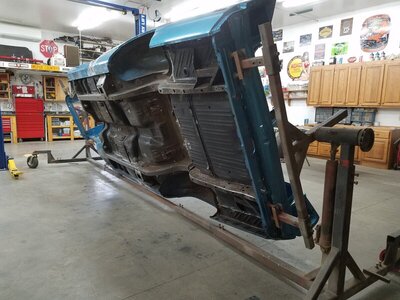
Got over to my buddies place and borrowed his home made rotisserie. It's not pretty, but works just fine. This is the 4th time I have used it, and I am thinking the last. I always seem to forget how much work and time it takes to totally redo one of these old cars. Shorter memory the older I get I guess. Having a hoist sure make it simple getting a car on one of these things.


- Local time
- 5:24 PM
- Joined
- May 14, 2011
- Messages
- 18,917
- Reaction score
- 38,147
- Location
- On the Ridge, TN
Rotisserie is awesome! I've always wanted to do a car on one of those. I'm envious, sir. 
Your car is coming along nicely! I've had to use a few Sherman and Goodmark parts on my project. Definitely not the same quality as AMD. I have an Accessible Systems rotisserie and it looks pretty close to what your friend built.
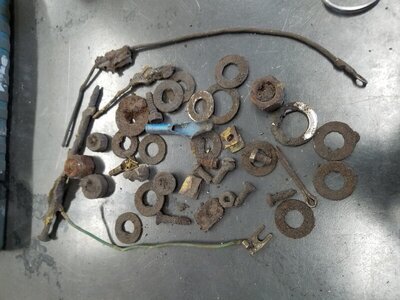
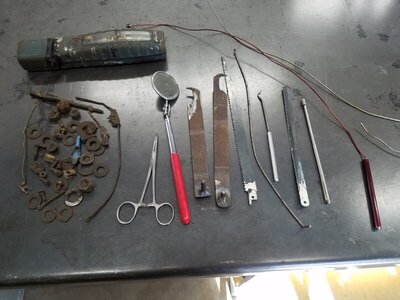
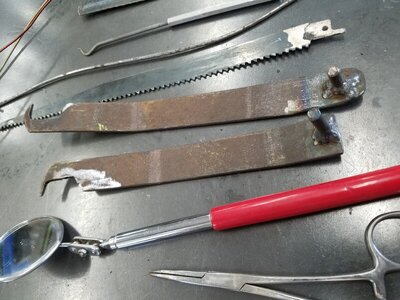
Crazy day with the car today. Had it tipped on the drivers side and was checking things over when I noticed a washer in the drain plug hole on the drop extension. Dug that out and figured I better take a mirror and flashlight to see if anything else was down there. 1/2 a hardware store is what I found. Lug nuts, washers, screws , a nail, clips, and a couple of wires. These things were stuck so tight and on top of it, when I had the car painted 15 years ago they sprayed in that yellow creeping stuff to prevent corrosion in spots that could not be reached. Was almost to the point of giving up and drilling out the spot welds to open the area up. Spent 3.5 hours on it before making a couple of special tools. Another 1.5 hours later and it was finally clean. Can't say I have ever seen anything quite like this, but am sure it is not uncommon. Not a fun job at all.


- Local time
- 5:24 PM
- Joined
- Jan 29, 2018
- Messages
- 21,275
- Reaction score
- 66,891
- Location
- Midland Ontario, Canada
Should pick up a tenth in the quarter mile now!
- Local time
- 5:24 PM
- Joined
- May 14, 2011
- Messages
- 18,917
- Reaction score
- 38,147
- Location
- On the Ridge, TN
Wow! Where the heck did all that come from, do you suppose?
East wood has a solider that is stronger than the lead. I used it on my A pillars where the upper cowl meet them. It worked fine Used a heat gun and a putty knife to smooth and work it. Kept the heat on the putty knife and it worked out well. But like others used the All metal in the sail panel area's did not want heat on the metal after rust proofing every thing inside and out. Just my two cent's and hope it all stay's together once the car is on the road.Ok cheers. I think I'll do the same as otherwise it's either lead or filler and I don't like filler and have never used lead. Hopefully it will come out as good as yours did!
- Local time
- 5:24 PM
- Joined
- Jul 17, 2008
- Messages
- 26,199
- Reaction score
- 81,478
- Location
- South Jersey USA
Everyone around here uses that green fiber strand stuff over these joints. I've never used All-Metal, I'll have to check it out.
F allmetal....... buddy insisted we use it over his sail panel seams. He drives a truck for a living, but knows better than me.
Both sides cracked some time after paint; not from driving either. Its not built yet lol........and they were welded solid...... I have also seen adhesion problems both under and over top of it.
I have used "Marine Tex" for 30 years, all sorts of repairs and never had a failure........ "the mighty repair kit" ........you will thank me later
the seams are now covered in marine tex......I hate tearing into a perfect job
I prefer the grey, 5:1 with the catalyst that "smokes".... lmao
Amazon.com : TRAVACO PRODUCTS- MARINE TEX Marine-TEX 14 OZ KIT Gray : Boating Equipment : Automotive
Last edited:
- Local time
- 5:24 PM
- Joined
- Jul 17, 2008
- Messages
- 26,199
- Reaction score
- 81,478
- Location
- South Jersey USA
So you sprayed the whole bottom of the car with it, and then painted over?
I have a whole thread on it....... in detail
lizard skin | For B Bodies Only Classic Mopar Forum
Last edited:
Exactly my thoughts as I was dropping each piece in a pile on the floor, lol.Should pick up a tenth in the quarter mile now!
I bet sometime early in its life there was a small box or can with an open top, or a loose top, forgotten by its owner. 1st hard turn to the right dumped it over. I still can't believe there isn't rust through from all those pieces wedged in there for so many years. Being a Texas car and then having that yellow creeping grease sprayed in there saved me I reckon.Wow! Where the heck did all that come from, do you suppose?
- Local time
- 5:24 PM
- Joined
- Jul 17, 2008
- Messages
- 26,199
- Reaction score
- 81,478
- Location
- South Jersey USA
While we are on the topic of products that have never failed me..... rather than use aerosol weld primer that is very expensive, lingers in the air, and doesn't go very far; years ago I discovered non aerosol Bloxide weldable primer. I used to get quarts, but only seem to be able to get it by the gallon now. I just ordered a new gallon, and will divide it into 4 quart cans to keep the air off of it. A gallon may last me the rest of my life, so I give a couple quarts to a couple friends who build stuff. Not only do I use it as a weld-thru, but I also dribble it into seams and "blow" it into crevices to prevent rust. gallon runs 100 bucks, I apply it with a brush, let dry before welding. there are a few youtube vids also.... awesome ****!

Last edited:
Similar threads
- Replies
- 21
- Views
- 2K
- Replies
- 39
- Views
- 2K
- Replies
- 5
- Views
- 374


