Matt great to see you at the swap meet yesterday. From our conversation yesterday here is your requested kick in the pants to get focused on this project. :whip2: Like I said, Donny is way ahead of you now. :rolling:
You are using an out of date browser. It may not display this or other websites correctly.
You should upgrade or use an alternative browser.
You should upgrade or use an alternative browser.
Progress report, Junkyard Dog
- Thread starter detmatt1
- Start date
Propwash
Well-Known Member
- Local time
- 1:29 PM
- Joined
- Oct 29, 2009
- Messages
- 9,710
- Reaction score
- 4,324
- Location
- Island of Misfit Toys
Thanks for pushing SGT...I'm looking forward to my Junkyard Dog fix as well. Been a while. Feel like a kid in a candy store waiting to see the dog come back from paint.
detmatt1
Well-Known Member
Thanks for pushing SGT...I'm looking forward to my Junkyard Dog fix as well. Been a while. Feel like a kid in a candy store waiting to see the dog come back from paint.
Me too!
detmatt1
Well-Known Member
Seriously though, I'll be wrapping up a rather large commercial job here by next week, I fabbed 24 concrete countertops for an office remod. That among other things have been keeping me very busy.
There has been some progress on the "DOG" though, the machine work on the engine is just about done and ready for assembly and I am anxiously awaiting a progress report from the body shop. I'll keep you posted.
There has been some progress on the "DOG" though, the machine work on the engine is just about done and ready for assembly and I am anxiously awaiting a progress report from the body shop. I'll keep you posted.
Donny
Well-Known Member
- Local time
- 1:29 PM
- Joined
- Aug 28, 2009
- Messages
- 3,206
- Reaction score
- 543
- Location
- North East San Antonio TX
Glad I'm not the only one slackin' on my project! I did put my other GTX fender in epoxy primer today!
Roadbird
Well-Known Member
- Local time
- 11:29 PM
- Joined
- Mar 27, 2012
- Messages
- 700
- Reaction score
- 88
- Location
- Spanaway, Washington
Looking good.
Ron 73
Deceased, But not forgotton
Seriously though, I'll be wrapping up a rather large commercial job here by next week, I fabbed 24 concrete countertops for an office remod. That among other things have been keeping me very busy.
There has been some progress on the "DOG" though, the machine work on the engine is just about done and ready for assembly and I am anxiously awaiting a progress report from the body shop. I'll keep you posted.
Yes sir! I have to admit, i to am looking forward to the Dog updates.. Last i was hear (body updates) i believe you were doing some small parts in your shortage of time because of work.. Good luck to you, im sure this will be worth the waiting!
- Local time
- 1:29 PM
- Joined
- Nov 21, 2008
- Messages
- 20,113
- Reaction score
- 50,352
- Location
- In GTXtacy Illinois
are we there yet??? are we there yet??? are we there yet??? lol
can't wait to see the DOG in color!!! keep on truckin' Matt!
hopefully you'll be drivin' the DOG soon!! :hello2:
can't wait to see the DOG in color!!! keep on truckin' Matt!
hopefully you'll be drivin' the DOG soon!! :hello2:
moparstuart
Well-Known Member
- Local time
- 1:29 PM
- Joined
- Jul 19, 2008
- Messages
- 6,586
- Reaction score
- 1,052
:hello2::hello2::hello2::hello2::hello2::hello2::hello2::hello2::happy1::happy1::happy1::happy1::happy1::happy1::happy1::happy1::happy1::happy1::happy1::happy1::happy1::happy1::happy1::happy1::happy1::happy1::happy1:are we there yet??? are we there yet??? are we there yet??? lol
can't wait to see the DOG in color!!! keep on truckin' Matt!
hopefully you'll be drivin' the DOG soon!! :hello2:
Superfreak
Well-Known Member
I was thinking I might have to come down south to kick a dog in the *** in-order to see some progress..........yes?...........no?
detmatt1
Well-Known Member
I was thinking I might have to come down south to kick a dog in the *** in-order to see some progress..........yes?...........no?
Yes and bring some tools!
2059
Well-Known Member
- Local time
- 2:29 PM
- Joined
- May 4, 2012
- Messages
- 1,357
- Reaction score
- 682
- Location
- North Central Indiana
Wow! New member here. What a great thread/project. It should be "required reading" for anyone working a resto. Picking up my '64 330 over Memorial Day wknd and I'm sure I'll be following your project to completion for tips and inspiration. Matt, you are a true craftsman!! Keep up the great work!
Reminds me of another Mopar Fanatic/Cabinet, furniture maker; Eddie Haines in Florida. Just sent the check to him for a '64-correct crossram 426 Hemi.
Reminds me of another Mopar Fanatic/Cabinet, furniture maker; Eddie Haines in Florida. Just sent the check to him for a '64-correct crossram 426 Hemi.
wannadrag
Well-Known Member
Matt check out the new MCG rag.Has a nice LL1 68 RR twin to yours.
detmatt1
Well-Known Member
I saw that, drool cup was handy!
RailRider
Active Member
I think he used DP90 and I'm not sure why it's black, but I am not a painter and also haven't talked to him yet since he sent me those pics. I'll find out tomorrow.
DP comes in several colors. Gray, Gray-Green, White, Black, Red Oxide and Blue. Its a PPG epoxy Primer/Sealer. Its sticks to almost anything and keeps it from rusting. Its considered a non sanding primer which means if you sand it you have to re-apply again after scuffing the original layers. I usually spray the DP on and then apply a fill and sand primer like K38 over it.
Just imagine when all the black AMD metal is on and the black primer. :hello2:
b-body-bob
Well-Known Member
There's an original owner turquoise 68 here. Last I saw it had a tunnel ram on it, and it looked like you couldn't raise the hood without taking the fuel lines off ") The guy that owns it says he kept all the original parts so he can put it back to stock if he decides to.
The guy that owns it says he kept all the original parts so he can put it back to stock if he decides to.
The guy that owns it says he kept all the original parts so he can put it back to stock if he decides to.detmatt1
Well-Known Member
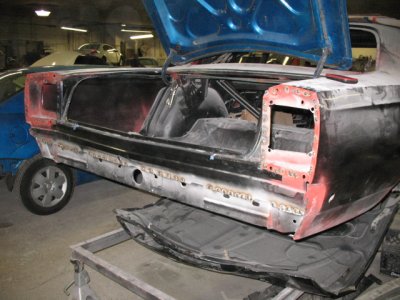
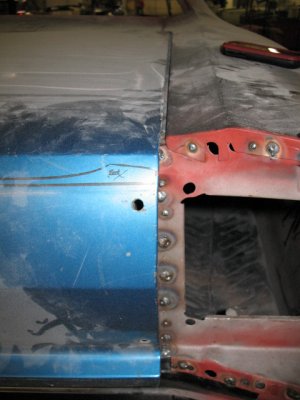
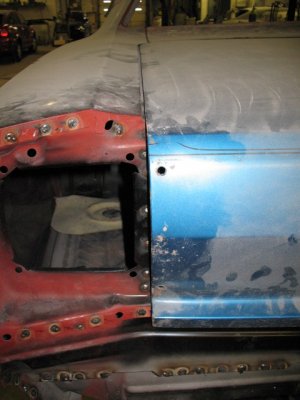
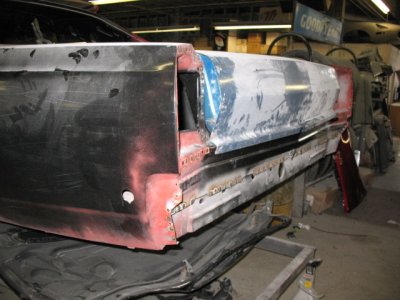
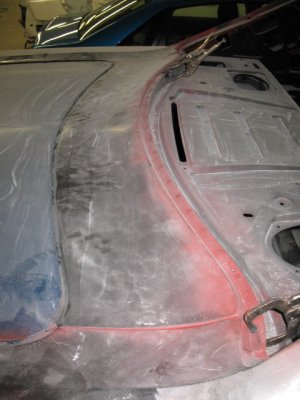
Yeah, finally some forward progress on the body! Final alignment of the trunklid and surrounding panels, tail light buckets and the panel in between them are welded in. Go Carl GO! Thanks man!
Attachments
roadrunnerman
Well-Known Member
glad to see you get some work done on it.been awhile since i had "DOG" fix.
Roadbird
Well-Known Member
- Local time
- 11:29 PM
- Joined
- Mar 27, 2012
- Messages
- 700
- Reaction score
- 88
- Location
- Spanaway, Washington
Go back to page 3 to see the steel false work that holds the roof in place while the cowl section was out.:grin:
Thanks again everybody for the positive feedback.
Really great work. I have been reading your threads here and I'm on page 7 or 8. Lot's more to read and just want you to know that I'm enjoying it and can't wait to return and start on mine. Keep it up detmatt1.
Roadbird
Well-Known Member
- Local time
- 11:29 PM
- Joined
- Mar 27, 2012
- Messages
- 700
- Reaction score
- 88
- Location
- Spanaway, Washington
I'm interested. Now I really want to finish this deployment and get home. 25 more days, can't wait. I'm fired up to begin my resto on my 1970 RR 383. I plan on restoring her back to her old glory days when she rolled of the line in St. Louis.
Similar threads
- Replies
- 22
- Views
- 5K


