Here is one product if you want to try it.. http://www.heatshieldproducts.com/powersports/powersports-heat-shield-sleeving/fuel-line-heat-shield
You are using an out of date browser. It may not display this or other websites correctly.
You should upgrade or use an alternative browser.
You should upgrade or use an alternative browser.
Restomod charger pics
- Thread starter 747mopar
- Start date
Hell ya, just paint that block of wood black, glue it on and call it good!
Seriously, that is an awesome concept, I really like the shape.
NICE
LMAO, I think I'll make it out of fiberglass first.
- - - Updated - - -
The Cherry is just for the mold/template for Fibreglass Darius.
747 I like your idea of the flat/black textured black. Since it is a restomod I think it would also look amazing with a Carbon Fibre look. Either way as always you are talking down your skills... I'm pretty sure there isn't even a handful of guys here that could create a mold that nice out of cherry
Sure they could with just a little practice, trust me body work and metal repair is much harder. I'm hoping that I can show just how easy it is to create your own part so others will try it. I'm pretty buried right now and have some long work days coming so don't know how long it will be before it's done.
- - - Updated - - -
If you insulate your fuel line from the tank forward that also helps. If you've got headers it really heats up underneath!
I'm going to insulate everything that is close to a heat source but that insulation isn't cheap so not all of it.
- - - Updated - - -
How do you insulate fuel line?
With this stuff. There's other options but this stuff will look clean and it looks a little better as far as insulating. Just look in the ignition section of a Summit catalog because this stuff is for both line and wires.
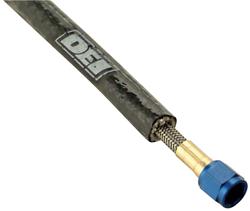
- - - Updated - - -
Here is one product if you want to try it.. http://www.heatshieldproducts.com/powersports/powersports-heat-shield-sleeving/fuel-line-heat-shield
I ordered some stuff just like that to insulate any lines that are in places that I can't slide the tube over.
- - - Updated - - -
I got thinking about it and I think the scoop not being done has allot to do with it too, with that hole in the hood the air coming threw the compartment just exits out the hole instead of being pushed past the motor and cooling things off??????????? Another reason to finish it.
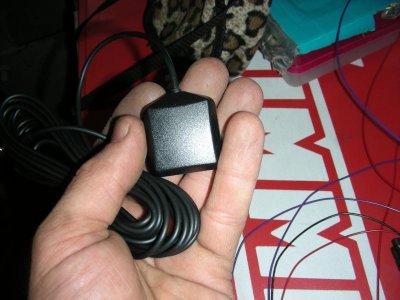
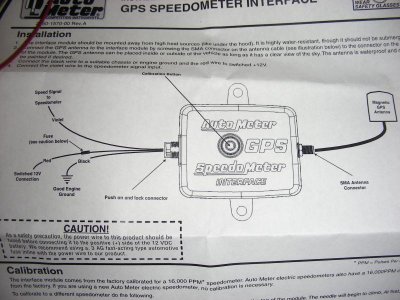
Got a few goodies today, my headlights, maxi fuses and I got the speedo sender the other day. Spent hours cussing under the dash getting the speedo sender installed but it's done just have to try it out now. I found out there's a downside to wiring your car and making your own dash, you can't cuss about the idiots who made it such a pain to work on. The sender install is actually super easy it was just getting the wire routed to where I was happy with it that caused the headaches (not easy working over the steering column). I mounted to the backside of my fuse box bracket in the glove box, you can reach the button and see the speedo if you ever need to calibrate it but since my speedo has never been hooked up it's all plug and play. If you have to calibrate it you just hold the button until the speedo reads 80 mph and your done. Here's a pic of the antenna (strong magnet) which I put in the rear window (15ft of cable), the diagram and the unit itself.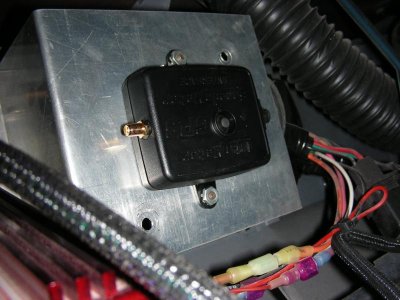
- - - Updated - - -
Here's my maxi fuses (still waiting on the fuse holder for the 125 amp fuse). The 120 maxi is for the 100 amp alt which I'll run some 4 gauge wire that is good for 140 amps to get rid of the fusible link (don't like things that have to burn in half to do their job). The other fuse (60 amps) is to do away with the main fuse box feeds fusible link which I'll conveniently put right under the dash where it's easy to get to.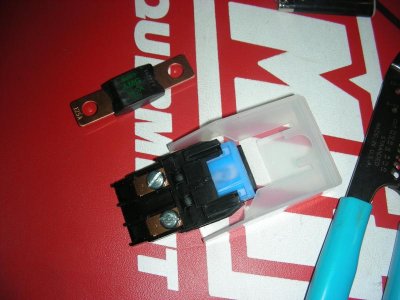
- - - Updated - - -
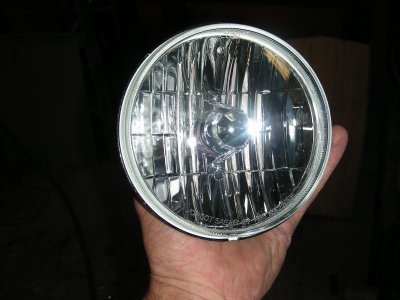
Last, here's the headlights. They are United Pacific brand, look nice and aren't made in China (or USA). I went with regular halogens for 2 main reasons, I like things simple (no ballast) and all my cars have halogens and I'm completely happy with them. These have your standard plugs right on them so you could literally just plug them in although I would highly recommend relay's. The bulbs are standard halogen bulbs. Now I need my solenoid valves to open the headlight doors and I'll have light.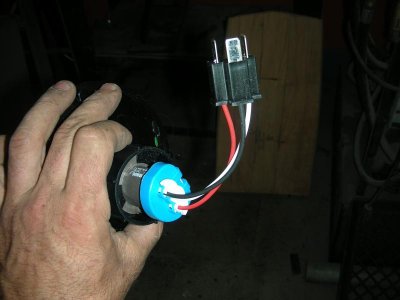


- - - Updated - - -
Here's my maxi fuses (still waiting on the fuse holder for the 125 amp fuse). The 120 maxi is for the 100 amp alt which I'll run some 4 gauge wire that is good for 140 amps to get rid of the fusible link (don't like things that have to burn in half to do their job). The other fuse (60 amps) is to do away with the main fuse box feeds fusible link which I'll conveniently put right under the dash where it's easy to get to.

- - - Updated - - -
Last, here's the headlights. They are United Pacific brand, look nice and aren't made in China (or USA). I went with regular halogens for 2 main reasons, I like things simple (no ballast) and all my cars have halogens and I'm completely happy with them. These have your standard plugs right on them so you could literally just plug them in although I would highly recommend relay's. The bulbs are standard halogen bulbs. Now I need my solenoid valves to open the headlight doors and I'll have light.


Got a few goodies today, my headlights, maxi fuses and I got the speedo sender the other day. Spent hours cussing under the dash getting the speedo sender installed but it's done just have to try it out now. I found out there's a downside to wiring your car and making your own dash, you can't cuss about the idiots who made it such a pain to work on.
LOL . . . got a good laugh outta that 747 Mopar . . . Cuss your heart away . . . ( then pat yourself on the back for doing such a good job ! ) . . .
Figured you'd get it all figured out . . .
daytona kid
Well-Known Member
lookin good dude, gotta get me one of those speedo set-ups.
Tried the Speedo out today and nothing...........I thought to myself "how in the hell could I screw this up"? Red wire goes to battery, Black to ground, Purple to Speedo signal terminal and you just plug in the antenna???????????????? And then WALLA!!!! it must need a little time to pickup a signal or something but after about an 1/8 mile or so it kicks in and works flawlessly "SWEET". Now to the headlights.
It seems like it should pick up the signal pretty quick, antenna does it for ya GOOD deal! I use the halogen bulbs in my 73, its a illuminating experience! One step at a time and as you say "WALLA!!!!" Cool as it gets and hope it go's smoothhhhh as can be for ya! 
Darius
Well-Known Member
Like Goon said it is just a mold but I agree it would look kinda cool but unfortunetly wood wiil shrink, swell and eventually crack under the heat conditions and is just a nightmare to upkeep when in the elements. I work at a samill so I have tons of lumber laying around, once they get to the center of a log it's cut into low quality blocking (3X6) for pallets so it's really cheap lumber to have laying around.
I was wondering about why use wood due to the durability under the conditions.
I wish I had access to Cherry like that, it costs me big bucks!
I do like how it is shaping up ...as a scoop.
Put a long night in working on the Charger last night, got all the main wiring done the way I wanted with the maxi fuses and no fusible links anywhere and got the fuel system insulated. Since I have a 100 amp alt I installed a 125 amp fuse and 4ga wire (140 amps) just to be safe and not have to be worried about it ever blowing (unless there's a short). Also wrapped the wires that go to the starter with some heat wrap. For the fuel line I bought this stuff off of Ebay, it's fire proof and insulated (looks like a hose), you just slide it over the line and that's it. The Mr Gasket heat dissipater was a huge disappointment, it didn't clear the linkage on the carb so I had to remove a chunk out of one side and then I noticed it wasn't even big enough restricting the flow so it got opened up too. To me that's ridiculous to have to do that much work to make a part fit. Got to drive it quite a bit today and it started perfectly every time although I don't think it was as hot today. We'll see but so far so good
Attachments
Good deal, I hate the wiring jobs, i always have a bunch of problems and i know what you mean getting parts to work, or in this case fit but its good to see your getting some driving time in! AND if it wasn't as hot to you today maybe we will have a cooler day come AM cause it did seemed hot and is still humid lol.. Must be coming our way!
The Chargers first car show (and mine with a car), very different not being the annoying guy asking all the questions for once. The corvette in the pick is a friends, he's already done the frame and undercarriage but hasn't even washed it and you wouldn't believe the crowd it drew haha. This is Main street in my little town during the Cy Young Festival, nice little show with some really nice cars (only 2 Mopars). For those of you who might ask how I fared I'll just say "it was a liberal car show" No loosers and everybody won a plaque haha.
Attachments
Im Mopar, you are a friend but honestly going by these pictures, You should have had a larger more prominent plaque!!!
BigBlock61
Well-Known Member
Im Mopar, you are a friend but honestly going by these pictures, You should have had a larger more prominent plaque!!!
Oh yea the clear winner from what I can see in those pictures.
Propwash
Well-Known Member
- Local time
- 7:50 PM
- Joined
- Oct 29, 2009
- Messages
- 9,695
- Reaction score
- 4,338
- Location
- Island of Misfit Toys
Neat vette...Tossed around getting one of those to play with. But, kind of a different league. Looks like a pretty decent show. I'd say the Charger pops out better than the rest. Chevelle next to you looks like it's painted in a Burnt Orange. Great to see after all those years, you're out enjoying your ride. Have fun!
The burnt orange Chevelle was built by a 25 year old kid, he said he did all the body work except paint (impressive). It's got a 400hp 383 crate motor in it, very nice but it's a just another Chevelle with yet another 383 haha. Sorry, just sick of Chevelle's and 383s (there were probably 4 at this little show alone). I am definitely enjoying the hell out if PropNeat vette...Tossed around getting one of those to play with. But, kind of a different league. Looks like a pretty decent show. I'd say the Charger pops out better than the rest. Chevelle next to you looks like it's painted in a Burnt Orange. Great to see after all those years, you're out enjoying your ride. Have fun!
HYRDGOON
Well-Known Member
- Local time
- 8:50 PM
- Joined
- Apr 20, 2013
- Messages
- 3,372
- Reaction score
- 2,745
- Location
- Breslau, Ontario, Canada
Agree your car and wormanship stood out from the rest. I went to a different cruise night than my normal one last night and stopped counting Chevelle's at 7!
MT_Mopar
Well-Known Member
Nice show, that little town you have there really accommodates your car show, that's pretty neat. Your car is looking great! Fun!
Very nice work.
What a weekend!!!! Lots of cruising in the Charger, cookouts and fireworks. Lack of headlights was getting old and keeping me from taking the Charger places so I tackled that this weekend. The headlights came with plug in's for the old sealed beam terminals but I don't have terminals (rewired the car) so I needed to figure out which wire did what (internet was contradicting on it's info). Surprisingly putting 12V to them didn't help because I couldn't tell the difference between the high & lows and just blinded myself repeatedly. Finally sitting at the bank I reached in the glove box and saw my spare bulb for the Dakota and what do ya know (it uses the same 9007 bulb) so that was pretty easy to get figured out. I was busting my butt to get it done in time to take the kids to a buddies for a cookout and fireworks but ran out of time so I threw all the needed tools in the trunk and said to hell with it. Now I can't come home until I have headlights haha, it only took about 15 minutes in his driveway to finish it up. I'll do a thread on the install once I get the pics and get a drawing of the wiring made but don't expect a Propwash quality how to do. I wanted to have lighting at least equal to my daily drivers but the quad 65 watt halogens really surpass my other cars and light up the road very nicely.
usaroadrunner
Well-Known Member
now im being serious now when you look at this picture what car jumps out at you first. seriously....THE ORANGE GODDESS!!!! dam it looks good out in the sunlight.


