• When you click on links to various merchants on this site and make a purchase, this can result in this site earning a commission. Affiliate programs and affiliations include, but are not limited to, the eBay Partner Network.

Restomod charger pics


Thanks Benno, I was actually just trying to figure out what yoke to run on the rear and where to get it. There's a driveshaft shop 15 minutes from me that does really nice work so that's where the shaft will come from.

- - - Updated - - -

Decided on the company I'm going with for the Emblems, Emblempros. I like Goons 522 but their lettering looks kinda funny being really rounded instead of sharp corners so I thought I'd shop around and found these guys. They cut their emblems out of stainless and have a whole slew of option and no CAD fee (or at least not a separate fee) to pay.

First pic is what I sent them to copy only 456sixspeed of coarse but it gives them the font, color and overall appearance I'm after.

P3691468.jpg

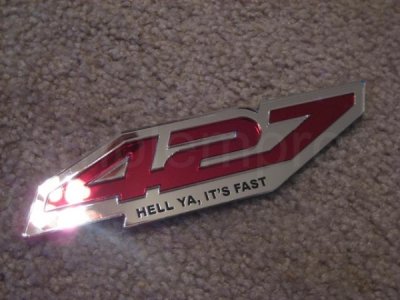
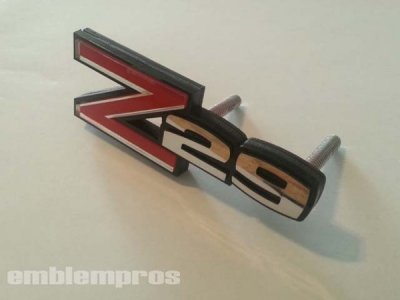
Here's some of their handy work.

2-427__3_.jpg

2-grill_20120823_154002__1_-.jpg

2-camaro_20script_20003-.jpg

When I saw this one I couldn't help but think how cool it would look on Speedy's Charger only Frankenstein haha.
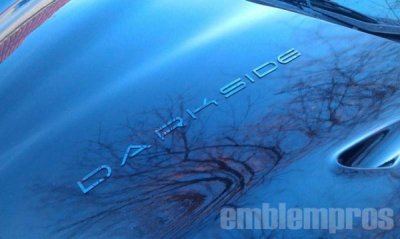

2-imag0112-.jpg
 
Thanks Benno, I was actually just trying to figure out what yoke to run on the rear and where to get it. There's a driveshaft shop 15 minutes from me that does really nice work so that's where the shaft will come from.

- - - Updated - - -

Decided on the company I'm going with for the Emblems, Emblempros. I like Goons 522 but their lettering looks kinda funny being really rounded instead of sharp corners so I thought I'd shop around and found these guys. They cut their emblems out of stainless and have a whole slew of option and no CAD fee (or at least not a separate fee) to pay.

First pic is what I sent them to copy only 456sixspeed of coarse but it gives them the font, color and overall appearance I'm after.

View attachment 235725

Really coo there 747Mopar . . . are you planning on going with

456 - SIX SPEED

or

456 - 6 SPEED

or

456 / 6 SPEED

or

456 + 6 SPEED

Or even a different layout ? ?
 
I was supposed to have an example today but I think he forgot to attach it but I'll do my best to illustrate.

456sixspeed

You get the idea.
 
Checked out emblempro's website. They turn out killer work; I bookmarked 'em for the future. Thanks for the heads-up.
 
I always am and that's why my wife hates me going there! I'll take this, maybe 2 of these, ahh look at that, sure would like one of these, oooooooooooh look at that blower!!!!!!!!!!

Devin this sounds vagley familiar, you and I going to one of these places and the way my wife reacts next to yours, ya know you and i together could get into an awful lot of trouble!!! :)
 
should look really cool. I toyed with a custom badge for mine but nobody needs to know what is lurking beneath the hood.
 
should look really cool. I toyed with a custom badge for mine but nobody needs to know what is lurking beneath the hood.

I guess I just like a little jewelry and really like the looks of the factory call outs that they came with plus I left almost all of the emblems off of mine (just the Grill emblem remains).
 
I guess I just like a little jewelry and really like the looks of the factory call outs that they came with plus I left almost all of the emblems off of mine (just the Grill emblem remains).

I like where you're going with it. Stock Looking with a twist and a little bit of bragging rights for an awesome combo! Emblempro looks like they do some awesome work!

My "Runner" in the RoadRunner on my Decklid is broken (slanted) I've actually left it until now instead of ordering a replacement because for some reason leaving that flaw seems kinda quirky and just says "Ya I'm a Crooked emblem... I'm a driver!!! F OFF" lol! But lately I've been thinking of Losing the RoadRunner for an AngryBird with the same lettering.... hrmmmmmm

That would be cool, I like the custom touches myself instead of walking the same beaten path as everyone else.
 
I guess I just like a little jewelry and really like the looks of the factory call outs that they came with plus I left almost all of the emblems off of mine (just the Grill emblem remains).

Don't get me wrong...on your car that's the best option you can go with for your theme....right now I'm in the sleeper camp...one day when I eventually put 18's on it ill switch to a hemi badge where the v8 resides. I like the plan...
 
More progress to report. Got the run out checked on the Quicktime bell housing (.0015") so it's good to go, got the tunnel sealed, painted and ready for the final install. Also got the bell housing and clutch installed so I could check the T.O spacing, looks like it will get shimmed although I think it would be fine without. So all this means that once I make the shim it will go in for the last time and then on to ordering the shaft and starting on the M.C.

View attachment 236505

Had to put a notch in the floor for the reverse light switch.

View attachment 236506

Checking the run out meant pulling the front plate off of the tranny so here's the indicating and a peak inside the tranny.

View attachment 236507

View attachment 236508

This is where the spacer I mention will go, when you do these swaps where your mixing and matching motors and trannies the spacing needs to be set so that the T.O. is not applying pressure once bolted up or that it doesn't have an excessive gap either.

View attachment 236509

Here's how you check it, fully compress the T.O. and with a straight edge across it measure back to the trans bolt face.

View attachment 236510

Then with a straight edge laid across the back of the bell measure in to the pressure plate fingers. Compare the 2 and you'll see where your at, my setup is 2 7/8" from the bell to the fingers and 2 1/2" from the T.O. to the face of the tranny which gives me 3/8" wiggle room. McLeod (the clutch I'm using) calls for 1/8"-1/4" so I'll make a spacer to deal with that.

View attachment 236511

If you ever run a bell that includes the plate be sure to check the oil galley plugs (almost always need to cut holes for them).

View attachment 236513
View attachment 236512

There is a more complete thread (T56 install) on this that I'm updating every week with allot more details over in the engine, driveline area.
 
Awesome shots and tutorial 747! Measuring this stuff is something that I will eventually need to do once I put an OD tranny in place of my stock A833. This is a great illustration and help to get that done. Thanks!

...Oh, and nice fab work as always. It is great to see the work you do, master Obi-Wan!

Hawk
 
Awesome shots and tutorial 747! Measuring this stuff is something that I will eventually need to do once I put an OD tranny in place of my stock A833. This is a great illustration and help to get that done. Thanks!

...Oh, and nice fab work as always. It is great to see the work you do, master Obi-Wan!Hawk


Thanks Hsorman, coming from you it means a bunch! If you ever do one of these please refer to this link because I put allot more detail into it, prices, sources and allot more detailed explanations. I'm only showing progress in this thread. Thanks

http://www.forbbodiesonly.com/moparforum/showthread.php?85042-Viper-T56-install/page7

- - - Updated - - -

Don't get me wrong...on your car that's the best option you can go with for your theme....right now I'm in the sleeper camp...one day when I eventually put 18's on it ill switch to a hemi badge where the v8 resides. I like the plan...

Love a good sleeper, I guess I blew that possibility with mine haha.
 
I can finally say the tranny install is done unless something goes wrong (wouldn't doubt it). I got my T.O. spacer made, the fitting to adapt it to a 3AN installed, 24" 3AN hose installed, M.C. bracket welded up and installed, linkage put together and installed, cross member finished and of coarse got the tranny back where it belongs.

Here's the spacer, fitting and line.

View attachment 237812

View attachment 237813

View attachment 237814

The finished and painted (bedliner) cross member (still need to drill the other 2 holes threw the crossmember).

View attachment 237815

View attachment 237816

The finished and painted M.C. bracket.

View attachment 237817

View attachment 237818

View attachment 237819

Here's the fit, I didn't notice that corner of my bracket overlapped the steering column until I looked at these pics (I fixed it already).

View attachment 237820

View attachment 237821

And here's the Wilwood remote reservoir kit I bought.

View attachment 237822

- - - Updated - - -

I want to be sure to give credit where it's do and that's to the folks at Quicktime, this bell housing is a work of art and the placement of the pilot bearing, clutch splines and everything else were spot on making my job easy.:headbang:

I got the slip yoke from the Viper this week and only need to get a shaft made and purchase a beefier rear yoke before it's ready for a test run......... Oh yeah and some freakin weather to do it in!!

View attachment 237833
 
Auto Transport Service
Back
Top