• When you click on links to various merchants on this site and make a purchase, this can result in this site earning a commission. Affiliate programs and affiliations include, but are not limited to, the eBay Partner Network.

Roger's Roadrunner

Don't know about past sins, more like coming back to haunt me.
 
Well, I gotta admit that I was the one that put it there back in the late 80's when I went to trade school (bodyshop). The last 2 weeks of our course, the trainers would let us bring our own cars in to work on. My car had a wrinkle down the whole side from a garage door frame. I didn't do it. So I had 2 weeks to strip car to bare metal, seal it, do the bodywork primer and paint. The lower part of that 1/4 has at least 3/4 inch of body filler on it. Fast forward 20 years, here I am.


Didn't mean any disrespect about the filler. I did the same thing on a Cuda I had 30 years ago. Young and didn't know any better. And a year after paint it was bubbling up again.
 
Glad to see you back in the saddle Roger. Steady as she goes. It'll get done before you know it if you just give it a little time each week.
 
Didn't mean any disrespect about the filler. I did the same thing on a Cuda I had 30 years ago. Young and didn't know any better. And a year after paint it was bubbling up again.
No disrespect was taken in your comment. You and both know 20-30 years ago, they didn't have a lot of replacement parts like they do now.
 
not a bodyman by any means, but I'd go with a full skin, if not a full quarter since there is rust at the back window.
 
Wow...That's a lot of Makeup on the old girl. Look at the brightside Roger...Not only will you be getting rid of that bondo covered rust, but you'll probably lighten up the car quite a bit once that stuff is out of there. I'd agree with basketcase, full skins...skip the full quarters if you can and buy the window corner patches. Save yourself some jing and time. New AMD full quarters 1,100 pr....skins 660 pr.
 
Wow...That's a lot of Makeup on the old girl. Look at the brightside Roger...Not only will you be getting rid of that bondo covered rust, but you'll probably lighten up the car quite a bit once that stuff is out of there. I'd agree with basketcase, full skins...skip the full quarters if you can and buy the window corner patches. Save yourself some jing and time. New AMD full quarters 1,100 pr....skins 660 pr.

Or $400 a pair for the Goodmark skins,i used them and they fit fine.
 
Wow...That's a lot of Makeup on the old girl. Look at the brightside Roger...Not only will you be getting rid of that bondo covered rust, but you'll probably lighten up the car quite a bit once that stuff is out of there. I'd agree with basketcase, full skins...skip the full quarters if you can and buy the window corner patches. Save yourself some jing and time. New AMD full quarters 1,100 pr....skins 660 pr.
I've got the corner pieces and I will probably go the full skins on both sides.

- - - Updated - - -

Or $400 a pair for the Goodmark skins,i used them and they fit fine.
I got on their site but couldn't find the skins.
 
Prices went up from last winter,1/4 skins a $250 each now.Here is where i get my stuff,its driveable so i save a ton in shipping.The place is huge and not just truck stuff,tons of sheet metal for classic cars.

http://cooltruckparts.com/263.aspx
 
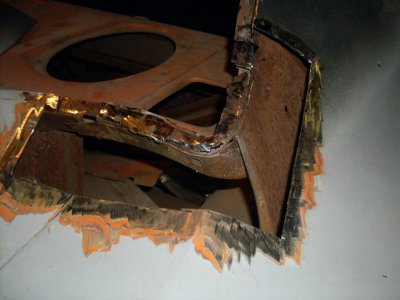
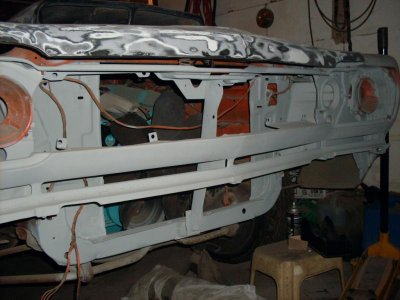
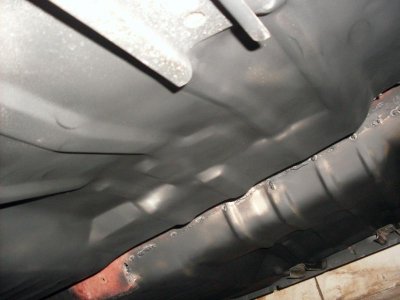
Haven't done much except a few small things. Sanded and primered filler panel, hood latch support, welded the floor/tunnel underneath and spray rust inhibiter, and cut out the old metal on 1 back window corner. Going to try and finish that tomorrow. Also going to see if I can get the torque converter and tranny mounted.

SDC10562.jpg SDC10563.jpg SDC10561.jpg
 
Looks good Roger! Good to see you back at it, moving and everything slowed you down i know but looks like your headed in the right direction in your new place.. Good luck bud!
 
There is some progress, keep at it you'll be done before you know it :)
 
Thanks ron, chris. We're still putting small things in place. Finally got the electrician to come out yesterday and put in new wiring for the air compressor. That was kinda slowing me down a little bit. Going to try and get as much done between now and the 13th. That's when I go back to the doctor and will probably get released to go back to work. Time to crack that whip.
 
keep chipping away, it'll be done before you know it.
 
Got a little more work done today. Fixed a couple holes on the C pillar and got 1 window corner put in and welded. Then put some etch primer on. Will cover with some short hair fiberglass but will do that when I put the other corner piece in so I can do everything at once.

SDC10568.jpg SDC10569.jpg SDC10570.jpg
 
Lookin good, those are beautiful cars. I read most of your post and wanted to mention something "forgive me if someone already did". It looked like you tacked your repairs in but didn't fully weld them which will work but make sure you seal the seam from the inside. Anywhere moisture can come threw will eventually become a bubble in the paint. What I do is put a couple tacks just to hold it in place then cut threw both peaces with a 1/16 thick cutoff wheel and remove the trimmings (just one side at a time) this leaves a 1/16 gap which is perfect for tacking them together leaving the panels flush. I start with the tacks spaced about an 1"-1.5" apart, once I have it all tacked I slowly keep adding tacks until it's a full weld and then put a light on the under side to show any missed spots. Even then I like to seal the other side for insurance. Like I said "sorry if someone already pointed this out". Keep up the good work and Good luck.
 
Thanks. And no, nobody else has mentioned anything like that but I appreciate that you did. That one picture does show that I did tack weld, but I was not finished when I took that photo. I did add several more welds and also seam welded in a few other spots. Don't know if this was correct or not, but I put a flange in for the new piece. I knew I couldn't butt weld and I didn't want an overlap, so if someone can say right or wrong on the way I did it, please let me know. The vinyl top is going back on but I still want it as smooth as possible. Thanks. Forgot to ask, what did you use to seal underneath?
 
Thanks. And no, nobody else has mentioned anything like that but I appreciate that you did. That one picture does show that I did tack weld, but I was not finished when I took that photo. I did add several more welds and also seam welded in a few other spots. Don't know if this was correct or not, but I put a flange in for the new piece. I knew I couldn't butt weld and I didn't want an overlap, so if someone can say right or wrong on the way I did it, please let me know. The vinyl top is going back on but I still want it as smooth as possible. Thanks. Forgot to ask, what did you use to seal underneath?

Nothing wrong with that, after all that's how Mopar did it from the factory in many spots. Just make sure you seal the back side, brush on seam sealer would work well for this. Anywhere that moisture can come threw is a possible problem in the future, just seal it up and forget it. Keep up the good work.
 
Auto Transport Service
Back
Top