• When you click on links to various merchants on this site and make a purchase, this can result in this site earning a commission. Affiliate programs and affiliations include, but are not limited to, the eBay Partner Network.

What did you do to your Mopar today?

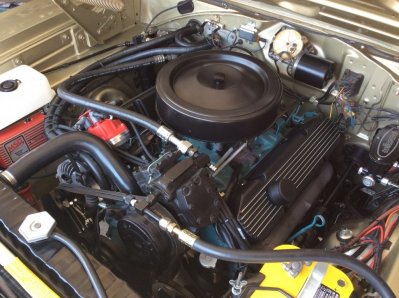
fixed my valve cover leaks on the 440

followed the instructions by dvw in the thread http://www.forbbodiesonly.com/moparforum/threads/valve-cover-gaskets.87565/#post-910213890

it was not a quick project as i made sure head flanges were oil free and dry before applying any rtv

i also ditched the steel valve covers and installed some mancini ones with blue moroso rubber gaskets also used arp valve cover bolts. they are all mounted to stock iron heads.

will still be on the prowl for any leak/smoke

image.jpg
 
Last edited:
Got my engine mount plates re-powder coated - so they'll be nice, and ready, when the engine goes back into the car . . .

The right one was only (2) holes - modified it to use all (4) holes available on the block for better support, and added the gusset too.

sm_motormountsdone01.jpg


And they've got (2) sides - so here's the other side . . . the powder coater, that I found locally, only changed me $20 to get both of these done - I'll be back to have him do more of my powder coating needs

sm_motormountsdone02.jpg
 
I installed a pair of Polk Audio DB401 4" speakers in my kick panels. They are marine grade. So, no worries about water. I had an old nasty set of panels to test fit; good thing, too. I got it right on the good panels. Just measured 4" from the bottom and 4" in from the edge, drill a 4" hole with a hole saw and install speakers. They overlap the rolled edge a bit but they have too in order to fit the recess behind each panel. There's about 1/4" clearance between the e-brake and the speaker grill. Woohoo!

Here's a few photos:

Polk DB401 speakers.jpg
1-IMG_0555.JPG
2-IMG_0557.JPG
 
Got my engine mount plates re-powder coated - so they'll be nice, and ready, when the engine goes back into the car . . .

The right one was only (2) holes - modified it to use all (4) holes available on the block for better support, and added the gusset too.

View attachment 352364

And they've got (2) sides - so here's the other side . . . the powder coater, that I found locally, only changed me $20 to get both of these done - I'll be back to have him do more of my powder coating needs

View attachment 352365
I have been wanting a big blast cabinet for years, but don't do enough to pay out the $ . Naibor just down the street got one and said I could use it anytime...whoooo---Haaaa........................................MO
 
Fixed transmission leak, fixed valve cover gasket leaks, rejetted the front carb, swapped the carbs front to back, redrilled for linkage, tightened up my loose wheels, installed seat belts, drove to town for the first time, put 12 gallons of 93 in, and did 3rd gear burnouts
 
Assembled the prop valve and bracket.
Plasti-dipped the wire loom.
Wasn't super happy with the way the plasti-dip retained the sag and drip contours as it set up.
Started wire brushing and spot blasting the loom that goes on the booster and guess what?
The factory plastic coating has sag and drip contours!
Ceramic painted the new calipers.
IMG_20160731_134515.jpg
IMG_20160731_134830.jpg
IMG_20160731_143415.jpg
IMG_20160731_140312.jpg
IMG_20160731_134927.jpg
 
I might need some help locating that wire loom that goes on the booster.
None of my "before" pics show that clearly.
Also, there are two holes in the inner fender that line up with the two holes in the prop valve mount.
The holes in the valve are not tapped (well, they are now, but from the other side because I had to drill out the rivets), so what are they for?
 
...and " I got, I got a line on you, I got a line on you, babe!"
IMG_20160731_143349.jpg
 
Nice work. I don't know if I've ever seen under the hood of a 73-74.

I...I got a line...I got a line on you babe.
 
I took my car to my buddy's place in Rio Rico and he is going install all the suspension stuff and work on a few other things for me. Once all this is done, when I get the car back I will be taking it to a local tire shop and they will install the new tires and wheels and perform the alignment including centering the steering wheel. I am hoping this will get rid of a lot of vibration I have at about 75mph. I will update in a couple of weeks!
 
Now that my engine is back in and running, I'm working out stuff...
Today I wired my front headlight harness....all lights are working, turn signals, horns, etc...
Pretty easy with all new harnesses

Jeff
 
Did a tape measure alignment in the driveway, installed a door mirror, grabbed a matching wingnut for the air cleaner, and drove to town for a victory soda pop afterward.
 
I walked past mine in the garage, pat them on the fenders and said "good mopar".
 
Assembled the prop valve and bracket.
Plasti-dipped the wire loom.
Wasn't super happy with the way the plasti-dip retained the sag and drip contours as it set up.
Started wire brushing and spot blasting the loom that goes on the booster and guess what?
The factory plastic coating has sag and drip contours!
Ceramic painted the new calipers.
View attachment 352471 View attachment 352472 View attachment 352473 View attachment 352474 View attachment 352475
Did you buy a rebuild kit for your prop valve? If so, where did you get it?
 
Over the past two days, I de-greased the 8 3/4 housing (off the car), and then took my angle grinder, with a wire brush on it, and removed the paint and rust. I took more Simple Green, and soaked the inside of the housing, then warped paper shop towels, around a long brush I had, and cleaned more of the oil away, in the axle tubes. She's now ready for primer and paint. I did pick up two gallons of white vinegar, and one of those plastic storage boxes. I soaked one of the backing plates, over night, in the vinegar. Am I ever sold on this process, in de-rusting small parts. I couldn't get half of the plate in the solution, due to the narrowness of the box, but the fumes did the work, of attacking the rust, on it as well. All it took was a small steel wire brush, to clean the loose rust. I left backing plate in, for another soaking. It should be pretty clean by morning.
 
Drove 50 miles to the upholstery shop. He figgered out how to attach my broken garnish moulding clips and installed all the rest of the moldings. He put in the new package tray and seat divider. He also installed my rear quarter window fuzzies and worked on the rain gutter trim. He also installed my re-covered sun visors . The all new headliner had been installed a couple weeks ago. He does excellent work and I am very happy with it. I sat in the shade with a fan on me and drank cold water as I watched !!.................................MO
 
Auto Transport Service
Back
Top