• When you click on links to various merchants on this site and make a purchase, this can result in this site earning a commission. Affiliate programs and affiliations include, but are not limited to, the eBay Partner Network.

What did you do to your Mopar today?

Big day today. Made another fitting for the `cuda. It takes 100's of times longer to get this stuff ordered/shipped. than to do the actual work. I really miss driving within an hour of home, to get ANYTHING!

olqo4.jpg
 
"Men everywhere applaud you for keeping a tool because..." Someday i'll need that SOB.""
Miller C-4597. No idea what I paid for it, but, whatever it was, it paid for itself in that one use in my opinion.
 
I bought an upper ball-joint socket, and we spent a hour on the lathe and mill...making it into a tool I needed for one use.

svs3sz.jpg

1g3hqg.jpg
 
Nope, just have to take things apart sometimes...that weren't intended to be. LOL
I needed to mill the logo off that aluminum plate, and it required a difficult disassembly.

I don't advertise for free. No favors or discount....the logo comes off, if it's visible. All this stuff costs too much, to advertise for them for free.
 
Last edited:
Cant tell you how many times I had to make something out of nothing out in the middle of nowhere....
 
I installed some 4* shims on the van for more caster. Man, what a improvement in handling at highway speeds! Wish I had done it sooner.
 
Had a wild ride coming home from a cruise on Wednesday night, about half way around a corner in 2nd gear I decide to nail it and get it sideways for a bit (as I have been known to do), all of a sudden I'm laying in the back seat, the welds on the seat back broke and I started to lose control really quick, I over corrected but saved it.
Yesterday I pulled the seat apart and took it to a buddy to weld up properly and then I installed two 1/4 inch bolts for insurance, installed this morning and went for a ride to the same spot and let her rip, everything is back to normal.
I will admit it scared the hell out of me, figure if I was going to have a heart attack that would have been it so I guess I'm OK.
 
I finally got all the pieces and parts to finish the hydraulic lines for the steering and brake boost....

2ecizkk.jpg


2s0ckn9.jpg
 
Trust me, the thought has crossed my mind. I want to see the audi dash setup once it is up and running.
 
Started working on a few things this weekend. First was to clean up this fender bolt, or rather lack of it.
30459057076_0ec4b37194_z.jpg

I also decided to pull the headlights and clean up behind them. I'm going to order some new adjusters for the headlights, as the old toast. Also are these old adjusters together right? I seem to remember them threading in from the other way on the last car I had.
30197168570_429ac92973_z.jpg
 
Trust me, the thought has crossed my mind. I want to see the audi dash setup once it is up and running.
Cool, I will post it for sure, when the time comes. That's a ways away yet though. Although I will be working in the cabin space next to get the final positioning worked out for the dash frame mounts and steering wheel assembly mount point, and the rectangular tunnel for the heat/ac, stereo/console/shift/parking brake assemblies all to mount to. Also sealing off the trunk area totally from the cabin for safety with the gas tank being over the axle space in the trunk. Once that's all worked out and the metal fab finished there are only a couple of other things before I can load some epoxy primer onto everything and begin filler/bodywork and getting the gaps and panel alignment worked out.
 
Started working on a few things this weekend. First was to clean up this fender bolt, or rather lack of it.
30459057076_0ec4b37194_z.jpg

I also decided to pull the headlights and clean up behind them. I'm going to order some new adjusters for the headlights, as the old toast. Also are these old adjusters together right? I seem to remember them threading in from the other way on the last car I had.
30197168570_429ac92973_z.jpg
Don't know about the adjusters but I just did the same thing with the fender bolt on my 67. Decided to slice the top open and slide a bolt with a large captured washer into the space and re-weld the top closed. Now that bolt cant escape and it's long enough to accept spacers for adjusting the fender height.
 
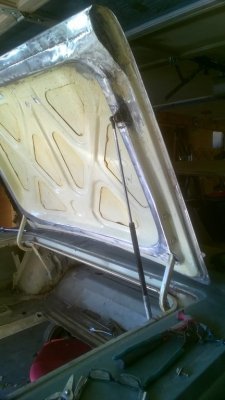
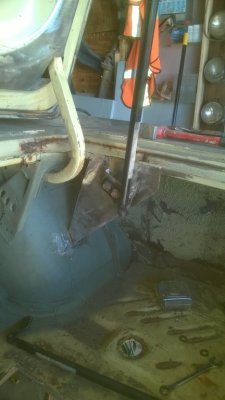
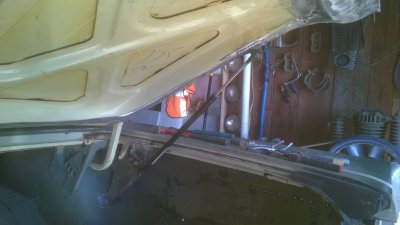
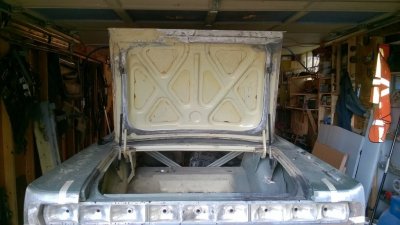
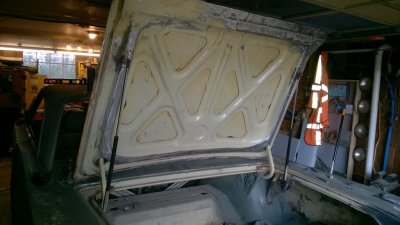
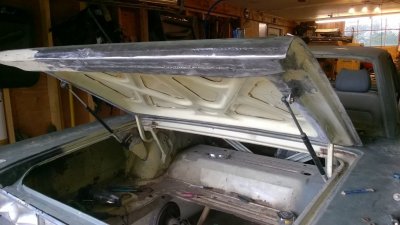
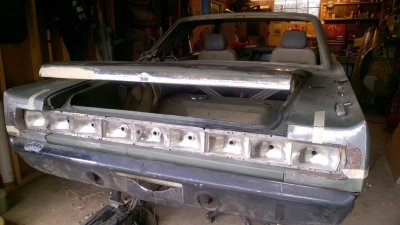
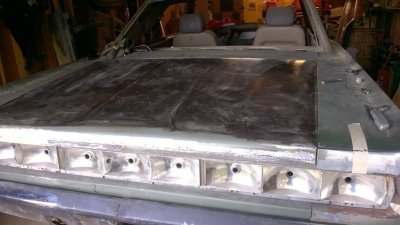
Today I finished fabrication of the new trunk aft section underneath that the trunk seal rests against. Remember that I moved the aft seal surface up to a position similar to that of a 66/67 Charger. So, using the 67 Coronet deck lid required cutting the lower 2/3rds of the lid off. That left a swath of open real-estate that had to be built to match the curves of the seal rail so the trunk will seal when closed. I cut and fitted 5 different pieces on each end to build the curve to match the seal rail and the under side lip of the deck lid AND the shapes of the deck lid remaining metal that had NOT been cut away originally. Interesting challenge and it was fun to solve. I spent a LOT of time placing and removing the lid while sitting in the hole created by cutting out the trunk spare tire area. made it easy to do the work. The lid rear bottom edge had to match the placement of the 66 T-Bird tail lights upper edge while leaving room for the lenses and yet meeting underneath the correct placement to catch the seal and line up with the tail corner extensions left to right. On top of all of that I narrowed the rear end with tubs and tossed the torsion bar trunk lid assembly. So now I needed to set up gas lifts to open the trunk lid and hold it open. I worked on that today as well. The lifts I salvaged from a late model SUV are STRONG and are 18" closed and 31" at full extension. I'll be using about 24-27 " of that length to hold open the lid. Since it did not come with such things I have to make the mounts for them. I worked out placement today and fabricated the upper mounts that will be welded to the underside of the lid on both sides to accept the ball studs at the piston end of the lifts. The bottom ends have a two bolt tab that rotates that will need to hang below the seal rail close to the lid hinges. They are tough to compress and just one holds open the lid easily. Looks cool with those on there too. So will the front hood, and i'll have to build those as well. Also I need to figure out the placement of the trunk latch and a method of operation since there is no lock hole any more and the lid is so short with the lights all of the way across. Fun times!
 
I finished the mock up of the right trunk lift. I did a lot of head scratching and measuring first. Got it right in one. The lift body misses the seal rail by 3/4 " and the trunk rail by 3/8 ". It extends out, at full open on the trunk lid, to about 3 " short of full lift. Just the one so far but it holds the lid open by itself. UPDATE:

I went ahead and did the other side. Now the lifts hold it open all of the way down to about 8" opening then it closes from sheer weight. Done but for cleanup and filler here and there.

WP_20161024_12_21_46_Pro.jpg WP_20161024_12_22_00_Pro.jpg WP_20161024_12_22_21_Pro.jpg WP_20161024_16_07_54_Pro.jpg WP_20161024_16_08_02_Pro.jpg WP_20161024_16_08_30_Pro.jpg WP_20161024_16_08_44_Pro.jpg WP_20161024_16_08_59_Pro.jpg
 
Last edited:
Auto Transport Service
Back
Top