• When you click on links to various merchants on this site and make a purchase, this can result in this site earning a commission. Affiliate programs and affiliations include, but are not limited to, the eBay Partner Network.

What did you do to your Mopar today?

Wayne, I admire your attention to detail, but you snagged me again and I have to ask.....re post 8004, did u remove, then replace/re install the outer drum vibration springs. If so, how’d you do it. Mine were missing, purchased a proper length set from a member, but can see their gonna be a PITA to put on. Was thinking about trying brake spring tools or trying to fab something.......Jim
Covered in my build thread, once you give it some thought it takes about 10 seconds to install them.

 
Are those Crane rockers?
I broke one of those to find out unfortunately they no longer make them.
I have some that I’m no longer using that have seen some use. Happy to send you a few just shoot me a PM. I‘m almost positive they are 1.5 ratio.
 
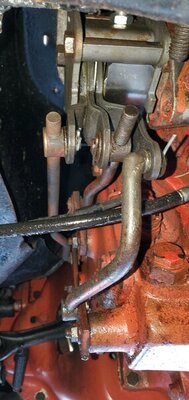
When I bought my 68 Satellite , the seller told me he had gone through the front suspension and it looked like he did. But it just didn't steer quite right. It wanted to wander from side to side once in a while , but I couldn't find any play Today, I found the problem . The idler arm on the right side had play up and down . I replaced it...drives like a new car....................MO
 
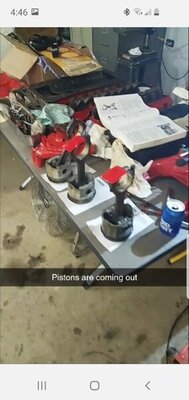
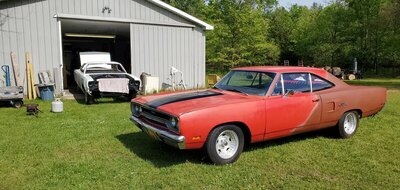
It's been a great couple of days with my son chomping at the bit and what a great motivator he is lol. Pulled the ole MOPARS out of the barn, cleaned them up, switched the pistons around in the fresh 440 for the 69, got the 70 on the hoist to replace the 4 speed clutch.

Screenshot_20200603-044645_Messages.jpg 20200601_165507.jpg 20200602_182736.jpg
 
Tried to figure out the pulleys on this 440, have determined that I need to space out the PS pump somehow, the crank pulley is correct I believe, I don't think the WP pulley is right but I do have another one.

View attachment 958670

I wouldn't try to space out the PS pump. If something is not lining up with that, you likely have an incorrect pulley somewhere. For the water pump pulley, you may need a shim or two. They look like this:
20200603_072544.jpg


Good Luck!

Hawk
 
I wouldn't try to space out the PS pump. If something is not lining up with that, you likely have an incorrect pulley somewhere. For the water pump pulley, you may need a shim or two. They look like this:
View attachment 958720

Good Luck!

Hawk

Thanks for the info, however I have the correct crank pulley and the PS pump does not align with the outside groove which is where it should. If I space out any of the pulleys I will compound my problem, it is more likely I have the wrong pump or perhaps the pulley is pressed on too far.
 
Thanks for the info, however I have the correct crank pulley and the PS pump does not align with the outside groove which is where it should. If I space out any of the pulleys I will compound my problem, it is more likely I have the wrong pump or perhaps the pulley is pressed on too far.

Understood. It just looked like your picture showed the water pump pulley to be too far inset, but it may have been an optical illusion based on the camera angle.

I'm sure you have checked this as well, but my pulley is dished a little bit. Could yours be on backwards? Just something to check...

Good luck!

IMG_2642.JPG
 
Understood. It just looked like your picture showed the water pump pulley to be too far inset, but it may have been an optical illusion based on the camera angle.

I'm sure you have checked this as well, but my pulley is dished a little bit. Could yours be on backwards? Just something to check...

Good luck!

View attachment 958868

Thanks for the response. While the angle for the picture may not be dead on, it is pretty close and clearly shows a misalignment, the pulley is about 1/2" too far in. As to the pulley being on backwards, anything is possible on this car... I have found a wide variety of things that make you scratch your head in wonderment. I will take a hard look at it today and see what I can discover.
 
I'm hoping you backed off the nut to the first cotter key hole in the nut retainer after torqueing.
Nope rolls smooth and the retainer lined up. Did that last time when I snugged it old school until rotation started to tighten up and here I was with a loose hub. Off for a test drive in 5 minutes.
 
Got home from donating platelets and found this on the porch. New package tray for the Coronet. Still waiting on the front seat covers.

1B33D8A5-D5E2-4877-9396-409012AC8421.jpeg
7A9AF574-E027-4279-85FA-F8F3F7B01C4B.jpeg
 
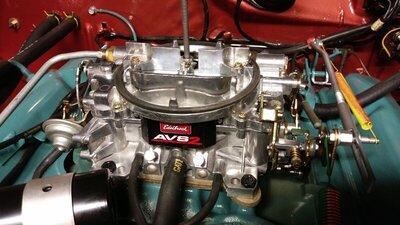
Thought I'd throw on an AVS2 and see how it goes. The extra 50cfm can't hurt either. Put the restored 4429 in the eddy box for safe keeping.

UPDATE-6/7--got to take it out for a cruise since the installation and initial setup. This is an excellent carb. Idles smooth, zero off-idle hesitation, minimal adjustments, great throttle response. Believe me, I'm a 100% purist, but the annulars are a nice improvement while retaining a factory look. She's ready for Carlisle....

20200603_191603.jpg
 
Last edited:
Put my 65 Dodge in the air. Drained 4 speed oil going to let it drip for a few days. Not sure I had the right lube in there. Going to check pinion angle. Have engine at 0* got lucky.
 
Well after doing not much other than driving it for a few months, in the last few weeks I:
1. Got the hood and fender tops painted (the hood had holes in it where the scoops were put in incorrectly by a previous owner).
2. Fixed both door handles where the screw holding the button assembly had come loose (used a bit of epoxy on the screws this time).
3. Ordered a new 264/.450 solid cam which should give power to 6,000 rpm, instead of 5,200 rpm with my current cam.
4. Fitted the radio bezel which I bought a few months ago and only just arrived due to Covid-19 delays.
5. Re-painted the garage floor which was looking pretty worse for wear after 5 years of restoration work.
20200603_172315.jpg
20200602_174925.jpg
20200606_103924.jpg
 
I got the holes drilled for the ramcharger scoops, and test-fitted them. I was so pleased, I almost broke into song and dance!! The $40 template from Dante's was worth every penny. By the way, if anyone's interested I'll probably sell the template now.

paint063.jpg
paint064.jpg
paint065.jpg
 
Charged the A/C in the Power Wagon and went for a nice cool drive!

IMG_0539.JPG
 
Re: 1972 Satellite Sebring Plus--Took off the car cover, primed the carb, drove down to the nearest gas station to fill up with premium (same price as regular these days). Aired up the tires, spare, and air shocks (a temporary fix needed for its maiden road trip a few years ago-I know, go with stiffer springs/shocks).

The fuel gauge read empty both before and after the fill-up. Had the gauges professionally restored once already, and I personally replaced a perforated brass float in the fuel tank already. Maybe a ground problem now, just guessing. The other gauges function as they should.

Got a few strange looks and drove straight back home. Total routine took about 20 minutes. Have new rotors, pads, and wheel bearings, need to renovate the front brakes one of these days.

Fotos in the shade make it seem like it has a show-car finish, but in sunlight it looks more like a factory quality (which is what I wanted).

DSC07466.JPG
 
Auto Transport Service
Back
Top