• When you click on links to various merchants on this site and make a purchase, this can result in this site earning a commission. Affiliate programs and affiliations include, but are not limited to, the eBay Partner Network.

1968 Plymouth GTX

Pulled the fuel tank and lines:
View attachment 681657

Removed the brake master cylinder, brake pedal assembly and brake lines.
When I pulled the front right wheel I found the car came with the optional disc brakes.
View attachment 681658

Removed the caliper and rotor:
View attachment 681659

Removed the upper control arm and found the bumper disintegrated:
View attachment 681660

Pulled the torsion bar back to remove the strut and lower control arm:
View attachment 681661

Lower control arm bushing was completely worn through on one side:
View attachment 681662

Next I will remove the splash shield and then on to the other side. The goal is to get it completely disassembled and then media blast the shell so I can better assess the condition of the floor pans.
Is that the original tank? If the sending unit is original and has the 3/8 fuel and 1/4 vent. I would be interested in that. Shoot me a PM if you want to sell that...

Justin
 
I don't think it is original. They had the vent lined capped at the front and just hanging at the rear. So I will be looking for the correct set up too when the time comes.
 
Turns out it does have the original sending unit. I'll have to see if it still works.
I see reproductions are available.
 
Turns out it does have the original sending unit. I'll have to see if it still works.
I see reproductions are available.

If it is still in good shape, reuse it. And they can be repaired. Reproductions are generally not accurate on our gauges. I wish I had saved mine.
 
Removed the brake master cylinder, brake pedal assembly and brake lines.
When I pulled the front right wheel I found the car came with the optional disc brakes.
View attachment 681658

Those appear to be later model single piston calipers. Good start and good luck on your build. Love the 68's. Here's my '68 Hemi GTX. Left the exterior pretty much as we found it after being in a storage unit for 30 years.
Current rf4.jpg
Current e9.jpg
 
Turns out it does have the original sending unit. I'll have to see if it still works.
I see reproductions are available.
If it is an original unit I would be interested in it......If it has the right date, readable stampings and not pitted....If the right date I have an original 70 unit which is the same just different date. It is restored and calibrated for an even trade.......

If your interested shoot me a PM of the date format on it. Originals have a 4 date format, a penstar and the "INITROL" stamped on it...
 
Sending unit appears to be a KS replacement.
Manual lists 3004180 for the sending unit, this one is obviously not that. 2857947
Fuel Sending Unit.JPG

Fuel Sending Unit 1.JPG
 
Sending unit appears to be a KS replacement.
Manual lists 3004180 for the sending unit, this one is obviously not that. 2857947
View attachment 684481
View attachment 684477
Well that’s a bummer for both of us. If i do find one. I will let the one I have go for a good price and will shoot you a pm... Thank you for checking and getting back to me.....:D so nice to see someone taking the time to look and respond back....:thumbsup:
 
Decided to dismantle the hood to be sure to get all the rust out.
Hood Separated.JPG


You can see that the inner support at the bottom of this picture is loose.

Hood Separated 2.JPG


Hood Separated 1.JPG


Not too bad for a 50 year old car.
Hood Support Structure.JPG


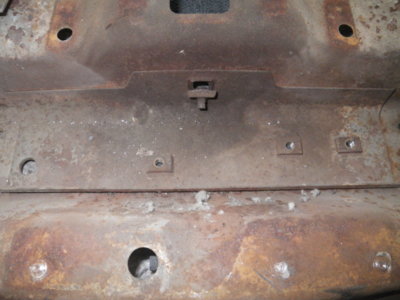
I also removed this center support shown here because the hood catch bolt had broken off and the nut fell off inside. I will post a picture of that later.
The inserts that hold the 440 emblems looked good but this one had a broken stud.
Hood Insert Pin broken.JPG


I will have to figure out how to repair it when the time comes.
 
Hood center support removed and the problem bolt and nut revealed.
You can see the remnants of the mouse nest I found under there as well.

Hood Catch Nut Broken.JPG
 
Inner and center supports after a trip to the blast cabinet.
The holes where I drilled through removing spot welds will be welded up prior to epoxy primer and reassembly.
Inner Supports Media Blasted.JPG


Removed the hood hinge nut assemblies.
Hood Hinge Nut Assemblies removed.JPG


Look much better after blasting.
Hood Hinge Nut Assemblies blasted.JPG


Washing support structure in preparation for media blasting.
It is at this stage where I take a hammer and dolly to any areas that need straightening.
Washing Inner Structure.JPG


Scraping the hardened adhesive off prior to washing and straightening any dents in areas that are hard to reach when assembled.
Like the dent in the front of the hood shown in the picture after this.
Scraping prior to Washing.JPG


The dent on the hood where the emblem attaches had a few other areas around it that were pushed in as well.
Was much easier tapping them out now than later. Also the hood latch area on the support structure was caved in a bit and that too was easily bumped out.
Front damage.jpg
 
Too windy to blast outside to day so I started working on the upper control arms.
Removed the upper ball joint using a 1/2" Impact Driver and a special socket I purchased when doing the Coronet R/T. Makes easier work out of an otherwise very difficult job.
Heated the inner sleeve on the bushings with a Propane (Mapp) gas torch until hot and then removed it. The rubber comes out easy after that.
Before picture:
Upper Control Arm.JPG


After a trip through the blast cabinet:
Upper Control Arm Blasted.JPG


Ready for epoxy primer:
Upper Control Arms Blasted.JPG


Tomorrow I hope to finish blasting the hood but if too windy again, I'll begin working on the lower control arms. Need to get them ready so I can weld on the new sway arm brackets when they arrive.
 
While working on the lower control arms I made a discovery. It appears these are the original LCAs but someone cut off the sway arm brackets. At least that is what I am thinking these welds were for. Both control arms have them in the same area.
Lower Control Arm welds.JPG
 
Before you get to carried away consider what stance/tires/driving your going to do. You might consider aftermarket arms. At the min. you might consider the offset moog bushings to get more adjustment for radial tires. Just throwing it out there so you don't waste time or money on something you might change later.
 
Nice job on cleaning up the hood inner structure. Maybe you already know this, but do not sandblast the outer hood panel. That large flat surface will warp with sandblasting. You don't want to mess up a nice solid original hood.
 
Auto Transport Service
Back
Top