Nice work Speedy, I really wish some people would just leave these cars alone instead of cobb jobbing them together (makes our job that much harder). For a young buck you do a fine job and take pride in your work, keep it up Speedy.
You are using an out of date browser. It may not display this or other websites correctly.
You should upgrade or use an alternative browser.
You should upgrade or use an alternative browser.
'69 charger r/t-se: Building my dream car
- Thread starter Mr.SpeedFreak
- Start date
Nice work Speedy, I really wish some people would just leave these cars alone instead of cobb jobbing them together (makes our job that much harder). For a young buck you do a fine job and take pride in your work, keep it up Speedy.
X2 Speedy . . . You're attention to detail is outstanding . . . You give me yet another example to try to measure up to on my project ! ! !
Your pictures and you descriptions really help to put things in perspective too . . . thanks for keeping us updated ! ! !
Propwash
Well-Known Member
- Local time
- 1:26 AM
- Joined
- Oct 29, 2009
- Messages
- 9,710
- Reaction score
- 4,332
- Location
- Island of Misfit Toys
Sharp work man. Rock N' Roll!
Mr.SpeedFreak
Well-Known Member
- Local time
- 11:26 PM
- Joined
- Jan 29, 2013
- Messages
- 1,645
- Reaction score
- 1,056
- Location
- Southern Oregon
Thanks guys! Feels good to have that metalwork in the rear-view mirror for sure haha. I laid some All-Metal on last weekend but got held up since the new can I bought was 90% chunky solid crap. Must have been sitting on the shelf for a while or something but I exchanged it a fresh one yesterday, so more to come on that soon.
Also got back to troubleshooting why Frankenstein refuses to run, starting with pulling my distributor (with Pertronix) and dropping in the old points dizzy Mike let me borrow. But naturally it couldn't be that easy, dropped it in with no change at all. So I tore the shop apart and dug up the points that got pulled from my distributor for the pertronix in the first place. Mine was fresh rebuilt when I bought it from Mike so I knew the points were brand new, just had to find em haha
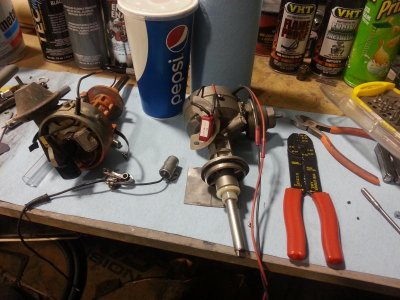

This is gonna show how much of a noob I am, but even though I got the basics of how it works, I've never really messed with points ignition. But with the old dizzy to look at where stuff goes, I got everything switched out in mine no problem. Set the gap to .016" and gave the contacts a dab of dialectric grease, good to go.
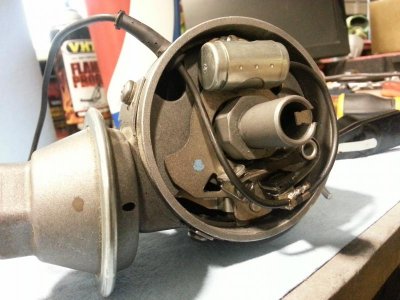
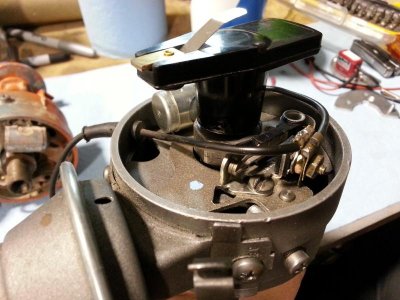
Dropped it in and Frankenstein fired off and ran for a few seconds, but died off and refused to come back. :banghead: the timing was still off since it was coughing back out the carb, but no matter where I turned the distributor I still couldn't get a good solid run. I had the ballast resistor re-connected, vacuum ports blocked off, firing order and connections double-checked, and checked to make sure the distributor gear was oriented right (slot parallel to the engine centerline), so at this point I'm thinking it's something with the carb, especially since it ran so well in the beginning but refused to idle. I know the throttle shaft must be worn cause it's leaking a bit of gas (which would mean a resulting vacuum leak there too?) and the carb is 45 years old so I shouldn't be too surprised I guess.
I'm all ears for any help or suggestions, what do you guys think? :shruggy:
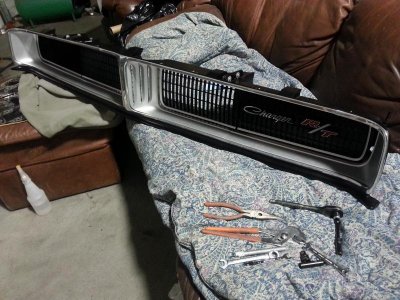
On a better note, I got going putting the grille back together. Got the plastic sections back together and the trim fitting nice after some tedious work. My greasy fingerprints are all over everything, but it's coming along pretty good!


Also got back to troubleshooting why Frankenstein refuses to run, starting with pulling my distributor (with Pertronix) and dropping in the old points dizzy Mike let me borrow. But naturally it couldn't be that easy, dropped it in with no change at all. So I tore the shop apart and dug up the points that got pulled from my distributor for the pertronix in the first place. Mine was fresh rebuilt when I bought it from Mike so I knew the points were brand new, just had to find em haha


This is gonna show how much of a noob I am, but even though I got the basics of how it works, I've never really messed with points ignition. But with the old dizzy to look at where stuff goes, I got everything switched out in mine no problem. Set the gap to .016" and gave the contacts a dab of dialectric grease, good to go.


Dropped it in and Frankenstein fired off and ran for a few seconds, but died off and refused to come back. :banghead: the timing was still off since it was coughing back out the carb, but no matter where I turned the distributor I still couldn't get a good solid run. I had the ballast resistor re-connected, vacuum ports blocked off, firing order and connections double-checked, and checked to make sure the distributor gear was oriented right (slot parallel to the engine centerline), so at this point I'm thinking it's something with the carb, especially since it ran so well in the beginning but refused to idle. I know the throttle shaft must be worn cause it's leaking a bit of gas (which would mean a resulting vacuum leak there too?) and the carb is 45 years old so I shouldn't be too surprised I guess.
I'm all ears for any help or suggestions, what do you guys think? :shruggy:
On a better note, I got going putting the grille back together. Got the plastic sections back together and the trim fitting nice after some tedious work. My greasy fingerprints are all over everything, but it's coming along pretty good!


Last edited:
Well the quickest way to figure out where the problem lies is just dump a little gas in the carb, if it fires and runs for a second and then dies it's the carb if not it's the ignition.
Propwash
Well-Known Member
- Local time
- 1:26 AM
- Joined
- Oct 29, 2009
- Messages
- 9,710
- Reaction score
- 4,332
- Location
- Island of Misfit Toys
Sucks to hear you're still battling engine issue's Speedy. At least the grill turned out super sharp!
Here's my recommendation:
http://www.summitracing.com/parts/qft-bd-780-vs/overview/
I respect the old school stuff, but honestly most old carbs don't hold a wick to a lot of the high performance new one's. Do you have a buddy/family member with a spare carb you could borrow to do a comparison for troubleshooting?
CHARGERSTEVEN
Well-Known Member
Good to see you hard at it again speedy. I finally got my rear end issues done with replacing both frame rails now it on to installing those great fitting amd panels. The right full quarter must have off non at least 20 times but every thing is coming together. This part is a little more simple. Lol
- Local time
- 1:26 AM
- Joined
- Jan 1, 2013
- Messages
- 8,050
- Reaction score
- 3,467
- Location
- Mascoutah, Illinois
The grill came out great Speedy .. hope you are able to figure out the problems soon
HYRDGOON
Well-Known Member
- Local time
- 2:26 AM
- Joined
- Apr 20, 2013
- Messages
- 3,375
- Reaction score
- 2,747
- Location
- Breslau, Ontario, Canada
I'm with Prop on this one. Is there someone you could scam a carb off in the meantime to try? What did you have on the Chevelle??
For the investment in a new one it may be worth it's money in saving you grief (I have the QF 780 Prop recommended but not the "Black Diamond" I think ,ine is $100 cheaper)
For the investment in a new one it may be worth it's money in saving you grief (I have the QF 780 Prop recommended but not the "Black Diamond" I think ,ine is $100 cheaper)
Mr.SpeedFreak
Well-Known Member
- Local time
- 11:26 PM
- Joined
- Jan 29, 2013
- Messages
- 1,645
- Reaction score
- 1,056
- Location
- Southern Oregon
Thanks for all the input guys! Well here's what I got right now:
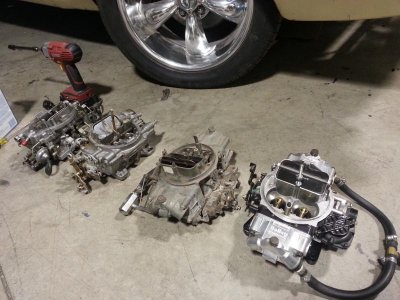
Factory AVS, 670 street avenger (off the Chevelle, Goon, but not enough cfm), a 650 double pumper and a 625 Carter AFB, both borrowed from a friend. Both Holleys would need a spacer to even be able to bolt to the intake because of linkages hitting the casting, and the AFB wasn't getting fuel out the squirters guessing because of a stuck needle or gunked up accelerator pump. So at the moment all 4 are a no-go. lol
And thanks for the recommendation on the new carb Prop and Goon, if I were to buy a carb for indefinite use it'd be that Quick Fuel for sure. But I was kinda trying to avoid spending a lot of money on a new carb since I'm planning on making the jump to fuel injection next winter, really just need a decent driver-quality carb to enjoy some seat-time cruising around this summer (hopefully). So at the moment I'm kinda thinking either making my AVS work or buying the $275 replacement from Classic.. :shruggy:
BUT here's something I was wondering what you guys would think about- I was doing some research online today and found this thread by Pops describing some of the same issues with an AFB as I've been having with my AVS (leaky throttle shaft, won't idle, hard starting, etc).
http://www.forbbodiesonly.com/moparforum/showthread.php?24959-Carter-AFB-FUEL-LEAK-BY-THROTTLE-SHAFT(S)
A possibility was brought up that maybe the float level was too high (or Mike suggested possibly gunked-up sticky check valves in the squirters), causing the carb to flood and the resulting fuel dump to rear its ugly head by running off the butterflies and wisping out the throttle shaft.
This would kinda make sense with the way my engine was acting when my dad and I were trying to get it running after the points ignition swap: seemed to me like it was loaded with fuel and the only time it would start to fire was with a ton of timing advance, which caused it to backfire out the carb and light off all the fuel sitting in it and the intake. Do you guys think an issue like that could be more to blame for the AVS problems than a vacuum leak at the throttle shaft? Or at least worth looking into?
If there's a good chance of this being the case, I was thinking about buying a rebuild kit for the AVS, going through everything and checking again to make sure it's fully cleaned out, double checking the float level however the FSM tells you to, and while it's apart take a look at the throttle shaft wear. I don't know how true this is, but I read online that the AFB/AVS normally has .016-.022" of throttle shaft play in the bore, which seems like a hell of a lot to me (?) but that seems about what I have now.
I'll be the first to admit I'm far from an expert, but with the new info/goals I have in mind, what say you guys?
(Help me Obi-Wan Kenobi's, you're my only hope) haha
Mr.SpeedFreak
Well-Known Member
- Local time
- 11:26 PM
- Joined
- Jan 29, 2013
- Messages
- 1,645
- Reaction score
- 1,056
- Location
- Southern Oregon
Thanks 440+6, and just to be sure, that .016-.022 tolerance is for the "tightness" of the shaft in the bore right? Not a "side to side" movement in and out of the carb body? I just checked that "tightness" play and mine is pretty much right at .016".016 to .022 is correct for avs and afb carbs, you can always put a bushing in the shaft if your set on that carb and it's leaking.
440+6
Well-Known Member
Yea, it's the sloppiness of the shaft in the bore, up down or front to back movement, not in and out of the carb.
Usually caused by to strong of a return spring, or misaligned throttle cable or carb hits wot and cable wants to travel more.
Sounds like yours is ok if you put a micrometer on it in all directions, and it moves from open to close nice and smooth.
Just rebuild it and get that car to move.
Usually caused by to strong of a return spring, or misaligned throttle cable or carb hits wot and cable wants to travel more.
Sounds like yours is ok if you put a micrometer on it in all directions, and it moves from open to close nice and smooth.
Just rebuild it and get that car to move.
Mr.SpeedFreak
Well-Known Member
- Local time
- 11:26 PM
- Joined
- Jan 29, 2013
- Messages
- 1,645
- Reaction score
- 1,056
- Location
- Southern Oregon
Awesome thanks for confirming that for me! I have the carb apart now and checking everything out, the primary squirters seemed a little gunked up, cleaned them out and lowered the float level a little to the fsm's recommended 1/2". Also noticed the accelerator pump looked a little old and cracked, maybe letting fuel by. But Mike mentioned I should look at the check ball bearing or plunger or whatever is under the main squirters to make sure it's there and clean. My problem is I'm not sure if my carb (AVS 4966) should have a ball bearing for a check or just a plunger. This is what I have: (just what looks to be a large flat brass plunger)
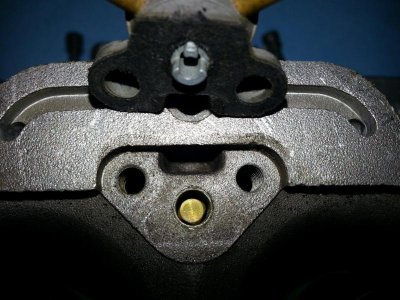
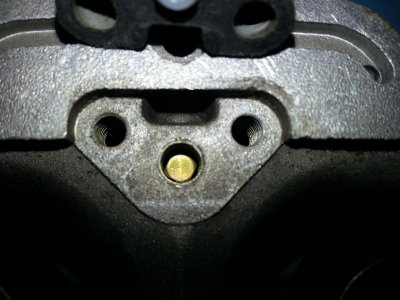
So is there supposed to be a ball bearing that's missing or is what I have complete?
Thanks again for all the help 440+6! I have a full rebuild kit on the way that should be here tomorrow, too :icon_thumleft:


So is there supposed to be a ball bearing that's missing or is what I have complete?
Thanks again for all the help 440+6! I have a full rebuild kit on the way that should be here tomorrow, too :icon_thumleft:
440+6
Well-Known Member
I don't remember a ball bearing, been 15+ years since I had a carter apart, check out this site for instruction sheets and exploded view.
If you need hard to find parts Chicago carb will usually have them, been dealing with them forever.
http://www.chicagocarburetor.com/instruction-sheets.php
Update;
It dose show a ball #43 on diagram, waddya know
If you need hard to find parts Chicago carb will usually have them, been dealing with them forever.
http://www.chicagocarburetor.com/instruction-sheets.php
Update;
It dose show a ball #43 on diagram, waddya know
Mr.SpeedFreak
Well-Known Member
- Local time
- 11:26 PM
- Joined
- Jan 29, 2013
- Messages
- 1,645
- Reaction score
- 1,056
- Location
- Southern Oregon
That's interesting, all the exploded-view AVS pictures I saw on google just showed a plunger but the Chicago carb instructions do show a ball.. :thinker:
Maybe I'll take this borrowed AFB apart and see what it does/doesn't have compared to my AVS :shruggy:
Maybe I'll take this borrowed AFB apart and see what it does/doesn't have compared to my AVS :shruggy:
PFG MOPAR
Well-Known Member
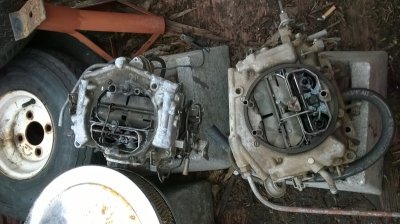
I got a couple to loan ya !
Came with the 440 I bought a few days ago !!
:headbang:
Heck, I better start a work log :grin:
Any 440 parts you'd part with?
about that 6 PACK !!! :icon_pidu:
Mike..
I did start a work log: http://www.forbbodiesonly.com/moparforum/showthread.php?71521-1971-General-Lee-!!!&p=910063463#post910063463 No more hijackin your thread Speedy )
)
Came with the 440 I bought a few days ago !!
:headbang:

Heck, I better start a work log :grin:
Any 440 parts you'd part with?
about that 6 PACK !!! :icon_pidu:
Mike..
That's interesting, all the exploded-view AVS pictures I saw on google just showed a plunger but the Chicago carb instructions do show a ball.. :thinker:
Maybe I'll take this borrowed AFB apart and see what it does/doesn't have compared to my AVS :shruggy:
I did start a work log: http://www.forbbodiesonly.com/moparforum/showthread.php?71521-1971-General-Lee-!!!&p=910063463#post910063463 No more hijackin your thread Speedy
rebootej
Well-Known Member
Grill looks awesome man! Good luck with the engine, hope you get it sorted out.
PFG MOPAR
Well-Known Member
Mr.SpeedFreak
Well-Known Member
- Local time
- 11:26 PM
- Joined
- Jan 29, 2013
- Messages
- 1,645
- Reaction score
- 1,056
- Location
- Southern Oregon
Damn, I blinked and a week went by! Sorry I'm slacking on the updates guys, but I've been busy kicking some *** haha
Guess I should start where I left off with the carburetor issue, I ended up getting the kit and doing a full rebuild of my AVS. (thanks for the offer though PFG Mike!) Bolted her up, bumped the timing up twice and Frankenstein fired right off and ran awesome, and no more throttle shaft leak. But, wait for it, the "Charger curse" strikes again. I didn't get a chance to idle tune since I had a bit of smoke burning off the headers and decided to shut it down. The smoke turned out to be from the passenger side header hitting the corner of the trans oil pan. So after finding that out I went to fire it off again and the starter went out, turn the key and only get a hard click. :frustrated:
I jumped the starter wires at the relay and no change. I checked it out and found the bottom mounting stud and nut had come a little loose, but the top bolt was pretty tight so I'm not sure if that'd have anything to do with it. Figure I'll have to just pull it out and have it rebuilt. Saving that fun for another day.. haha
Anyways, I got the entire grille frame put back together and vacuum pod assemblies back on.


Some front-end ****! Still not sure what I'll do to keep the aluminum radiator from sticking out like a sore thumb through the grille, I know Eastwood sells a special black radiator paint but I'd rather not paint fins that are supposed to dissipate heat.. :shruggy:

And on to Operation: Collateral Jammage, prepping/painting the doorjambs has turned into a mad thrash on the whole middle section of the car. Rockers, doorjambs, door pillars, underside of the drip rails, and upper and lower cowl are all in the crosshairs. Kept the doors on so I could keep track of the door gaps as I work

A little dusty, but having the fenders off got a good view of the front suspension, QA1 shocks and spindles off my friend's '70 Hemi Challenger

Broke out the abrasive wheel and went to town on the passenger side lower cowl/ door pillar.

And the passenger side rocker.
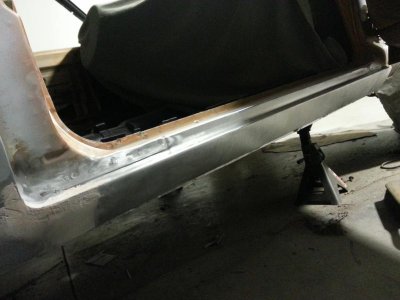
Then some fun with the door gaps. Both bottom seams are about 90% done but the upper driver's side where I had done some metalwork is all good to go.
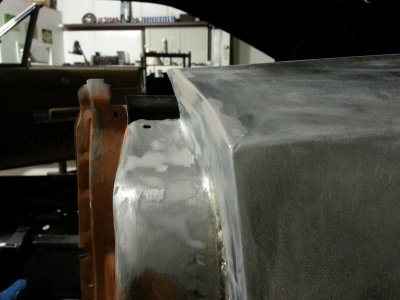

So tonight I'm gonna be finishing up those lower edges and Muscle Car Alley Mike's coming by tomorrow to help with taking the doors off. Pretty happy about the faster pace and I'm on a mission to have Frankenstein back on the road this summer, even though it'll only be in sealed primer and my interior might be a little racecar ish haha
Guess I should start where I left off with the carburetor issue, I ended up getting the kit and doing a full rebuild of my AVS. (thanks for the offer though PFG Mike!) Bolted her up, bumped the timing up twice and Frankenstein fired right off and ran awesome, and no more throttle shaft leak. But, wait for it, the "Charger curse" strikes again. I didn't get a chance to idle tune since I had a bit of smoke burning off the headers and decided to shut it down. The smoke turned out to be from the passenger side header hitting the corner of the trans oil pan. So after finding that out I went to fire it off again and the starter went out, turn the key and only get a hard click. :frustrated:
I jumped the starter wires at the relay and no change. I checked it out and found the bottom mounting stud and nut had come a little loose, but the top bolt was pretty tight so I'm not sure if that'd have anything to do with it. Figure I'll have to just pull it out and have it rebuilt. Saving that fun for another day.. haha
Anyways, I got the entire grille frame put back together and vacuum pod assemblies back on.


Some front-end ****! Still not sure what I'll do to keep the aluminum radiator from sticking out like a sore thumb through the grille, I know Eastwood sells a special black radiator paint but I'd rather not paint fins that are supposed to dissipate heat.. :shruggy:

And on to Operation: Collateral Jammage, prepping/painting the doorjambs has turned into a mad thrash on the whole middle section of the car. Rockers, doorjambs, door pillars, underside of the drip rails, and upper and lower cowl are all in the crosshairs. Kept the doors on so I could keep track of the door gaps as I work

A little dusty, but having the fenders off got a good view of the front suspension, QA1 shocks and spindles off my friend's '70 Hemi Challenger

Broke out the abrasive wheel and went to town on the passenger side lower cowl/ door pillar.

And the passenger side rocker.

Then some fun with the door gaps. Both bottom seams are about 90% done but the upper driver's side where I had done some metalwork is all good to go.


So tonight I'm gonna be finishing up those lower edges and Muscle Car Alley Mike's coming by tomorrow to help with taking the doors off. Pretty happy about the faster pace and I'm on a mission to have Frankenstein back on the road this summer, even though it'll only be in sealed primer and my interior might be a little racecar ish haha
Similar threads
- Replies
- 27
- Views
- 2K
- Replies
- 6
- Views
- 566
- Replies
- 8
- Views
- 504
- Replies
- 9
- Views
- 509
- Replies
- 11
- Views
- 560

