• When you click on links to various merchants on this site and make a purchase, this can result in this site earning a commission. Affiliate programs and affiliations include, but are not limited to, the eBay Partner Network.

'69 charger r/t-se: Building my dream car

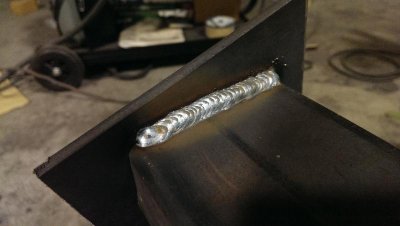
Glad to see you back after it and getting it closer to driving! Upside down calipers..................Jeez Speedy, I think that Chebbie is rubbing off on you haha. Good luck with the ignition "I WANT TO SEE SOME BURNOUTS NEXT TIME"! Nice welds by the way.

- - - Updated - - -

Oh yeah, I'm a little jealous I never received a "Fer Racin" sticker for my CHARGER. That's pretty cool
 
Last edited:
Wow Speedy, you got a whole lot going on man! Tough enough just restoring/moding one car.....can't imagine trying to juggle two.
 
Speedy, I to would love to see some burn outs!!! Working on two is something im glad your doing, One is plenty for me but your work is great no matter what your doing!!! Keep up the great stuff your doing man, the quality shows!
 
Thanks guys! I've been so busy lately I miss being here on the forum as often, but I totally agree on two cars being too much lol. So that's been the point of this huge push this past couple weeks, I took two weeks off work to kickstart this Chevelle resurrection, get my own car back, and clear my plate so I can put my full attention on the Charger. It didn't quite land me in the endzone but I'm getting pretty damn close!

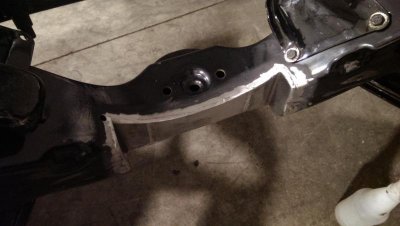
Started with finishing off that crossmember notch I mentioned before so I could get the engine and trans in place. Actually came out pretty nice, and most importantly IT FITS.
IMAG0390.jpg

IMAG0394.jpg

IMAG0432.jpg

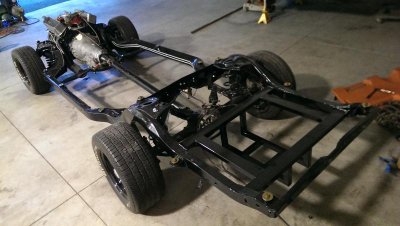
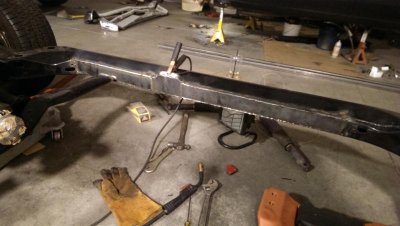
Then I set my sights on boxing up the flimsy chebbie C-channel frame. Took quite a bit of work to cut out my boxing sections and get a good fit, but all things considered it went pretty well and the frame is strong as hell now
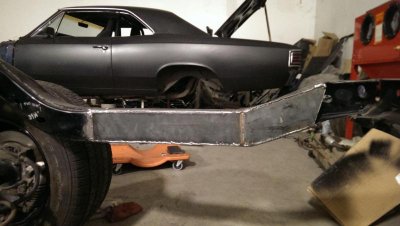
IMAG0483.jpg

IMAG0509.jpg

Now since the trans crossmember normally mounts up inside the C-channel, I had to get a little creative here. With the drivetrain in its final position, I welded each end of the crossmember in place inside the c-channel, notched these boxing sections, and basically integrated the crossmember into the frame
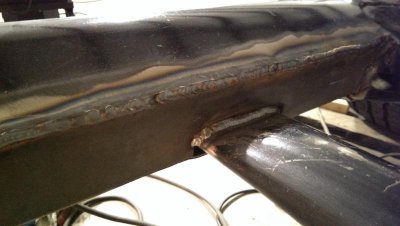
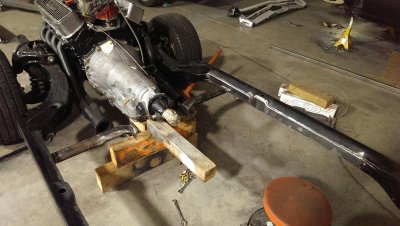
IMAG0469.jpg

IMAG0590.jpg

Leaving the bottom gap open as the lowest point and a good way to drain any water that ends up in there
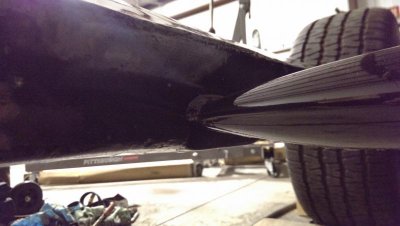
IMAG0655.jpg

Then to make sure I'd still be able to drop the trans, I broke out the trusty sawzall and cut the center section free, widened each cut just enough to slip in two pairs of flanges I had pre-drilled and bolted together, and zapped it together. This should actually make it easier to drop the trans than it was before, as the center section is within both sides of the exhaust, no more wrestling the entire crossmember over the pipes.
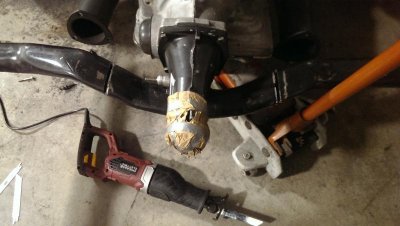
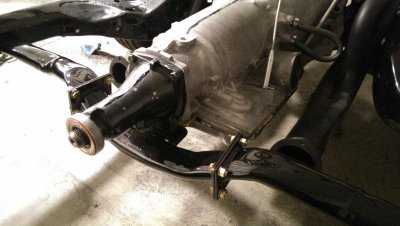
IMAG0563.jpg

IMAG0651.jpg

IMAG0653.jpg

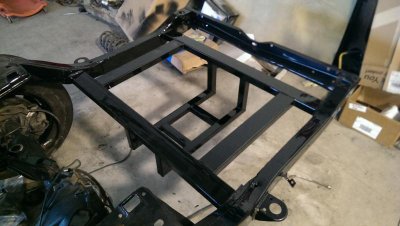
You guys might have wondered why I boxed the rear section where there's probably not a whole lot of torsional stress, this was mainly for reinforcement/convenience of mounting the 20 gallon fuel cell cradle. I'm actually really proud of this thing, as it's probably the biggest fabrication project I've done up to this point, and it actually came out nice and square, and perfect as far as the dimensions I was shooting for
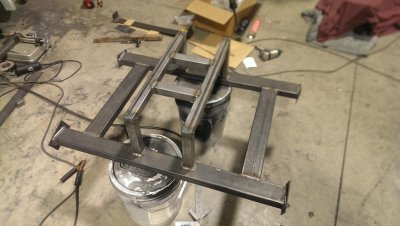
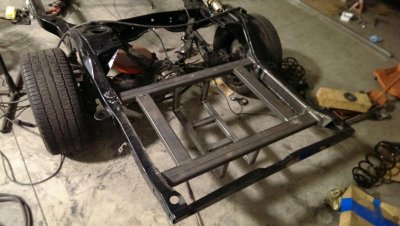
IMAG0540.jpg

IMAG0548.jpg

IMAG0549.jpg

IMAG0551.jpg

After all the practice I was finally starting to get the hang of laying a little better beads haha
IMAG0511.jpg

Wanted to hang the cell down low below the bumper all "vintage nascar style" half for looks, and half for keeping all the weight of the fuel as low to the ground as possible. The way I measured everything, the top of the cell should be just about 1/8" up from flush with the trunk floor

So now with everything welded up, I did some light grinding to clean up a couple spots, hand sanded, and brushed on some jet black chassis saver. Got lucky and it matched the existing powdercoat really well. All painted up:

IMAG0626.jpg

IMAG0624.jpg

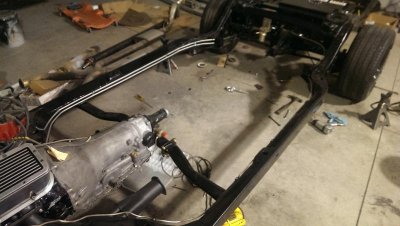
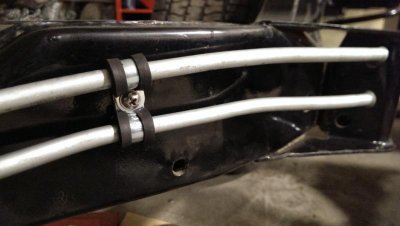
Next I bent up my own 3/8" sending and return fuel lines, re-bent the original main brake line I mangled up pulling it from the old frame, drilled and tapped my 3/16" boxed frame sections, and secured all the lines with some insulated clamps and stainless hardware. Also got the fuel pump mounted in the best spot I could find, as close to the fuel cell as possible.
IMAG0802.jpg

IMAG0839.jpg

Entire rolling chassis all finished up ready to roll under the body!
:beavisnbutthead:
IMAG0873.jpg

IMAG0876.jpg

With that buttoned up I turned my attention to the body, starting with chopping off the fubar front frame section so I could beat the drivers side footwell back straight haha.

IMAG0716.jpg

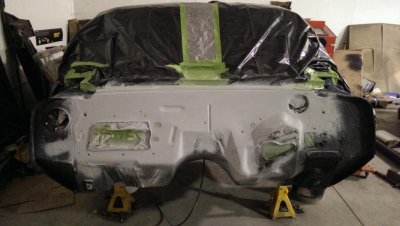
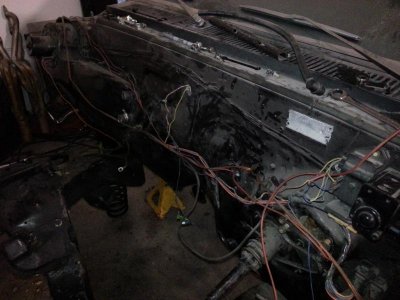
Chebbie firewalls have a face only a mother could love, potmarked with random dimples and tiny indentations all over the place, and a massive seam running straight down the middle slopped over with sealer. I decided that wasn't gonna cut it now that I've gone mopar (guess it raises your standards a little lol), so starting this project quite a while back, I spent a good chunk of time smoothing everything out a bit.
Before:
20140812_224931.jpg

Stripped the sealer, welded the seam every 4-6" where I'd be filling, as well as welding up all the random unused holes
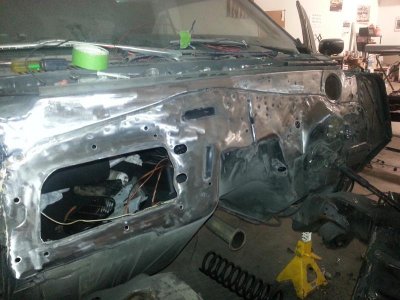
20140820_010421.jpg

Then a thin layer of All-metal over the seam and welds, followed by 3m platinum plus filler, and some quality time with the longblock sanding it all down.
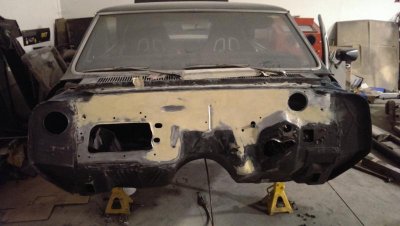
IMAG0736.jpg

Some high build primer and sanding..
IMAG0779.jpg

.. and a fresh couple coats of Hot Rod Flatz Boulevard Black. (The whole car will be repainted with this stuff eventually)
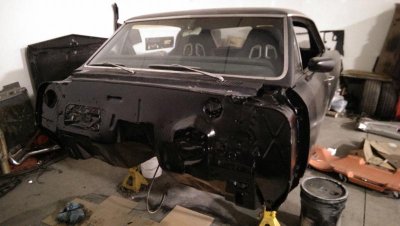
IMAG0791.jpg

Had to keep in mind before painting, I bought a "6 cylinder/ dual quad" camaro throttle pedal to run a Lokar cable rather than the ugly original throttle rod that looked something like Mad Max's leg brace. Doing this, I had to swap the original mounting holes around so the camaro pedal would bolt up. Luckily it ended up working perfect

IMAG0739.jpg

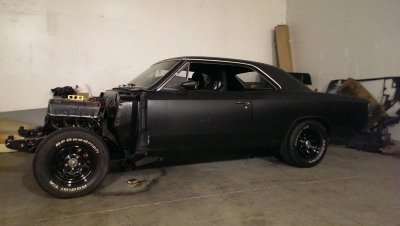
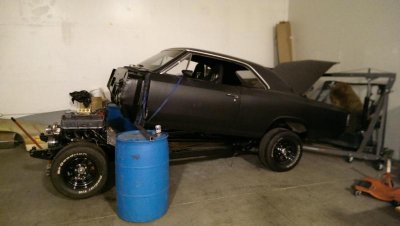
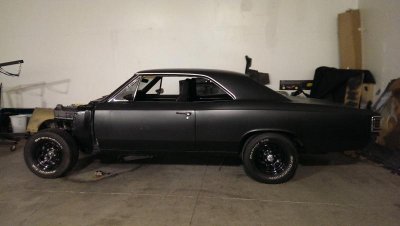
Finally the moment of truth! Called up the neighbors in the next shop over who were nice enough to lend a hand, and dropped the body back on the rolling chassis.
IMAG0891.jpg

Back on the ground for the first time in two and a half years :icon_pray:
IMAG0954.jpg

IMAG0966.jpg

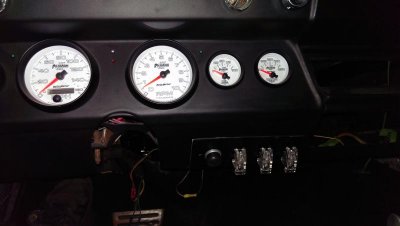
So now that I've rolled past that milestone, it's just a mountain of odds and ends getting back on the road, starting with one solid night just cleaning up under-dash wiring and running the sender wires for my gauges. I'm actually going to do things a little different this time around with the wiring, as I'll have a few more accessories with a B&M line lock, headlight halos, and wanting to have the fuel pump on a toggle switch. So in keeping with the ratty, semi-oldschool-nascar-ish theme, I'll be replacing the ashtray with a switchpanel for that stuff, along with a push button for starter cranking. The way everything will work, I'll still be using the key in the ignition to "arm" everything, flip on the fuel pump (or leave it on if I get lazy), hit the push button for cranking, let it run like normal, and kill it like normal by turning the key off. Just to throw a little unique look to everything, I ended up finding these toggle switches with clear covers and white led's when in "on" position. Think they'll look pretty cool in the car :icon_thumleft:

IMAG1002.jpg

And finally the last bit of progress to report for now, I spent last weekend on the whole front brake system including the B&M line lock I've had sitting in the box for the past 3 years haha. Had to spend almost an hour at Napa going through all their fittings, and another few hours back at the shop bending up my own lines from the straight ones you can buy from Napa. Oh and all the booster/ master cylinder/ brackets/ etc got stripped and repainted with underhood black. Pretty happy with how it all came out

IMAG1058.jpg

IMAG1068.jpg

So I think that's all caught up to where I'm at right now, I'm pushing hard to get this thing back killing tires by Christmas, and at that point I'm looking forward to being all freed up to be back on the Charger. Hope you guys all had an awesome Thanksgiving, now I gotta get caught up on everyone's build threads haha
It's good to be back!
:eek:ccasion14:

IMAG0969_1.jpg
 
Last edited:
Nice welds Speedy and the box looks great, to bad they're going to waste on a Chebbie haha. PM me when you get back to work on Frankenstein, somebodies gotta do it!!!! :poke: At least you'll be all practiced up by then right?
 
Nice welds Speedy and the box looks great, to bad they're going to waste on a Chebbie haha. PM me when you get back to work on Frankenstein, somebodies gotta do it!!!! :poke: At least you'll be all practiced up by then right?
Hey watch it Dev, it's not just a chebbie it's a MSF chebbie, so you know it ain't the average mulletmobile. No car is a waste as long as it's in my hands haha but don't worry if I am back in the driver's seat by Christmas it'll be back to work on frankenstein 100%
 
Definitely made some serious progress and nice work as always Speedy! Like the idea of keeping that cradle and cell nice and low!
 
Definitely made some serious progress and nice work as always Speedy! Like the idea of keeping that cradle and cell nice and low!
Thanks Goon! Not sure if you guys have seen any of the Ken Block Gymkhana videos, but I'll be giving a nod to Hoonigan with this decal slapped across the back of my fuel cell hanging down for all to see lol

IMAG0568.jpg


Got some more tinkering done last night that could apply to any car, my push button for the starter showed up so I figured I might as well get my switch panel figured out. I got lucky with the ashtray being exactly where I wanted the switches, so I taped the switch covers to the front to get an idea of what spacing I wanted.

IMAG1150.jpg

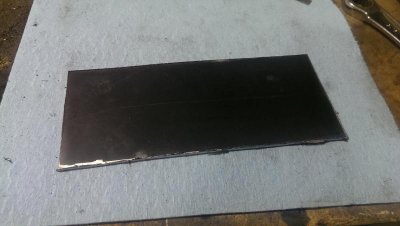
Then when I knew the spacing (ended up being 1 5/8" apart center to center) I added some width for the push button since it wouldn't fit in the ashtray cutout, and cut out my overall dimensions.

IMAG1155.jpg

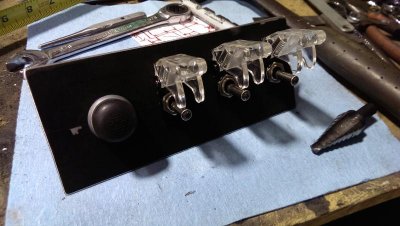
Got all the holes marked and punched out using a step drill.

IMAG1157.jpg

Mocked the switches up first before drilling the push button hole, just to make sure I liked the placement. I picked up the toggle switches on ebay for something like 4 or 5 bucks a piece, and drilling the holes to size (1/2"), there's still just a hair of play for the switches to move around which is nice to get them perfectly squared up.

IMAG1166.jpg

The push button is "Summit Racing" brand but it's funny by the "Push" lettering on the cover you can tell pretty easily it's from Hella. So here's with all the switches mocked up

IMAG1173.jpg

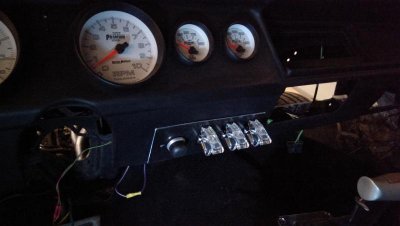
Used my panel as a template for drilling the proverbial "purist kryptonite" hole in the dash for the push button, then threw everything in for a test fit. Liking the placement at this point :icon_thumleft:

IMAG1182.jpg

IMAG1190.jpg

So there it is, pre-school stuff but pretty fun knocking it out and seeing it come out looking halfway decent haha. Just gotta drill the mounting screw holes in each corner and throw some paint on it!
 
Chev's looking pretty slick Speedy! Lotta cool Doo-Dad's & Mod's. Mean looking on top of it. Should be a real beast on the street's.
 
Chev's looking pretty slick Speedy! Lotta cool Doo-Dad's & Mod's. Mean looking on top of it. Should be a real beast on the street's.

Shhhhhhhhhhhhhhhhhhhhhhhhhhhhh, its a Chebbie you can't say it's a beast on here.


I watched most of his videos as well, mans got some skills for sure. Don't worry I'm just busting your balls about the Chebbie, I have a 75 Gran Torino I'm planning on doing in the future (I think they're cool and it has some sentimental value as well being the car that hooked me). The Chevelle does look pretty mean and it's the year I like best.
 
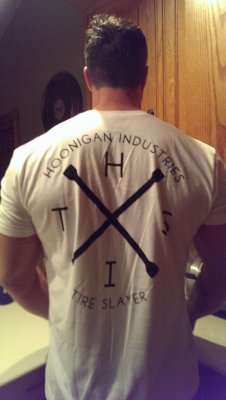
LOL Oh and in response to whether or not I've seen the new Gymkhana Vids Speedy. I just grabbed this shirt and the KILL ALL TIRES when it released! :)

Tire Slayer.jpg
 
Wow! Some great fab work Speedy, that Chevy is gonna rock.
 
Chev's looking pretty slick Speedy! Lotta cool Doo-Dad's & Mod's. Mean looking on top of it. Should be a real beast on the street's.
Thanks Will! Yeah it should be pretty fun! Gonna stick out like a sore thumb being daily driven in the sea of elderly-driven camries and high school subaru kids in my neck of the woods that's for sure lol

Those switches are BADDASS!!
If anyone asks what they're for, I'm just gonna go with "hellfire rockets, oil slick, and ejection seat for passengers thar b!tch about my driving" lol

Shhhhhhhhhhhhhhhhhhhhhhhhhhhhh, its a Chebbie you can't say it's a beast on here.

I watched most of his videos as well, mans got some skills for sure. Don't worry I'm just busting your balls about the Chebbie, I have a 75 Gran Torino I'm planning on doing in the future (I think they're cool and it has some sentimental value as well being the car that hooked me). The Chevelle does look pretty mean and it's the year I like best.
Yeah he's never done too well in the WRC but he's definitely capable of some pretty flash maneuvers lol. Man, first a chebbie and now a ferd being mentioned on this sacred forum? What the hell's fbbo coming to? Hahaha, but I hear ya man and thanks! We all have our non-mopar soft spots! Fun fact on the chebbie, I was actually drawn to it in the first place mostly because it reminded me of a second gen Charger with the roofline and sucked-in rear window, it was the closest I could get at the time. :icon_biggrin: plus it didn't hurt that it was so similar to a 66/67 GTO either I guess haha big fan of them as well

LOL Oh and in response to whether or not I've seen the new Gymkhana Vids Speedy. I just grabbed this shirt and the KILL ALL TIRES when it released! :)

View attachment 226333
Hell yeah goon! Guess we'll both be sporting our love for pavement-painting whenever this whole fbbo buildthread crew is finally roadworthy enough to meet up in Vegas for MATS. Who's down??
:eek:ccasion14:
IMAG1247_1.jpg

Wow! Some great fab work Speedy, that Chevy is gonna rock.
Thanks man! It was a lot of fairly unknown territory for me so it was a fun learning experience for sure. Maybe a one-off tubular K-frame for the Charger is in my future :thinker:
 
Last edited:
Damn Speedy, you have some awesome fabrication skills. Both projects are looking fantastic. That Chevy will be cool and all, but I think the Charger will get all the attention, I am a little biased though lol.
 
Speedy you impress me every-time i see what your up to but man you have my attention with these fab skills, I have no problems with Chevelles having a couple myself in the past, i like the Mopars better and always will, but that 67 is going to be a beast, and besides with you practicing all this on the bow-tie, That Charger already is lookin sweeter buddy rofl... Keep it up man, i said it before some one will see all these skills sometime and want you to take control of a shop, i hear that train ah-comin......
 
Man, sorry guys I'm way behind on the updates. As embarrassing as it is to admit, I realized the fast idle issue was just the electric choke not being hooked up and was stuck on the fast idle cam lol.
:head_smack:
Unfortunately solving that problem I still couldn't get it firing right, so my buddy Mike came by and took a look. He told me the dizzy slot is usually never perfectly parallel with engine centerline like it's supposed to be, but actually just a hair off one way or the other. Sure enough mine was, so we skipped a tooth so it would be just a hair to the opposite side of centerline, fired it off, played with initial timing, and it ended up running the best I've ever heard it run. Kissed 5,500 rpm and was just silky smooth. But then we start tuning idle mixture and Mike notices the ballast resistor is getting super hot, and slowly the engine runs worse and worse until it dies. Not sure on what the problem could be, I've tried replacing the Pertronix coil with the premium Napa one and using a new ballast resistor, with no improvement. Also noticed the coil is getting nearly 10v which is high as far as I know? So in any case I was already planning on going to Mancini's electronic ignition so I'm hoping that will solve the problem. :shruggy:

In other news, my friend Casey came up to visit from San Francisco a few weeks ago and we knocked out a mad thrash on the Charger in a desperate quest for some tiresmoke. No windshield, no doors, no problem lol

View attachment 220901

We got the brake hose issue solved with some backtracing on the specific application for my front brake setup, and an order from Summit for all 3 new hoses including the correct rear one.

View attachment 220902

View attachment 220904

Bench bled the master cylinder, checked all my connections, and went to town bleeding the system. Just a note, I went with dot-4 fluid for its higher boiling point than dot-3, and better price/availability compared to dot-5. Should work just fine for me.

View attachment 220905

View attachment 220907

We got fluid at all 4 corners, the original driver's seat bolted in temporarily, the shifter adjusted, and the driveshaft in, but ended up being defeated by the ignition trouble and some semi-functioning brakes that must still have air somewhere in the lines. But all in all we had a good time and got a lot done on ol' Frankenstein. I'm playing this one a little close to the chest, but I've finally found some seats worthy of the Charger's cockpit, now there's just the challenge of finding a pair I can afford.. :thinker: haha still was an awesome feeling to finally sit in the driver's seat for the first time, looking out the windshield with the shifter in hand and engine running. The time is nigh, gentlemen!

View attachment 220908

Also while Casey was up here, we decided to check out an auction of a stock-car shop just around the corner from my place. Ran into PFG there and there was a big turnout but everything was going CHEAP. Casey scored an aluminum racing seat for $35 and a gocart engine for $25, and I scored a $950 steering box for $10, a set of shocks for $15, and an ATL bladder/case type fuel cell for only $25! Plus we both bought various $10-15 Hoosier/Goodyear slicks, some mounted, and I put mine straight to use in the "living room" lol

View attachment 220911

View attachment 220914

So that's about where the Charger's at for now, and I've been moving along with the Chebbie as well. Finally got the rear end and suspension out and swapped over to the new frame.

View attachment 220916

View attachment 220919
The eagle has landed!
View attachment 220920

Of course the frame I bought is one year earlier than the '67, so the rear springs are different. And as I was getting ready to start boxing the frame, I go to test-fit the engine/trans and naturally the Summit "64-72 Chevelle" high-cap oil pan doesn't clear the engine crossmember :banghead:
"Missed it by that much"
View attachment 220921

So now I'm going with the "doesn't fit? Make it fit" strategy lol speedfreak engineering at work here, hopefully have the frame boxed this weekend

View attachment 220922

And my fellow mopar guys might be pleased to hear, I'm (sort of) bringing a little pentastar to my chebbie in the form of this Jeep Grand Cherokee steering box. It's a great upgrade for the Chevelle, bolts right up, and the ratio goes from 14.4:1 to 12.7:1 with increased road feel feedback through the wheel. Between the box and the adapter kit/ragjoint, I'm all in this corner carving for $150 :icon_thumleft:

View attachment 220923

Speaking of steering, I ended up pulling the trigger on the Prototipo, worth every penny!
View attachment 220924

Oh and I owe a huge thanks to Goon and USArr! Just got my Goon-approved "fer racin" sticker Mike was cool enough to send my way, and it was an awesome surprise to show up in the mail lol you guys rule!

View attachment 220926

More progress to come this weekend, I'll try not to get so far behind this time haha hope everyone's doing well gearing up for the holiday season
:eek:ccasion14:


i dont know if goon told ya but that bad boy decal will add a solid 25hp....lol glad ya like it.

- - - Updated - - -

Glad to see you back after it and getting it closer to driving! Upside down calipers..................Jeez Speedy, I think that Chebbie is rubbing off on you haha. Good luck with the ignition "I WANT TO SEE SOME BURNOUTS NEXT TIME"! Nice welds by the way.

- - - Updated - - -

Oh yeah, I'm a little jealous I never received a "Fer Racin" sticker for my CHARGER. That's pretty cool


whoa whoa whoa, i guess i will fire up the plotter an get one out to you since you added the 3rd pedal. lmao. as for vinyl i think i got flat black, chrome, an few more colors i will have to check. like i said these will add some 25hp at least, an limited edition.
 
Auto Transport Service
Back
Top