• When you click on links to various merchants on this site and make a purchase, this can result in this site earning a commission. Affiliate programs and affiliations include, but are not limited to, the eBay Partner Network.

71 Charger Superbee Tribute/Restomod Build

Some more

IMG_9633.jpg
IMG_9590.jpg
IMG_6022.JPG
IMG_9528.jpg
IMG_9599.jpg
 
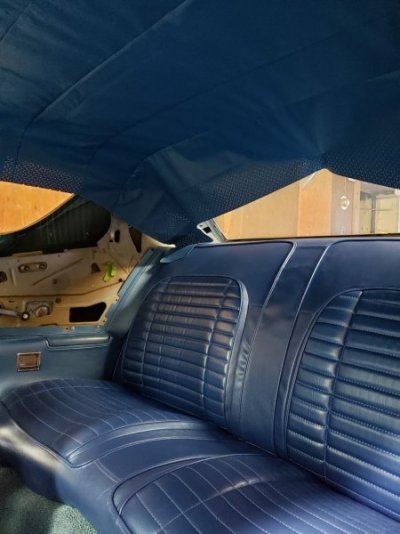
Since my last posts I went through some issues trying to recover the rear seat, the short of it is that I didn't really know what I was doing and essentially was defeated for a few days. Then after thinking it through while working on the headliner in my Challenger I came up with a new game plan which I executed today. Basically I had a bad technique which I corrected and was able to get the back rest cover on. I might work on the bottom tomorrow.

I know I already posed the old seat but I like to see them together. The recover is not perfect but its perfect enough, those creases in the left side (as you are looking at it) I steamed out somewhat.
IMG_9603.jpg
IMG_9652.jpg
 
So I was able to recover the bottom of the back seat, in this case though I just reused the foam. I am not super happy with the creases and such but we are due to get some hot weather this coming week and I am going to put both parts out into the sun for awhile and see if that helps. If not I will remove the cover and work on stretching it some more, I will also put a 1/2" more of foam onto the top of the bottom seat.

IMG_9633.jpg
IMG_9656.jpg
IMG_9657.jpg
IMG_9659.jpg
 
As promised I set those seats out in the sun and it helped a lot, so much so that I will be using them as they are.

On another note, the 572 Hemi Roadrunner is on its way to Australia, it was picked up yesterday and in on its way to long beach CA.

IMG_9711.jpg


IMG_9713.jpg


IMG_9721.jpg
 
I also made some improvements to my 70 Challenger;

Got the headliner tightened up some, still have a couple issues but it is what it is at this point.

Cleaned up the under hood wiring which I have been meaning to do for a long time.

I had to order some new parts such as A pillar covers, door handles, shoulder belt clips, etc.

IMG_9694.jpg
IMG_9695.jpg
IMG_9644.jpg
IMG_9692.jpg
IMG_9693.jpg
 
I also made some improvements to my 70 Challenger;

Got the headliner tightened up some, still have a couple issues but it is what it is at this point.

Cleaned up the under hood wiring which I have been meaning to do for a long time.

I had to order some new parts such as A pillar covers, door handles, shoulder belt clips, etc.

View attachment 1663491View attachment 1663492View attachment 1663493View attachment 1663494View attachment 1663495
71 charger headliner1.jpg Headliners can be a REAL pain. In the head, neck, shoulders, arms, and ***.
 
View attachment 1663584 Headliners can be a REAL pain. In the head, neck, shoulders, arms, and ***.
I've done a few of them now but when I originally did the Challenger that was my first and I didn't know what I didn't know. Now I can get one pretty tight and looking good especially since I just bought a steamer.
 
I decided to see if I could build some bolsters in the stock seat covers. I reused the old foam from the frames but these were actually 70 Challenger seats so the foam was different than a 71 Charger, I modified it to make it work.

The end result is a very tight seat and it does have more pronounced side bolsters but I am not sure if they are enough. I am going to finish both buckets and will make a decision once I get to that point.

IMG_9822.jpg
IMG_9823.jpg
IMG_9825.jpg
 
This I'll be interested to see, I got a pair of factory buckets with the Satellite, but they definitely need more bolster.
 
So here is the back part of the drivers side bucket. I now have to do the passenger side seat plus put all the hardware back on them.

Keep in mind that the seat was originally out of a Challenger and the foam is different as is the side wires and overall design. The frame is the same but the foam and cover are different. I had to basically glue the old foam together (2nd pic) and then recut the slots for the listing wire (one on each side and one across the top). I have added 1/2" of foam to this seat back with another 1/2" on the bolsters. It is not a massive improvement I don't think but it does push the bolsters up some, enough I hope to make a difference in butt/back slide elimination.

IMG_9840.jpg
IMG_9850.jpg
IMG_9851.jpg
IMG_9854.jpg
IMG_9856.jpg
IMG_9858.jpg
IMG_9859.jpg
 
I was able to put the seat out in the sun for a bit which did soften up the wrinkles and make them less obvious but I am perfectly fine with how the seat is not.

I got the seat put completely together to include the runners and am happy with the result, now to do the passenger side.

In reference to the "enhanced" bolster plan, well I was able to put the seat onto something and sit in it just to feel it. I cannot say that the bottom is really that enhanced, a tiny bit perhaps, however the back is better than in stock form and does cradle your back somewhat. Nothing that I would used for repeated road racing or auto crossing but for normal driving they should be good.

On that note and for anyone looking into doing this (adding foam to the bolsters), I will say right now that I would go 1 to 1.5" on top of good foam on the bolsters. I added 1/2" across the entire seat and then another 1/2 on the bolsters but this is with used foam, so new foam would probably yield much different results. On my seat I sincerely believe I could have stuffed another 1/2" in there although it would have been a larger fight to get the cover on and secured.

IMG_9892.jpg
 
Not much to report as of late, the Charger is still outside the shop and the Challenger inside. I decided that I wanted to install a 3.5" touch screen LCD so that I could monitor both fuel pressure and AFR.

Well like all good deeds this one did not go unpunished, turns out that I needed to upgrade the firmware on both the handheld and the ECU and then had to reload the tune (global configuration file aka GCF in Holley speak). This turned out to be a major PIA for some reason.

Oh and for good measure the brand new Optima yellow top decided to take a crap right when I needed it.... Not sure what that was all about but it did manage to bounce back to life after being on an Optima charger all night.

Finally got the car started today and let it run up to operating temp, all was good for awhile and then the AFRs went crazy jumping to 25-35 which means the ECU was trying to compensate by dumping fuel in so it was running fat. I turned the car off and let it cool and then restarted it and the AFRs were good again, but I didn't warm it up to see what would happen.

I did manage to get the seats for the Charger all done finally... lol
 
Nothing to really note on the Charger but I did make some major headway on the Challenger. I ran into some issues when I installed the 3.5 Touch screen LCD into the car to allow me to monitor the ECU/car. There were some firmware issue which gave me some trouble but I was able to work through it through watching YT videos and some help from a couple of guys on the Holley forum.

I want to do a couple more things with the Challenger before I move it out of the shop and bring the Charger back in.

 
Well I finally got the 71 back into the shop. I was able to get the taillight housings somewhat fixed so that I can run normal style bulbs. As some of you remember I went down this whole LED light panel route and while it would work for sure it was just getting to be a PIA having to wire in and package the controller boards.

I am going to use LED 1156 and 1157 bulbs however bc with the repaired housing the bulbs will sit right down on the housing and I am concerned with heat.

IMG_9981.jpg
IMG_9982.jpg
 
Auto Transport Service
Back
Top