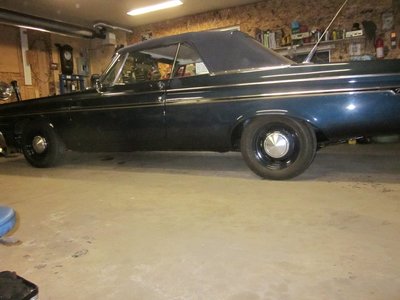
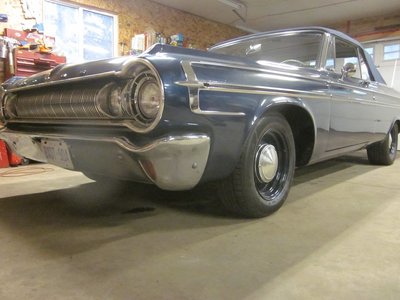
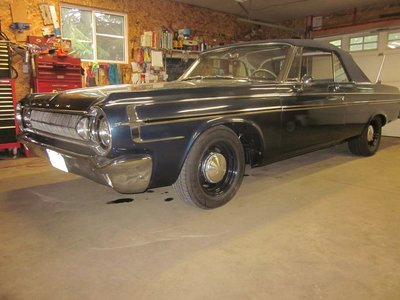
Good news!
Can of rusty worms
- Thread starter Glenwood
- Start date
That's awesome Glen, congrats!!
For timing, total will depend on the quality of gas, compression and temp. With crappy corn gas probably less than 36*
Some guys set total first by reving the motor up until the mechanical is all in, say 36*, then your initial is set as well. I never had luck with this as there was always a better initial.
The advance plate in your distributor is marked with a number, say it is marked 12*. Plate is marked in cam degrees so to get crank degerees times the number by 2. So set your initial with a vacuum gauge to highest vac reading, adjust idle as you go because the more you advance, the higher the idle. Say you get best vacuum at 16*. 12* mech x 2 = 24* + 16 = 40* total. Waaay too much so what most guys do is weld the mech plate to limit mech advance. In this case welding the plate to 10* would get you 36* total (10×2 + 16 = 36).
Oh, and you can check the oil gauge / fuel gauge by momentarily grounding the wire. Pull the wire from sender and ground (with key on) and the gauge should respond. Easy to do with a helper.
If it fails to respond, wiggle the barrel connector on the back of the dash and watch for the gauge to come alive. Those pins suck and may look good but they come loose.
If it fails to respond, wiggle the barrel connector on the back of the dash and watch for the gauge to come alive. Those pins suck and may look good but they come loose.
Glenwood
Well-Known Member
- Local time
- 6:23 AM
- Joined
- Jun 19, 2015
- Messages
- 2,929
- Reaction score
- 2,854
- Location
- Kawartha Lakes, Ontario
Putting on the hood all by myself thanks to this gizmo I bought last year. Pretty roughly made and needs some tweaking but did the job!


Glenwood
Well-Known Member
- Local time
- 6:23 AM
- Joined
- Jun 19, 2015
- Messages
- 2,929
- Reaction score
- 2,854
- Location
- Kawartha Lakes, Ontario
now that's more like it! Lot's of adjusting but got it pretty close.

Glenwood
Well-Known Member
- Local time
- 6:23 AM
- Joined
- Jun 19, 2015
- Messages
- 2,929
- Reaction score
- 2,854
- Location
- Kawartha Lakes, Ontario
That's awesome Glen, congrats!!
For timing, total will depend on the quality of gas, compression and temp. With crappy corn gas probably less than 36*
Some guys set total first by reving the motor up until the mechanical is all in, say 36*, then your initial is set as well. I never had luck with this as there was always a better initial.
The advance plate in your distributor is marked with a number, say it is marked 12*. Plate is marked in cam degrees so to get crank degerees times the number by 2. So set your initial with a vacuum gauge to highest vac reading, adjust idle as you go because the more you advance, the higher the idle. Say you get best vacuum at 16*. 12* mech x 2 = 24* + 16 = 40* total. Waaay too much so what most guys do is weld the mech plate to limit mech advance. In this case welding the plate to 10* would get you 36* total (10×2 + 16 = 36).
Thanks Mark, it's making more sense to me now. I guess to find out the initial when it's past the mark on the timing cover, I need an advance type light right?
Glenwood
Well-Known Member
- Local time
- 6:23 AM
- Joined
- Jun 19, 2015
- Messages
- 2,929
- Reaction score
- 2,854
- Location
- Kawartha Lakes, Ontario
That bad boy needs a SS Grille!!
I agree! I love those grills. I think a scoop might be in its distant future.
Anyone know if the hood trim should be black down the center to match the side and trunk trim?
Took her out for a test run and the brakes work! I think the kickdown needs adjusting. The open manifolds are so loud I couldn't tell if the gears were shifting properly lol.
Thanks Mark, it's making more sense to me now. I guess to find out the initial when it's past the mark on the timing cover, I need an advance type light right?
I would stick with a regular light. If you still have the timing tape just glue at least 50 degrees advanced onto the balancer. Or you can use the tape to mark degree increments with a sharpe marker. Once idle is set to highest vacuum check it with the light to determine what your mechanical needs to be.
miller
Well-Known Member
Great hearing you've got the engine run in! The timing, yeah, the quote is one way. All in all, it's about giving the motor what it wants, and going by the fuel used. Know that sounds vague, but it works. Every engine is different...and it will tell you. Funny thing, on mine, just basic set-up, refuses to ping. But, I haven't had mine on the road, yet.Some say to advance the timing at idle (800 rpm?) with the vacuum advance disconnected until the engine starts to ping and then back off.
Sixtynine_Bird
Well-Known Member
Nice job  you must be pride of you
Glenwood
Well-Known Member
- Local time
- 6:23 AM
- Joined
- Jun 19, 2015
- Messages
- 2,929
- Reaction score
- 2,854
- Location
- Kawartha Lakes, Ontario
Nice jobyou must be pride of you
merci mon ami! (sorry after 12 years of French in school, that's about all I retained!)
Glenwood
Well-Known Member
- Local time
- 6:23 AM
- Joined
- Jun 19, 2015
- Messages
- 2,929
- Reaction score
- 2,854
- Location
- Kawartha Lakes, Ontario
here's a few updates...
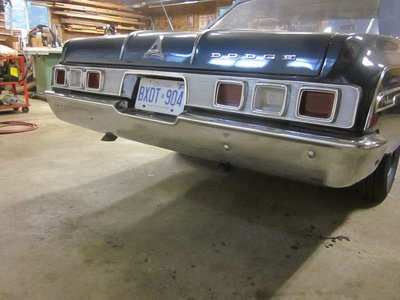
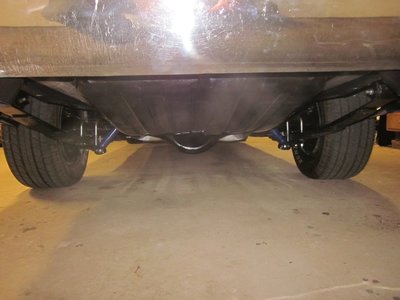
The exhaust was installed last week, but took a few extra days due to parts, so the alignment was not done and I decided to trailer it back home. They did a nice job on the 2-1/2" pipes with magniflows. They are pretty quiet but there is definitely a drone at about 1800 rpm. Something I may need to deal with later if I find it intolerable.
The shop that did the exhaust has been in business nearly 50 years by the same owner. A nice old guy who seems to just love coming to work, still in his uniform. He had the pipes tucked up nicely as I requested and brought the tips just below the bumper like I wanted. Then he painted the tips black for some reason and I'm not sure I like that but left it for now.


Glenwood
Well-Known Member
- Local time
- 6:23 AM
- Joined
- Jun 19, 2015
- Messages
- 2,929
- Reaction score
- 2,854
- Location
- Kawartha Lakes, Ontario
miller
Well-Known Member
Looking good!
I put tti 2 1/2" pipes on mine, with h-pipe. One slight leak at the head pipe, I have to deal with...but, that's another story.
Wonder if you have the same prob(?) I have? My better half says, she 'will' drive it, once ready to go!
I put tti 2 1/2" pipes on mine, with h-pipe. One slight leak at the head pipe, I have to deal with...but, that's another story.
Wonder if you have the same prob(?) I have? My better half says, she 'will' drive it, once ready to go!
Glenwood
Well-Known Member
- Local time
- 6:23 AM
- Joined
- Jun 19, 2015
- Messages
- 2,929
- Reaction score
- 2,854
- Location
- Kawartha Lakes, Ontario
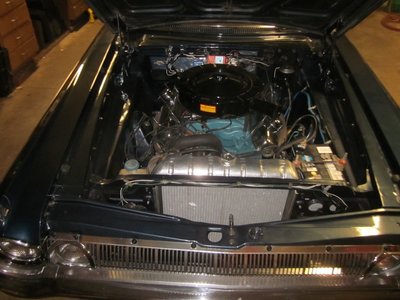
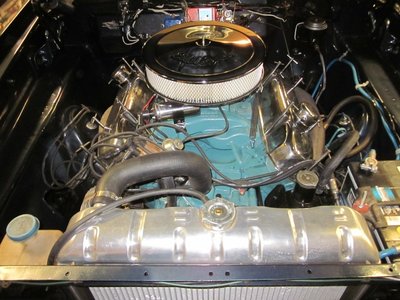
I used a 65 breather I bought of a member and like the look. It does not drop below the 750 edel carb by much at all but still cleared the hood with a 3-1/2" filter, even with the performer 440 alum intake. I plan to trim the snout off and chrome it in the future. I bought an edel 1221 dropbase breather and used the base and 3" filter below the 65 top. So it is unsilenced. I could not use my new mopar performance black rocker covers or moroso gaskets unfortunately. The right cover hits the hp manifold.
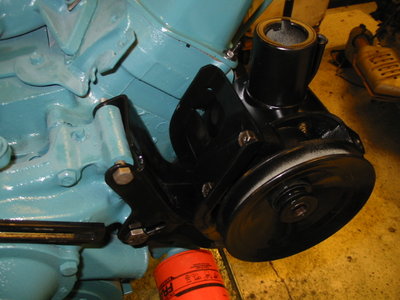
Having powersteering pump issues. It leaks around the seam, so needs a new oring/gasket I guess. The bigger problem is the pulley won't stay tight and the angle causes the belt to rub on the fan pulley. This pump has two pivot points, which makes it tough for adjustments. The lower pivot has a long bolt that passes through the two brackets sandwiched together, but won't stay tight. I'm wondering if there is supposed to be a sleeve like on an alternator. I think a slightly shorter belt will correct the angle and stop the rubbing. Otherwise it is working ok.
![DSCF4502[1].JPG DSCF4502[1].JPG](https://www.forbbodiesonly.com/moparforum/data/attachments/426/426623-155f4c35af3fc46b90289a76ba902671.jpg)
Having powersteering pump issues. It leaks around the seam, so needs a new oring/gasket I guess. The bigger problem is the pulley won't stay tight and the angle causes the belt to rub on the fan pulley. This pump has two pivot points, which makes it tough for adjustments. The lower pivot has a long bolt that passes through the two brackets sandwiched together, but won't stay tight. I'm wondering if there is supposed to be a sleeve like on an alternator. I think a slightly shorter belt will correct the angle and stop the rubbing. Otherwise it is working ok.


![DSCF4502[1].JPG DSCF4502[1].JPG](https://www.forbbodiesonly.com/moparforum/data/attachments/426/426623-155f4c35af3fc46b90289a76ba902671.jpg)
Glenwood
Well-Known Member
- Local time
- 6:23 AM
- Joined
- Jun 19, 2015
- Messages
- 2,929
- Reaction score
- 2,854
- Location
- Kawartha Lakes, Ontario
Looking good!
I put tti 2 1/2" pipes on mine, with h-pipe. One slight leak at the head pipe, I have to deal with...but, that's another story.
Wonder if you have the same prob(?) I have? My better half says, she 'will' drive it, once ready to go!
I'm not sure why there is that drone, but I've read that it has to due with frequencies through the tail pipes? I don't know.
Glenwood
Well-Known Member
- Local time
- 6:23 AM
- Joined
- Jun 19, 2015
- Messages
- 2,929
- Reaction score
- 2,854
- Location
- Kawartha Lakes, Ontario
During some test driving, I also notice some vibration when I let off the throttle. The driveshaft is the stock b&t sb poly and will be replaced. The pinion angle looks wrong by about 3-4* to me. I plan to take it to a driveline shop soon to have it looked at and make a new shaft.
Glenwood
Well-Known Member
- Local time
- 6:23 AM
- Joined
- Jun 19, 2015
- Messages
- 2,929
- Reaction score
- 2,854
- Location
- Kawartha Lakes, Ontario
I've been messing with the kickdown and seemed to have it shifting properly (at about 2000rpm), but I don't know at what speeds since the speedo is off and a bit jittery. I'll use a gps soon to see where it is shifting.
I've trying to tune the 413. The timing tape flew off in the first 30 seconds of the cam breakin, so I wasn't sure where I set it lol. I did it by feel/sound and found that I had set it to 12-13* initial when I glued a new tape on from MSD. Not bad! That's with the vac advance unplugged at about 700rpm. When I plug the vac advance back to the carb, the timing jumps to over 30*. Didn't think idle was supposed to advance it. I think it's connected to the port recommended by edelbrock. Something I have to look at. The overall timings seems to be over 40* though, so I have more work to do here. Otherwise it starts and runs ok.
I have a bigger concern right now. I noticed some potential problems while changing out the valve springs. a couple of the exhaust pushrods seemed to get worn from the breakin and were a tad sharper than I remember below the rockers. No pics, but I plan to pull the rockers again to look at their condition after a few miles have now been put on. I did not check preload when assembling the motor (mostly because I didn't understand it yet!), nor did I check the the pushrod length requirements. I assumed (wrongly) that was for solid cams, not hydraulics. After much reading lately, I can see how these mistakes can lead to a catastrophe if left unchecked.
I'm wondering if my stock stamped rockers are going to be inadequate for my cam. It is a lunati 60603 .494I/.513E. I'm using comp 911-16 springs.
Also, can the preload be checked with the valve train still bolted up using a dial indicator?
For the vac advance, if you plug it into the manifold vacuum it will advance more at idle. If you plug into ported, it doesn't change the idle rpm or initial timing. My poly is plugged into ported and runs fine. My gtx is plugged into manifold and runs fine. For BB motors everyone says 36* total is the magic number of total advance. With us in the states, non ethonol blend gas is rare so pinging is more of a concern the higher we go. I really hate corn gas.
Good luch on the drivetrain. Hope it isn't a concern with your cam.
Good luch on the drivetrain. Hope it isn't a concern with your cam.
Similar threads
- Replies
- 9
- Views
- 596
- Replies
- 12
- Views
- 2K
- Replies
- 2
- Views
- 1K

