• When you click on links to various merchants on this site and make a purchase, this can result in this site earning a commission. Affiliate programs and affiliations include, but are not limited to, the eBay Partner Network.

Can of rusty worms

Also, can the preload be checked with the valve train still bolted up using a dial indicator?
No. I'm sure you've already seen this, but if it helps...

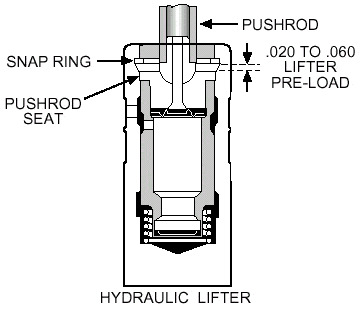
hydraulic-lifter-breakdown.gif

Where you see the preload 'gap', the main reasons for it, is this...it allows that gap to 1) keep the cup of the tappet, from making contact with the retainer ring. 2) allow the working travel of the cup/tappet body, to work as designed.
The length of the push rods, 'set' that preload (gap), and is measured using a gauge to measure the actual gap.

Using a dial indicator is only going to show you the travel the cup has, inside the tappet body, past the preload.
 
Last edited:
I used a 65 breather I bought of a member and like the look. It does not drop below the 750 edel carb by much at all but still cleared the hood with a 3-1/2" filter, even with the performer 440 alum intake. I plan to trim the snout off and chrome it in the future. I bought an edel 1221 dropbase breather and used the base and 3" filter below the 65 top. So it is unsilenced. I could not use my new mopar performance black rocker covers or moroso gaskets unfortunately. The right cover hits the hp manifold.
Having powersteering pump issues. It leaks around the seam, so needs a new oring/gasket I guess. The bigger problem is the pulley won't stay tight and the angle causes the belt to rub on the fan pulley. This pump has two pivot points, which makes it tough for adjustments. The lower pivot has a long bolt that passes through the two brackets sandwiched together, but won't stay tight. I'm wondering if there is supposed to be a sleeve like on an alternator. I think a slightly shorter belt will correct the angle and stop the rubbing. Otherwise it is working ok.

View attachment 498465 View attachment 498466 View attachment 498467 View attachment 498468
Hey, I see your aluminum radiator does it cool good or too soon to tell.
 
Hey, I see your aluminum radiator does it cool good or too soon to tell.

So far so good. The temperature stays in the middle of 'NORMAL' on the original gauge, but goes up a little and back down as the stat seems to open and close. It's a two 1" core OER.
 
Any chance of a pic, or two?

I managed to take a couple as I pulled it apart yesterday. What a day! I started removing the covers and the kid calls with a breakdown of her civic. So I dropped everything and picked up an ignition coil and coolant. The car is eating antifreeze like no tomorrow. Looks like she has a bad head gasket and maybe warped the head. That'll be this week's project!

back to the fun stuff.
I pulled the rockers and did not find any further wear of any of the parts thankfully! The rockers have a slight 'chafing' similar to some other old ones from a 452 head I have. This chafe at the base of the rocker's pushrod socket is probably what nibbles away at the pushrod. When I first noticed the wear on two rods only, I flipped them around and no further wear is apparent after 20 miles. I think they are ok for now, but I will likely replace the rods and rockers at some point.

IMG_4725.JPG


IMG_4728.JPG
IMG_4730.JPG


What I first noticed one two rods.

IMG_4731.JPG


other side of same rod after I flipped it.

IMG_4733.JPG


IMG_4734.JPG

old rocker from452 head.

IMG_4735.JPG
 
old rocker from452 head.
The wear pattern on the 452 rocker looks pretty normal. The ones on your 413 don't. Should I assume you used the stock push rods off the motor? At least on the two you mention. Might consider changing those two rockers, and push rods.

For what it's worth, your cam exhaust lift, being over .500, sure will test the stock valve train. How well it holds up, with that much lift, others might chime in.
Don't swap around lifters, but how do they look...and the cam lobes?

You can get an idea what your tappet preload is, by locating a cam lobe, with the tappet on the lobe's base circle (lowest spot). That's with the valve train in place. Then simply use a wire gauge, of sorts, to measure that mentioned gap, between the top of the tappet cup, and the retaining ring.
 
For what it's worth, Glen. I had the same p/s pump bracket you have mounted up. Didn't like the way it fit, besides not letting the pulley line up. Used one (of 3) of the other type brackets, finally making it work.
The p/s pump leak, easy fix, unless the seal behind the pulley is leaking. Just a big o-ring on the housing.

I added a sleeve yesterday and replaced the bolt with a grade 8 bolt & nylock nut which seemed to help a bit. It's a tight squeeze to adjust the pump because the hp line hits the battery tray when I try to drop it down a tad to keep the belt from rubbing the fan pulley. Finding the right belt is another adventure! It's tolerable but a bit of a nuisance. I have to figure out what pump I have and find gaskets/orings for it. The pulley shaft seal seems to be okay so far.

Still looking at options for rockers. Took it for a drive yesterday with the top down as the weather was great for a change. It drives great aside from a few minor things. Alignment is scheduled for Friday. I hope the weather holds. It has been a very stormy summer up here so far this year.
 
merci mon ami! (sorry after 12 years of French in school, that's about all I retained!)

That is perfect! :thumbsup:

I'm sorry actually cause I wrote "pride" instead of proud! I just saw that when I was reading your post! --'

Love the stance and everything! :) glad to see another resto project done!
 
TRW pump...about the same as mine.
Had about the same problem on mine, hp hose against the battery tray. New hose, little longer than the original. Aimed the bent metal part towards the rear, between pump and tray, put a twist in the hose, to keep it clear of the exhaust.
 
weather was nice Saturday morning, so I dropped the top and took my daughter to work. During the trip, I ran out of gas though it was a little sooner than I expected. With no gas gauge, I figured on about 7-9 mpg and was pretty close, even with my odometer off. Thankfully, I carried a few gallons extra with me, so now I know about how far I can get. In the process, I think I fried my starter, or at least pushed it over the edge.
Got to a gas station and put a little more in the tank. I'm trying to keep it low to pull the sender this weekend, so didn't want to fill it. Dropped her off at work and stopped to pick up something and that was it...the starter crapped out!
Bypassed the new cables to make sure it wasn't them, and tried thumping the starter but no go. A guy stopped by to help in a nice Galaxy with a thunderbolt hood, I think he'd called it. Not a ford fan, but it was nice looking, around a 63-64 I'd guess.
Anyway, got my son to come by so I could pick up some tools, a jack and a new dakota starter while he babysat the car. Got back, dropped the starter and went to install the new mini but would not fit! The wire relocation copper bars hit the block. So I removed it and carefully wired it to the starter terminals as the post is close to the block. Went to insert the starter back in and nope...won't fit! ugh!!!! Gave up an called a tow truck, some 6 hours and $200 later.
 
After some reading of old posts (thanks fbbo!), I found that some blocks have to be modified a bit to fit the fatter mini starters. So that was today's mission!

I used the one I had from the poly since it looked like a fairly new bosch starter.
IMG_4818.JPG


compared to the mini.

IMG_4819.JPG


with the relocation block

IMG_4820.JPG


found the problem! the connection to the field coils over heated and melted the threaded crimp. It may have been loose or corroded, or maybe it the new engine was too much for it. The commutator and brushes look good though.
IMG_4821.JPG

IMG_4822.JPG
IMG_4823.JPG
 
So now for the mini...

Here's the interference with the block. The top hole won't align, as I found out yesterday. The problem area is the curved portion of the block that the starter passes through.

IMG_4837.JPG
IMG_4839.JPG
IMG_4841.JPG


Marked the area with a marker and a few minutes with the die grinder did the trick. This picture is a little deceiving due to the camera angle. The portion I carved was at about the 8 o'clock.

IMG_4849.JPG


IMG_4847.JPG
IMG_4848.JPG
IMG_4844.JPG
 
Last edited:
Now for the wiring. The starter posts are a bit too close to the block for my liking. You can probably by a kit online and I saw a thread here for a kit someone makes and sells for $20. Good value imo. However, I decided to modify the one the starter came with.

I basically split it in two, trimmed some of the encapsulated plastic and bent the copper bar to reposition it. Worked fine.

IMG_4850.JPG


The stud on the relocation bar actually came loose. It was lightly soldered and would have been a pain to tighten or loosen after it broke loose, so I soldered it much better to the bar. I covered the exposed copper with electrician's rubber tape, then PVC tape as we do with our 600 volt splices. Attached the wiring and she fired right up!
 
No on to the fuel sender. Popped it out and took a look.
I thought the float may have gotten stuck or had a pin hole, so I checked the resistance...no change through the full stroke. Time to pop it open.
I'm no expert, but I think that little copper or brass bar is supposed to be connected to something!

IMG_4851.JPG


IMG_4852.JPG
IMG_4853.JPG


Looks like I'll have to order one after all...
 
Are we ever really done working on these cars?

Was that starter new? I would guess loose connection causing way too much resistance.
 
Are we ever really done working on these cars?

Was that starter new? I would guess loose connection causing way too much resistance.

No, I don't think it ever really ends. It's been quite a while since I changed a starter in a parking lot. I much prefer the shop lol!

A loose connection would definitely add resistance and be a hot spot. I don't know if it was new, but it doesn't look worn.
 
Auto Transport Service
Back
Top