• When you click on links to various merchants on this site and make a purchase, this can result in this site earning a commission. Affiliate programs and affiliations include, but are not limited to, the eBay Partner Network.

My 1967 Belvedere Convertible Plans and Restoration (aka - Mad Scientist Build)

Good looking weld on those connectors...somebody is learning!

WOW - KB, thanks a bunch ( I'm working on it ! ) . . . coming from you, that's great to hear ! !

If you say they look like I'm learning . . . Then I guess I'm learning ! ! ! That made my day ! ! !
 
Yep, Me watching!! :)

Now that's a scary thought . . . you're learning from "this" rookie ? ! ? LOL . . . Thanks Ron !

I haven't disappeared, just been doing a lot of little things, welding up small holes in the engine compartment, of course, grinding down the welds, adding additional weld in the wheel wells, and engine compartment. Still doing some clean up on the whole front end clip, preparing to shoot it with self etching and epoxy primer.

Just about at the point where I need to pull the windshield trim and windshield so I can get the dash out. Got some holes in the firewall that need to get welded shut and don't want to do it with the dash ( and insulation ) still in place - I like my CAR ! Trying to find a post with pics on how to remove trim . . . no luck yet. Read posts on how, but seeing what the trim clips looked like and now to "un-clip" them would make the job easier.

And another question - When you paint the wheel wells and engine compartment, do you do that with single stage, or do you use the same base/clear that you paint the whole body. ( I'm thinking that base/clear is how I'm going on this car ) . . . still trying to learn all this stuff ! ! !
 
Just about at the point where I need to pull the windshield trim and windshield so I can get the dash out. Got some holes in the firewall that need to get welded shut and don't want to do it with the dash ( and insulation ) still in place - I like my CAR ! Trying to find a post with pics on how to remove trim . . . no luck yet. Read posts on how, but seeing what the trim clips looked like and now to "un-clip" them would make the job easier.

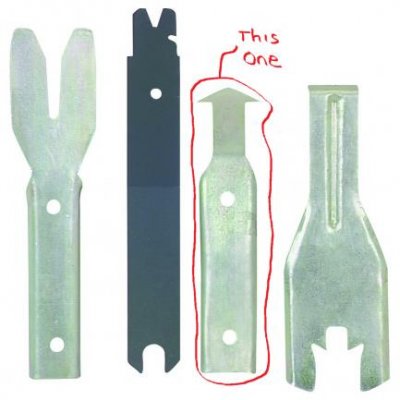
Well I wish I had taken photos for you of this process. I did it on the parts car first for practice and then moved to the real car....but it was pretty easy with the right tool.


Untitled.jpg

I bought the set you see there and the one i circled worked like a charm. Just slide it under the trim and use the little hook edge to hook the clip on the back side and then pry out a bit, it should release and then you just gently pull up on the trim. Rinse and repeat. You can also use the tool to pull up a touch on the trim and use a flashlight to look in the crack, the trim is more resilient then you may think. I have done this 3 times now...haha. Which also means I have lots of extra trim, though I don't know if sedan trim fits the windshield of a convertible
 
Go to advance search for trim removal and it will probably take you to 71airgrabber's thread. He has a great how-to.
 
Well I wish I had taken photos for you of this process. I did it on the parts car first for practice and then moved to the real car....but it was pretty easy with the right tool.

I bought the set you see there and the one i circled worked like a charm. Just slide it under the trim and use the little hook edge to hook the clip on the back side and then pry out a bit, it should release and then you just gently pull up on the trim. Rinse and repeat. You can also use the tool to pull up a touch on the trim and use a flashlight to look in the crack, the trim is more resilient then you may think. I have done this 3 times now...haha. Which also means I have lots of extra trim, though I don't know if sedan trim fits the windshield of a convertible

Thanks KB . . . Looks like I'll be looking for trim tools . . . can you guess what I might be doing this weekend ? ?

- - - Updated - - -

Go to advance search for trim removal and it will probably take you to 71airgrabber's thread. He has a great how-to.

Thanks Roadrunnerman - I've been searching through posts trying to find just that - I did find it - and that'll help. I'll also add some pictures in this thread on "how to" . . . can't hurt.

Thanks a bunch for the pointer ( can't tell you how many threads I've searched through already - ( sigh ) ) . . .
 
I used a single stage paint for the jams, under hood, trunk, etc on a car I did years ago and it never looked anywhere near as good as the exterior base clear. On my current project I used spray on bedliner (two part) for the whole underside, floors, fender wells, etc and the same base clear for everything else. Base clear holds up allot better plus you have the benefit of buffing the clear without disturbing the base especially if t's metal flake. Progress looks great, nice frame connectors "looks like allot of welding". Enjoy
 
Watch clearing out some brush in the area in front of my house and found a yellow jacket nest by accident. Not sure where it was. Was being attacked by "something" and kept swatting them away - then moved away from the area to see if they'd leave me alone. That's when one of those buggers bit me on the stomach - and looking down at my shirt and pants, there were about 20-30 of them on me "trying" to sting me. Thank goodness they couldn't get through my jeans or double shirts that I was wearing ( or they luckily picked the sports where I had room to spare ). Let the swatting begin - they would not go away, so I grabbed them, one at a time with my leather gloved and terminated them. Took about 10-15 minutes till they were all gone - and more showed up as I was clearing the ones that had already landed on me. Argh ! ! ! Luckily, the ends result was only one sting - but on my stomach - and it's bright red.

Boy those little buggers are bad news ! !

Nice work and I'm glad you are OK. Those bastards can be really bad news and you found out. Could have been much worse.
 
I used a single stage paint for the jams, under hood, trunk, etc on a car I did years ago and it never looked anywhere near as good as the exterior base clear. On my current project I used spray on bedliner (two part) for the whole underside, floors, fender wells, etc and the same base clear for everything else. Base clear holds up allot better plus you have the benefit of buffing the clear without disturbing the base especially if t's metal flake. Progress looks great, nice frame connectors "looks like allot of welding". Enjoy

Thanks 747Mopar - was going to PM you and ask ( your car looks AWESOME - what color is it . . . oh yeah ORANGE ! ) and ask what you used. Sounds like I've got my work cut out for me, not a painter ( yet ), and going to base / clear the engine compartment, under the car, and wheel wells . . . Oh boy ! ! ! Bring it on ! ! !

Sound like the way to make it look the best ! ! That's what I'm looking for. Thanks again 747Mopar
 
There's allot of options out there but I've found that the cheaper paints like PPG's Omni line of paints work well but the good stuff covers with allot less coats. I used House of Kolors Tangelo Pearl with Galaxy Grey for the stripe and can say it's some really good stuff especially the clear. I'd just recommend using a really good clear and not mixing brands "don't ask me how I know" sore subject. Can't wait to see some color on it.
 
Yes, very lucky. Got stung about 25 times years ago, worried the next one could be "really bad".

I'll have to go check them, not sure they say on them . . . but I'd have to guess they're more than 1000 pounds rating - they're pretty stout ! ! And HEAVY ! ! !

Glad your ok! I never used to have any problems with bees when stung but the last time i ended up in the ER, couldn't feel my lips, wife said my eyes looked like something out of a scary movie and had a hard time breathing, bad stuff! yellow jackets and i have a understanding, i stay away from them unless im armed with bee spray in both hands!

- - - Updated - - -

Thanks 747, im going to check into House of Kolors, no hurry with me but sounds like the way to go, cheap isint always the way to go.. remember my grandpap sayin "Pay me now or pay me later, but you will pay me!"
 
Got some new shineys . . . gotta love that !

Well the collection of parts has begun and I've got some new shineys to share with you . . .

First, the new flywheel . . .

sm_flywheel.jpg

The new bell housing . . .

sm_bellhousing.jpg

New clutch and pressure plate . . .

sm_clutchpressureplate.jpg

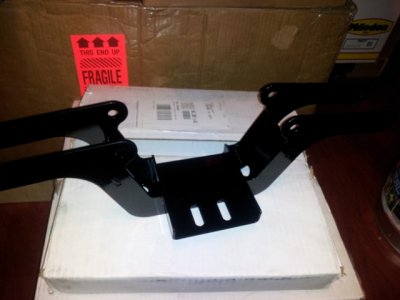
new transmission cross member to hold the Tremec 5-speed . . .

sm_crossmember.jpg

And a collection of other parts to go along with the build . . .

sm_moreparts.jpg

Hope to be able to get started putting together the engine, truing up the bell housing, and getting the hydraulic clutch all installed . . .

It's so nice to get new shineys for the "toy" ! ! ( SMILE )
 
Glad your ok! I never used to have any problems with bees when stung but the last time i ended up in the ER, couldn't feel my lips, wife said my eyes looked like something out of a scary movie and had a hard time breathing, bad stuff! yellow jackets and i have a understanding, i stay away from them unless im armed with bee spray in both hands!

- - - Updated - - -

Thanks 747, im going to check into House of Kolors, no hurry with me but sounds like the way to go, cheap isint always the way to go.. remember my grandpap sayin "Pay me now or pay me later, but you will pay me!"

I'm always afraid the next sting will send me to the ER too . . .

Agreed on the "pay me now or pay me later" . . . I'd say I've learned, but every now and then I screw up . . . I'm human ! ! ! ( can't help that )

- - - Updated - - -

Very nice little treasure trove you have there. Looking forward to this!

Thanks Tallhair . . . getting excited to start putting it together . . . still got a long way to go though, one step at a time ! ! !
 
Wow, Thats a shiny cool collection of parts of parts there! The Tremec is a good trans ive heard, Love seeing all the new parts! Very good man, your coming along great with this build!! :) Fun-ah-comin He haw!
 
Nice looking pile of parts - looks like Christmas came early.
 
Nice looking pile of parts - looks like Christmas came early.

YES IT DID . . . ( BIG SMILE ) . . . fun stuff ! ! ! Thanks H2E ! ! !

- - - Updated - - -

Wow, Thats a shiny cool collection of parts of parts there! The Tremec is a good trans ive heard, Love seeing all the new parts! Very good man, your coming along great with this build!! :) Fun-ah-comin He haw!

This site sure helps to keep one motivated . . . seeing all the fantastic work that's being done, and the end results - absolutely amazing.

I know I'm a ways out, but I'm greatly looking forward to the day when these parts are going "into" the shell, and the day I can fire it up and drive it ! ! !
 
Me Likey...

One day we will be able to take a cruise together and confuse people with our shift knobs that both have a "5" on them.
 
Me Likey...

One day we will be able to take a cruise together and confuse people with our shift knobs that both have a "5" on them.

And Yeah, it's got a Hemi ! ! ! That would be pretty cool ! ! Looking forward tot hat day KB ! !

- - - Updated - - -

Well, this last week had a couple frosty mornings, and the trees have decided to drop "most" of their leaves in unison. I can barely see my driveway, and I've got to get all these leaves picked up and moved to my mulch pile - gonna be a busy day today with that. Hopefully, I can get most of it knocked out today, and then get out to the shop tonight when it gets dark . . . oh yeah, that's about 6:30 these days . . . UGH !

Maybe tomorrow will be a shop/car day - to allow me to make some progress . . .

Leaves here I come ! ! !
 
Get a big tarp and rake them all onto that then secure it and pull it over to your mulch pile. Works great for picking up sticks too or clippings off the shrubs and trees etc.
 
Auto Transport Service
Back
Top