You are using an out of date browser. It may not display this or other websites correctly.
You should upgrade or use an alternative browser.
You should upgrade or use an alternative browser.
My 1967 Belvedere Convertible Plans and Restoration (aka - Mad Scientist Build)
- Thread starter conv67bdere
- Start date
- Local time
- 10:22 AM
- Joined
- Jan 1, 2013
- Messages
- 8,038
- Reaction score
- 3,467
- Location
- Mascoutah, Illinois
I'm thinking so but will let others advise on the right kind.
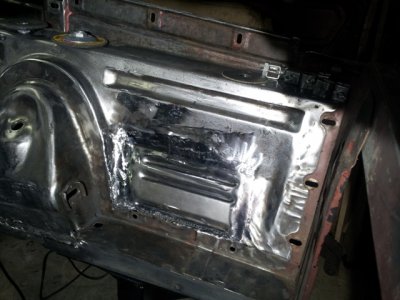
The stiffening creases are gonna look pretty good there .. looks like its meant to be (everybody loves Raymond ref )
)
The stiffening creases are gonna look pretty good there .. looks like its meant to be (everybody loves Raymond ref
That looks really nice, I think once you get it primed and sanded it will look like it was made that way. P.S epoxy primer is great for doing those areas, high build, levels nicely, superior adhesion, and provides great protection against rust. Omni makes an affordable one that works really well (Omni is PPG's economy line of products).
Finally got to my lower core support . . .
Been putting off the lower core support as I didn't know which direction to go with it. The directions show that the holes in the new support are weldments for attaching to the old support - I kinda liked the look of the holes myself. Since I'd already bought the replacement from US Car Tools - I decided to take a stab at doing it "my" way and see how the thing turns out - worse case, I have to buy a replacement core support.
Since it was a nice day ( the sun was shining and it wasn't raining - it did get up to 50 ) I was able to open the shop door and work on the lower core support.
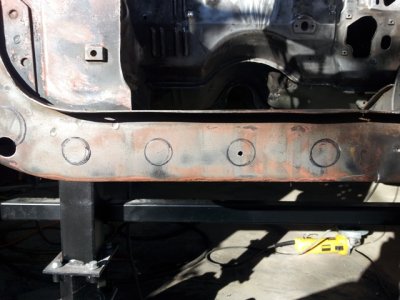
Here's what I've come up with so far: I set the support up and marked the holes on the old support:
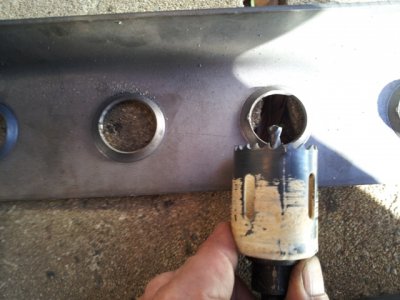
The dimpled holes required a bit more room so the metal will lay flat together new-old. Here's the hole saw I needed for the lower holes:
( you can see in the pic how it'll clear the edges of the dimples )
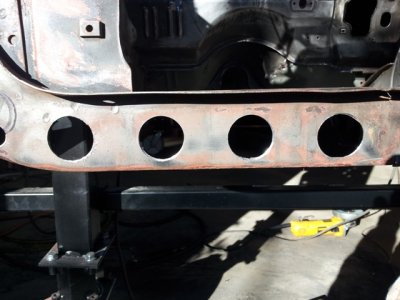
Now the easy part - drill out the holes and check the fit ( and see how it'll look ). Not too bad ! ! !
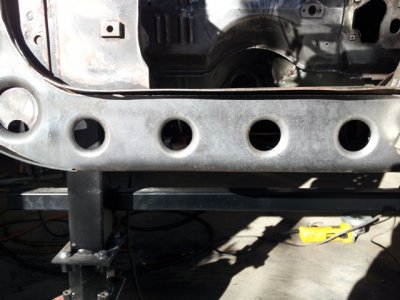
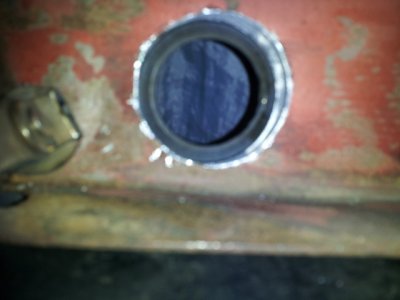
From the back ( sorry it's blurry - should have backed off more ) - you can see I've got plenty of room to clear the dimples and weld too:
This one was going to be fun - the center hole has "no" metal to hold the centering bit in place ( here's a trick I've developed )

Drill a hole in a piece of plywood and clamp the plywood to the metal where it needs to go ( the plywood is now the "guide" ) - and drill:
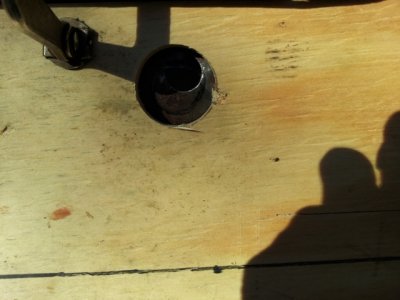
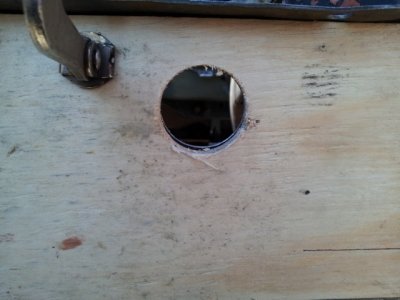
And the hole is where you need it to be - works like a charm ! ! !

Here's the drilled out hole - you can see how the centering bit barely grazed the edge of the metal ( think that would have worked - NOT ! )
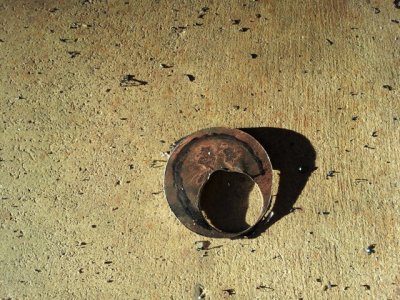
Check the support and see how it looks - now what to do with the other holes . . .

Decided to only drill out one more hole - so that it'll be part of what can show through. I'll explain why in the next pictures.
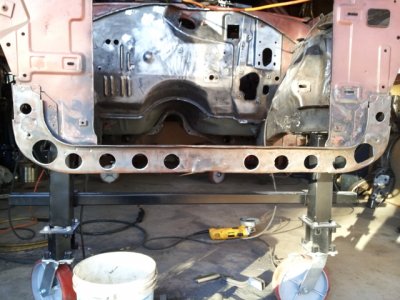
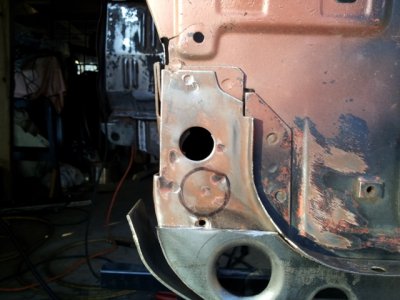
This part of the support I decided needed to come off - it's over the frame and I didn't want to make a bigger hole there, and it covers up a screw hole that holds a splash guard that attaches down here on the lower core support. So off it came - and it'll leave access to the bolt holes.

And the final fitting to see how it's going to look . . . I think this will work.
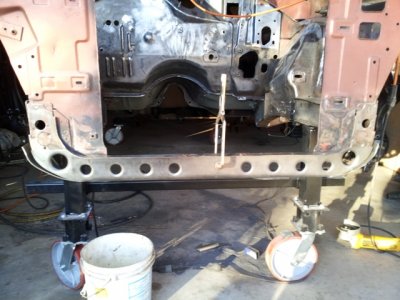
Now I'll just need to work on the alignment and make sure it gets welded in true and square - more welding practice ! ! !
This new support is about 1/8 thick ( much thicker than the original support ) and I left the original top, and bottom, which forms (2) angle braces ( looks more like a Z-beam than an I-beam )- with the angles, and the thicker metal, I think it should provide plenty of support and look pretty cool too boot ! ! !
Been putting off the lower core support as I didn't know which direction to go with it. The directions show that the holes in the new support are weldments for attaching to the old support - I kinda liked the look of the holes myself. Since I'd already bought the replacement from US Car Tools - I decided to take a stab at doing it "my" way and see how the thing turns out - worse case, I have to buy a replacement core support.
Since it was a nice day ( the sun was shining and it wasn't raining - it did get up to 50 ) I was able to open the shop door and work on the lower core support.
Here's what I've come up with so far: I set the support up and marked the holes on the old support:

The dimpled holes required a bit more room so the metal will lay flat together new-old. Here's the hole saw I needed for the lower holes:
( you can see in the pic how it'll clear the edges of the dimples )

Now the easy part - drill out the holes and check the fit ( and see how it'll look ). Not too bad ! ! !


From the back ( sorry it's blurry - should have backed off more ) - you can see I've got plenty of room to clear the dimples and weld too:

This one was going to be fun - the center hole has "no" metal to hold the centering bit in place ( here's a trick I've developed )

Drill a hole in a piece of plywood and clamp the plywood to the metal where it needs to go ( the plywood is now the "guide" ) - and drill:


And the hole is where you need it to be - works like a charm ! ! !

Here's the drilled out hole - you can see how the centering bit barely grazed the edge of the metal ( think that would have worked - NOT ! )

Check the support and see how it looks - now what to do with the other holes . . .

Decided to only drill out one more hole - so that it'll be part of what can show through. I'll explain why in the next pictures.

This part of the support I decided needed to come off - it's over the frame and I didn't want to make a bigger hole there, and it covers up a screw hole that holds a splash guard that attaches down here on the lower core support. So off it came - and it'll leave access to the bolt holes.


And the final fitting to see how it's going to look . . . I think this will work.

Now I'll just need to work on the alignment and make sure it gets welded in true and square - more welding practice ! ! !
This new support is about 1/8 thick ( much thicker than the original support ) and I left the original top, and bottom, which forms (2) angle braces ( looks more like a Z-beam than an I-beam )- with the angles, and the thicker metal, I think it should provide plenty of support and look pretty cool too boot ! ! !
Last edited:
- Local time
- 10:22 AM
- Joined
- Jan 1, 2013
- Messages
- 8,038
- Reaction score
- 3,467
- Location
- Mascoutah, Illinois
Nice work and nicely documented buddy. The plywood worked out really well .. cool K.I.S.S. principal application there 
daytona kid
Well-Known Member
Very nice! Thanks for the pics! I'll be looking at this while doing mine.. I've been thinking about doing mine but I'll have to remove the rotis brackets and hold that end up while doing it somehow.
That looks really cool "I like it". A little tip for welding it in if you want it "if not just ignore me". When welding thicker metal to thinner metal set the welder up for the thicker of the two and build your puddle on the thicker quickly washing it into the thinner metal. Sorry don't know where you are on your welding skills so I thought I'd mention it "I've been doing it since I was probably 10". Details, details with all the little touches your doing it's bound to turn out pretty sweet.
That looks really cool "I like it". A little tip for welding it in if you want it "if not just ignore me". When welding thicker metal to thinner metal set the welder up for the thicker of the two and build your puddle on the thicker quickly washing it into the thinner metal. Sorry don't know where you are on your welding skills so I thought I'd mention it "I've been doing it since I was probably 10". Details, details with all the little touches your doing it's bound to turn out pretty sweet.
Thanks 747 Mopar . . . You can shoot any and all tips for welding to me because I've been welding all the way back to June 2013 ? ! ? ( smile )
And I could use all the help I can ! ! I didn't even think about adjusting the welder for different thicknesses . . . Thanks for the tip ! !
Propwash
Well-Known Member
- Local time
- 10:22 AM
- Joined
- Oct 29, 2009
- Messages
- 9,695
- Reaction score
- 4,338
- Location
- Island of Misfit Toys
Hey good idea on the plywood template for drilling the hole.... Heck of a lot easier than dinking around with dremels and die grinders. Gotta love all the little ticks one will learn surfing the resto threads. Keep up the good work!
Hey good idea on the plywood template for drilling the hole.... Heck of a lot easier than dinking around with dremels and die grinders. Gotta love all the little ticks one will learn surfing the resto threads. Keep up the good work!
Thanks Prop ! ! Yeah - that was a little trick I learned with my woodworking and found it works just as well with the metal ! After all the directions that you posted in your "Family Tradition" thread, I'm very happy that I was able to share something with you that will help you out in the future. Thanks for the compliment - you just made my day !
Man that is some great work you've done on that! Very nicely documented to. Using the plywood like that surely made it easier to get what you wanted.. Pretty cool idea! Id sure like to borrow that 50 degrees from you for awhile lol, i think there must be at least a foot of snow here and its only 12 out and dropping! Throw another chunk of wood in and watch some old car flicks weather  Great work bud!!
Propwash
Well-Known Member
- Local time
- 10:22 AM
- Joined
- Oct 29, 2009
- Messages
- 9,695
- Reaction score
- 4,338
- Location
- Island of Misfit Toys
No sweat conv67, and thank you! :icon_thumright:
kb67mopar
Well-Known Member
Thanks Prop ! ! Yeah - that was a little trick I learned with my woodworking and found it works just as well with the metal ! After all the directions that you posted in your "Family Tradition" thread, I'm very happy that I was able to share something with you that will help you out in the future. Thanks for the compliment - you just made my day !
That is a very good trick. I have used a variation of it but instead of drilling the hole in the plywood you use the plywood as a place for the pilot bit to go...but both work and its a very good tip.
I like the look with the holes there! I also have to say your recycling extra floor pan material to remove the battery tray area is pretty sweet. It looks awesome. So I take it you are putting a fancy battery box in the trunk? Maybe one with a cnc'd logo on top of your design? "Larry's Customs" haha
Killer as always bud.
- - - Updated - - -
Man that is some great work you've done on that! Very nicely documented to. Using the plywood like that surely made it easier to get what you wanted.. Pretty cool idea! Id sure like to borrow that 50 degrees from you for awhile lol, i think there must be at least a foot of snow here and its only 12 out and dropping! Throw another chunk of wood in and watch some old car flicks weatherGreat work bud!!
Yup I am loving this snow! to bad its going to warm up and rain... If I can't drive the Coronet and its getting painted no sense in making me wish it was here....let it snow let it snow let it snow
Maybe one with a cnc'd logo on top of your design? "Larry's Customs" haha
Killer as always bud.
Hey KB - I think you may be onto something there ! ! ! I'll have to keep that idea in mind ! ! ! Thanks !
( SMILE )
No welding today - Arggggghhhhhh - ran out of welding gas . . . We'll do it in blue, cause that's how I feel . . . ( sigh )
That is a very good trick. I have used a variation of it but instead of drilling the hole in the plywood you use the plywood as a place for the pilot bit to go...but both work and its a very good tip.
I like the look with the holes there! I also have to say your recycling extra floor pan material to remove the battery tray area is pretty sweet. It looks awesome. So I take it you are putting a fancy battery box in the trunk? Maybe one with a cnc'd logo on top of your design? "Larry's Customs" haha
Killer as always bud.
- - - Updated - - -
Yup I am loving this snow! to bad its going to warm up and rain... If I can't drive the Coronet and its getting painted no sense in making me wish it was here....let it snow let it snow let it snow
You sure would love it hear right now! ;)
Sorry to hear your in the blues bud! That welding gas seems to run out just about the time when things are going as smooth as it gets, You'll be back at it in no time, Your work is top notch id bet on that one!
kb67mopar
Well-Known Member
You sure would love it hear right now! ;)
Sorry to hear your in the blues bud! That welding gas seems to run out just about the time when things are going as smooth as it gets, You'll be back at it in no time, Your work is top notch id bet on that one!keep your chin up and smile, smile smile, Its Christmas season buddy! and a Merry Christmas to all you guys and gals here!
To be honest Ron, I'd love to be up in the lake effect snow belts of the UP of Michigan. I spent time up there and loved every minute of it! (now if I could only get a job up there!)
Don't sweat it Larry...that's the welder's way of telling you to take an afternoon for beer and a couch. I have had that happen tons of times and the only tip I can offer is to keep a small spool of "flux core" wire handy. You can always switch it out and run gas-less but it does make lots of spatter and requires a bit more heat. (also learned from some pro welders that using flux core with gas makes a super clean weld and ends up with a stronger joint due to the metal composition...but still makes a bit of a mess with spatter)
Either way, as Ron said, Merry Christmas.....and I guess I should send you your present one of these days.
Don't sweat it Larry...that's the welder's way of telling you to take an afternoon for beer and a couch. I have had that happen tons of times and the only tip I can offer is to keep a small spool of "flux core" wire handy. You can always switch it out and run gas-less but it does make lots of spatter and requires a bit more heat. (also learned from some pro welders that using flux core with gas makes a super clean weld and ends up with a stronger joint due to the metal composition...but still makes a bit of a mess with spatter)
Either way, as Ron said, Merry Christmas.....
Thanks KB - yeah, I took the day off and switched it up - pulled the other stock manifold off the shoe box . . . so now when the new headers get in, I'll be able to get them installed and see how that all works out. Funny thing - alternator went out in the truck Monday morning ( yeah, welcome to Monday ) - and I've got NO vehicle to drive, so I had to borrow my daughters to get the replacement starter . . . go figure, 3 cars and all of them not working ! ! ! LMAO . . . such is life . . .
Got welding gas . . . now the work can continue . . . YAY ! !
Had to take a half day off work yesterday to go and pick up welding gas - 3 days of not being able to work on the Belvedere !
Arghhhhh ! !
Also picked up a new hole punch tool, to see how it'll work with the holes for plug welding.
Here's the new tool - pretty nice !

Here's the holes that it punched . . . not too bad, but the handles get pretty far apart and it does make it a bit difficult to squeeze.
After a day of doing the hole punching, you'll have built up your hand strength - that's for sure ! ! !
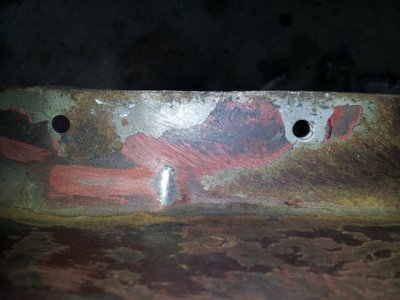
Not too bad of a tool . . . but it won't work in areas that are not near the edges of the metal . . .
Now - off to see if I can get that lower core support welded into place now ! ! ! Yahoooooo ! ! !
Had to take a half day off work yesterday to go and pick up welding gas - 3 days of not being able to work on the Belvedere !
Arghhhhh ! !
Also picked up a new hole punch tool, to see how it'll work with the holes for plug welding.
Here's the new tool - pretty nice !

Here's the holes that it punched . . . not too bad, but the handles get pretty far apart and it does make it a bit difficult to squeeze.
After a day of doing the hole punching, you'll have built up your hand strength - that's for sure ! ! !

Not too bad of a tool . . . but it won't work in areas that are not near the edges of the metal . . .
Now - off to see if I can get that lower core support welded into place now ! ! ! Yahoooooo ! ! !
Lower Core Support installed . . .
YAY . . . it's nice getting your welding gas back, so you can get back to work. I never realized just how bad the lower core support in my car was until I tried to get this new one aligned up with the old one . . . it wasn't even CLOSE ! !
But, I think I've got it all squared away - still got a little more final welding, but it's in place . . .
Here's one of the edges tidied up - it comes with only a tack ( had to break it to get the thing to fit up tight )
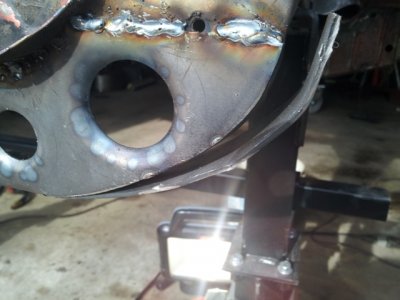
A view from the back side

Clamped and "finessed" into place with a BFH . . . ( smile ) . . .

Welded in place:
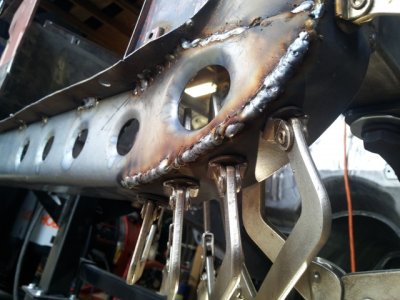
Rough grinding completed:

And final grinding done . . . not too bad . . .
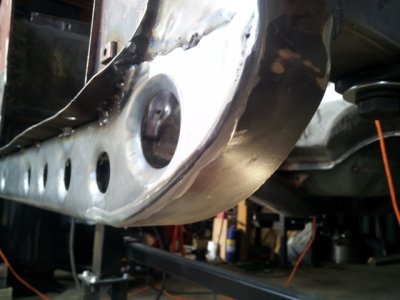
And the final product as it looks from the front ( with out the clamps ) . . .
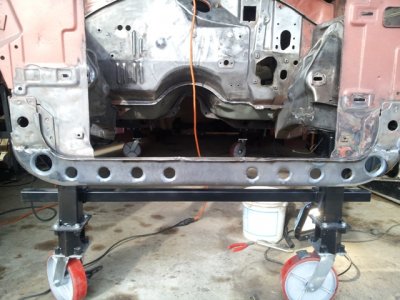
Really like the way this turned out, the support is SOLID ! I think I could stand on the thing now and it would be fine, not so before.
Even with the holes in it, the support is far more sturdy than it was - and when I get the rest of the final welding done, it'll be even better.
So my thought and evaluations:
1 - drilling out the holes did not seem to "hurt" how solid the support feels ( and it looks cool ! )
2 - I've still got access to my splash guard holes to get it installed
3 - the bracket that connect to the K-member was removed and will need to be added back.
4 - I'm very happy with the strength of the new bracket
And . . . I really like the way it looks ! ! !
YAY . . . it's nice getting your welding gas back, so you can get back to work. I never realized just how bad the lower core support in my car was until I tried to get this new one aligned up with the old one . . . it wasn't even CLOSE ! !
But, I think I've got it all squared away - still got a little more final welding, but it's in place . . .
Here's one of the edges tidied up - it comes with only a tack ( had to break it to get the thing to fit up tight )

A view from the back side

Clamped and "finessed" into place with a BFH . . . ( smile ) . . .

Welded in place:

Rough grinding completed:

And final grinding done . . . not too bad . . .

And the final product as it looks from the front ( with out the clamps ) . . .

Really like the way this turned out, the support is SOLID ! I think I could stand on the thing now and it would be fine, not so before.
Even with the holes in it, the support is far more sturdy than it was - and when I get the rest of the final welding done, it'll be even better.
So my thought and evaluations:
1 - drilling out the holes did not seem to "hurt" how solid the support feels ( and it looks cool ! )
2 - I've still got access to my splash guard holes to get it installed
3 - the bracket that connect to the K-member was removed and will need to be added back.
4 - I'm very happy with the strength of the new bracket
And . . . I really like the way it looks ! ! !
usaroadrunner
Well-Known Member
Nice job 67, its starting to all come together
Similar threads
- Replies
- 5
- Views
- 326
- Locked
- Replies
- 13
- Views
- 1K
- Replies
- 2
- Views
- 341
- Replies
- 8
- Views
- 1K

