That sucks but at least you got it home safely even if on a cob jobbed belt haha "good thinking". It's never fun to have issues in the morning especially when you have to get to work.
You are using an out of date browser. It may not display this or other websites correctly.
You should upgrade or use an alternative browser.
You should upgrade or use an alternative browser.
My 1967 Belvedere Convertible Plans and Restoration (aka - Mad Scientist Build)
- Thread starter conv67bdere
- Start date
That sucks but at least you got it home safely even if on a cob jobbed belt haha "good thinking". It's never fun to have issues in the morning especially when you have to get to work.
Gotta love creativity ! ! !
LOL . . .
just wait until you see what's in store for the Belvedere ! ! ! ( SMILE )
HYRDGOON
Well-Known Member
- Local time
- 1:00 PM
- Joined
- Apr 20, 2013
- Messages
- 3,375
- Reaction score
- 2,746
- Location
- Breslau, Ontario, Canada
Conv 67 I spent the last 2 mornings with my breakfast going through your thread from start to finish! Great build so far and love both cars you've managed to get some work in on!
Look forward to following this one all the way through!!
Look forward to following this one all the way through!!
Looking at the rear passenger quarter panel . . .
Got to looking at the rear passenger quarter panel and don't know why I ever thought it could be saved . . .
Outside - in front of the tire ( where the water from the convertible top drains )

Inside the wheel well . . . same location ( back side )

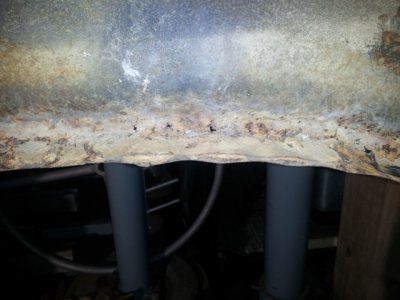
Wheel well lip . . . ( yes, you can see daylight through it in spots . . . )

Another section of the wheel well lip . . .
So, I've ordered another quarter panel, and it'll be going to make sure that I've got good metal there.
Questions:
- is 16 guage steel too thick for the replacement metal for the hump replacement ?
- how close to the quarter panel can this replaced metal get ?
- can the two of them be touching ? ( or is that a bad idea ? )
In the meantime I was cleaning up some of my other spot welds, fixing some tiny pin holes in my flooring and engine compartment work.
Going to try and get the replacement metal figured out while I've still got a panel in place . . . see if I can figure out what I'm doing ? ? ?
- - - Updated - - -
Thanks Hyrdgoon . . . just trying to plug my way through this thing and figure out how to do it right ! ! ! ( smile ) . . . Thanks for following along . . .
(2) cars . . . (2) projects keeps me twice as busy ! ! ! Trying to keep the 66 running while I work on the 67 . . .
Got to looking at the rear passenger quarter panel and don't know why I ever thought it could be saved . . .
Outside - in front of the tire ( where the water from the convertible top drains )

Inside the wheel well . . . same location ( back side )

Wheel well lip . . . ( yes, you can see daylight through it in spots . . . )

Another section of the wheel well lip . . .

So, I've ordered another quarter panel, and it'll be going to make sure that I've got good metal there.
Questions:
- is 16 guage steel too thick for the replacement metal for the hump replacement ?
- how close to the quarter panel can this replaced metal get ?
- can the two of them be touching ? ( or is that a bad idea ? )
In the meantime I was cleaning up some of my other spot welds, fixing some tiny pin holes in my flooring and engine compartment work.
Going to try and get the replacement metal figured out while I've still got a panel in place . . . see if I can figure out what I'm doing ? ? ?
- - - Updated - - -
Conv 67 I spent the last 2 mornings with my breakfast going through your thread from start to finish! Great build so far and love both cars you've managed to get some work in on!
Look forward to following this one all the way through!!
Thanks Hyrdgoon . . . just trying to plug my way through this thing and figure out how to do it right ! ! ! ( smile ) . . . Thanks for following along . . .
(2) cars . . . (2) projects keeps me twice as busy ! ! ! Trying to keep the 66 running while I work on the 67 . . .
Last edited:
Look at it as a good thing (replacing the quarter) I found things I would never had known about because I removed mine "it's a good thing in a way". I wouldn't let them touch but should be able to fit them tight "I think mine is about 1/2". What kind of quarter are available for the 67's?????
Look at it as a good thing (replacing the quarter) I found things I would never had known about because I removed mine "it's a good thing in a way". I wouldn't let them touch but should be able to fit them tight "I think mine is about 1/2". What kind of quarter are available for the 67's?????
This is the same company that I ordered the driver side from ( should have ordered both and saved a couple bucks . . . )
Found them on Amazon Prime -
http://www.amazon.com/Quarter-Belve...vedere&keywords=1967+belvedere+quarter+panels
Haven't done the driver side yet but the metal looked pretty good - I guess I'll be knowing more soon . . .
Good point on finding things . . . I really need to see what the rockers look like ( the driver side is REALLY BAD ) . . . and paint them black ? ?
HYRDGOON
Well-Known Member
- Local time
- 1:00 PM
- Joined
- Apr 20, 2013
- Messages
- 3,375
- Reaction score
- 2,746
- Location
- Breslau, Ontario, Canada
Black would be my choice ;)
Ron 73
Deceased, But not forgotton
Your going to have a sweet ride there when your finished,  You might have saved some money ordering both quarters but sometimes we have to do it the hard way i guess, money is tight anymore but time will see it thru! Good luck and have fun!
Your going to have a sweet ride there when your finished,You might have saved some money ordering both quarters but sometimes we have to do it the hard way i guess, money is tight anymore but time will see it thru! Good luck and have fun!
Thanks Ron . . . having a great time, learning a lot, and meeting a great group of guys/gals on the way - How could it get any better ? ! ? ! ?
Oh, and it only would have saved me $20 . . . even though every little bit helps . . . I don't think that will break the bank. ( smile )
Now I have to wait till it gets here - the estimate is the earliest ship of 1/24/14 . . . UGH ! ! ! Oh well . . . . on to other things . . .
- Local time
- 12:00 PM
- Joined
- Jan 1, 2013
- Messages
- 8,050
- Reaction score
- 3,465
- Location
- Mascoutah, Illinois
Good thing in the end .. better found out now than later and like 747 says you know what's in there now.
kb67mopar
Well-Known Member
Don't feel too bad, those look like the typical spots even for non convertibles. I kept finding things like that throughout my process too, it will pop up in places you never figured you'd have to do work. Though your car started out a whole lot cleaner than mine did so with any luck you will be able to get away with much less.
I did EXACTLY what you did though. Dreams of grandeur thinking I could save the drivers side rear quarter...in the end after tearing things apart and cutting out the bad spots I found that the rust in that side was worse than the other even though it looked cleaner from the outside. Something to check: look in through the inner body below the rear windows at the quarter panel and see if the body is rusting. I found spots where water from the window had rusted the body through from the inside out....
Either way when you get done you will be happy knowing there is no rust there to show back up later.
Oh and on shipping....Amazon seems to be terrible with that, I am STILL waiting on a distributor I ordered January 2nd. Though I think it will finally show up today.
Propwash
Well-Known Member
- Local time
- 12:00 PM
- Joined
- Oct 29, 2009
- Messages
- 9,710
- Reaction score
- 4,327
- Location
- Island of Misfit Toys
Would shipping be cheaper buying directly from Nor/Am Auto Body Parts? They do have thier own web store:
http://www.noramstore.com/
I don't see why 16 gauge wouldn't work. Just a little more weight. Not quite as easy to manipulate or cut as the 18 Gauge that was used. If it was the other way around and it was more thin, then you would have an issue. Not quite sure what/where you're referring to with these two questions:
- how close to the quarter panel can this replaced metal get ?
- can the two of them be touching ? ( or is that a bad idea ? )
Don't feel too bad, those look like the typical spots even for non convertibles. I kept finding things like that throughout my process too, it will pop up in places you never figured you'd have to do work. Though your car started out a whole lot cleaner than mine did so with any luck you will be able to get away with much less.
I did EXACTLY what you did though. Dreams of grandeur thinking I could save the drivers side rear quarter...in the end after tearing things apart and cutting out the bad spots I found that the rust in that side was worse than the other even though it looked cleaner from the outside. Something to check: look in through the inner body below the rear windows at the quarter panel and see if the body is rusting. I found spots where water from the window had rusted the body through from the inside out....
Either way when you get done you will be happy knowing there is no rust there to show back up later.
Oh and on shipping....Amazon seems to be terrible with that, I am STILL waiting on a distributor I ordered January 2nd. Though I think it will finally show up today.
Thanks for the update KB and the information - Good to know that I've got the rust in the same spots, so it makes me feel better that I'm going the correct route with replacing the rear passenger side quarter panel too. Still very nervous about welding in the new panel, but I'm going forward with the wisdom that you gave me - I can't make it any worse than it already is ! !
So - cut out the bad, double check what's behind it and hidden, and put it fresh new stuff so I don't have to worry down the road.
Thanks KB !
- - - Updated - - -
Would shipping be cheaper buying directly from Nor/Am Auto Body Parts? They do have thier own web store:
http://www.noramstore.com/
I don't see why 16 gauge wouldn't work. Just a little more weight. Not quite as easy to manipulate or cut as the 18 Gauge that was used. If it was the other way around and it was more thin, then you would have an issue. Not quite sure what/where you're referring to with these two questions:
Hey Propwash - those two questions refer to the inner wheel well and the quarter panel - the quarter panel has some interesting curves, and I'm trying to figure out how to run the metal up the inside of the quarter panel but still have it touching at the wheel well lip so it can be welded in place. Hope that make a little more sense . . .
I messed up and ordered a sheet of 16 guage instead of 18 guage - might use it just for the outer wheel tubs . . . I'm thinking it through . . . thanks for the information.
Direct from the website - the panel is $110 and the shipping is $108 for a total of $218
From amazon prime - the panel was $140 and free shipping - for a total of $140
Shocked the heck out of me ! ! ! ( smile )
My music selection . . .
Here's another of the groups that I really enjoy listening to while I'm working in the shop:
[video=youtube;xY0HCKOmrW0]http://www.youtube.com/watch?v=xY0HCKOmrW0[/video]
Hey 747Mopar - your first selection was NOT too hard, it was GREAT ! ! Thanks ! !
Here's another of the groups that I really enjoy listening to while I'm working in the shop:
[video=youtube;xY0HCKOmrW0]http://www.youtube.com/watch?v=xY0HCKOmrW0[/video]
Hey 747Mopar - your first selection was NOT too hard, it was GREAT ! ! Thanks ! !
Good song, might have to add that to my I pod. Good luck on the metal repairs, hope you don't find any surprises and remember you always have one thing in your favor "knowing your building one sick 67 vert" can you say motivated?
- Local time
- 12:00 PM
- Joined
- Jan 1, 2013
- Messages
- 8,050
- Reaction score
- 3,465
- Location
- Mascoutah, Illinois
Thanks for the update KB and the information - Good to know that I've got the rust in the same spots, so it makes me feel better that I'm going the correct route with replacing the rear passenger side quarter panel too. Still very nervous about welding in the new panel, but I'm going forward with the wisdom that you gave me - I can't make it any worse than it already is ! !
So - cut out the bad, double check what's behind it and hidden, and put it fresh new stuff so I don't have to worry down the road.
Thanks KB !
- - - Updated - - -
Hey Propwash - those two questions refer to the inner wheel well and the quarter panel - the quarter panel has some interesting curves, and I'm trying to figure out how to run the metal up the inside of the quarter panel but still have it touching at the wheel well lip so it can be welded in place. Hope that make a little more sense . . .
I messed up and ordered a sheet of 16 guage instead of 18 guage - might use it just for the outer wheel tubs . . . I'm thinking it through . . . thanks for the information.
Direct from the website - the panel is $110 and the shipping is $108 for a total of $218
From amazon prime - the panel was $140 and free shipping - for a total of $140
Shocked the heck out of me ! ! ! ( smile )
That amazon prime is really working out for you buddy. Congrats on that find!
Working on the inner wheel well fitment . . .
Now the inner wheel well needs to get some attention so that it'll sit where it needs and align with the middle section of the well.
So that was part of the to-do list for tonight - and here's where I got with it . . . first I went on the bottom and fit it to the frame . . .
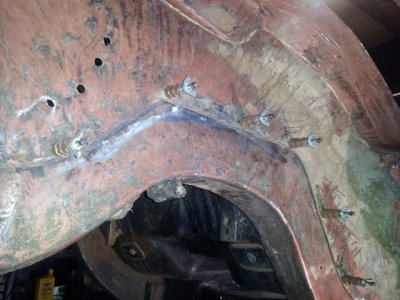
Then I came up on top and started the fitting at the front frame - this it the brace that holds the convertible top pump . . .
( notice I'm working on fitting it so that it looks more like a stock fitting - got marks for cut-offs )
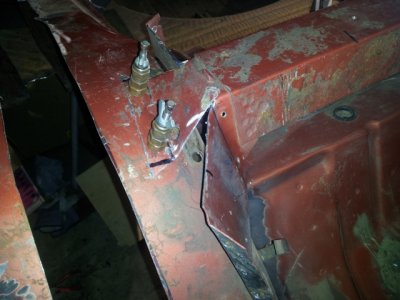
Then to the back where the trunk brace was attached to the wheel well . . . got one cleco in from the bottom here . . .
( I had to bend cut and bend the tabs back to get the well in place, now I'll fold them back and get them to fit )
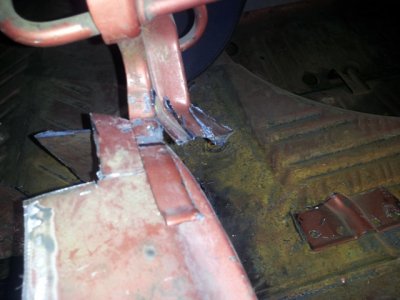
Then back to the front to work a little on "finessing" the front part of the bracket into place so the part that sits on top will be able to be screwed in properly.
Got it clamped there for now - but I'm getting close to where it needs to be - just a little more BFH work and I'll be there . . . ( smile )
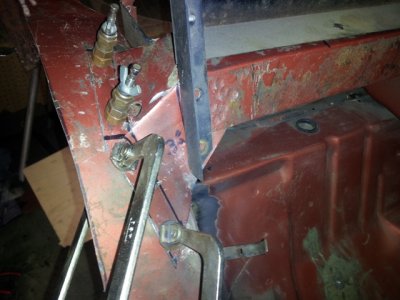
Not a bad day in the shop - good progress - and getting the mini tub progress moving again ! ! ! YAY ! ! !
Great therapy working on this car . . . ( smile )
Now the inner wheel well needs to get some attention so that it'll sit where it needs and align with the middle section of the well.
So that was part of the to-do list for tonight - and here's where I got with it . . . first I went on the bottom and fit it to the frame . . .

Then I came up on top and started the fitting at the front frame - this it the brace that holds the convertible top pump . . .
( notice I'm working on fitting it so that it looks more like a stock fitting - got marks for cut-offs )

Then to the back where the trunk brace was attached to the wheel well . . . got one cleco in from the bottom here . . .
( I had to bend cut and bend the tabs back to get the well in place, now I'll fold them back and get them to fit )

Then back to the front to work a little on "finessing" the front part of the bracket into place so the part that sits on top will be able to be screwed in properly.
Got it clamped there for now - but I'm getting close to where it needs to be - just a little more BFH work and I'll be there . . . ( smile )

Not a bad day in the shop - good progress - and getting the mini tub progress moving again ! ! ! YAY ! ! !
Great therapy working on this car . . . ( smile )
Propwash
Well-Known Member
- Local time
- 12:00 PM
- Joined
- Oct 29, 2009
- Messages
- 9,710
- Reaction score
- 4,327
- Location
- Island of Misfit Toys
WOW! That is nuts on the shipping! They taking advice from Year Ones shipping department or something? LOL.
IMO, I wouldn't let the inner wheelhouse and the quarter touch besides where they mate at the wheel house opening lip. One, the rubbing between the two when under heavy torque/twist. Second, it's a good place to trap dust,dirt and corrosion. You pre '68 guys really do get the short end of the stick when it comes to aftermarket sheetmetal and the quality of the stamped metal as well. It's pretty clear to see you have to step it up a couple levels just to perform the same panel replacement as the 68-72 cars. Good work!
IMO, I wouldn't let the inner wheelhouse and the quarter touch besides where they mate at the wheel house opening lip. One, the rubbing between the two when under heavy torque/twist. Second, it's a good place to trap dust,dirt and corrosion. You pre '68 guys really do get the short end of the stick when it comes to aftermarket sheetmetal and the quality of the stamped metal as well. It's pretty clear to see you have to step it up a couple levels just to perform the same panel replacement as the 68-72 cars. Good work!
Short story about my dog Titus . . .
If you're following my thread, you know that I've got a Harlequin Great Dane - his name is Titus. Titus weighs in at 150 pounds but he is very tall for a Great Dane. He measures about 38" at the withers - yes, taller than your kitchen counter tops ( no food is safe ).
He goes with me to most of the stores, Lowes Home Improvement, Northern Tools, HF, Tractor Supply and always gets a lot of attention. A trip to Lowes this past weekend found a mom with 4 boys walking the aisles, of course, they wanted to see Titus ( I always stop for the kids - oh and pretty ladies ). While the kids were petting Titus, I noticed one of them would not take his hand off Titus - then I saw the mom "sign" to him - he was deaf. He really liked Titus - then he walked up close to Titus and laid his head on his side . . . if that wasn't enough to make your day, he then turned to his side and gave him a kiss. Dang - was that the cutest thing ! ! So when it was time to go, the same little boy, who never let his hand leave Titus' side . . . did it again, lean and snuggle with the puppy, and a kiss . . . and the little boy walked away with the biggest smile on his face ! ! !
Warms my heart and made my day - and the day of one small little child . . . how cool is that ! ! ! ( SMILE ) Yes, I'm still smiling when I think of it . . .
Similar threads
- Replies
- 14
- Views
- 922
- Replies
- 14
- Views
- 646


