• When you click on links to various merchants on this site and make a purchase, this can result in this site earning a commission. Affiliate programs and affiliations include, but are not limited to, the eBay Partner Network.

The Willomet Charger

It was a longish weekend (and early Monday) of details. I pulled a half day on Friday, and I still didn’t make my goal of getting the front rails “done.”

I underestimated the time required to juggle some kitchen renovation tasks alongside car fab. Also, the Hobart’s new potentiometer died, and so I ended up TIG’ing a lot more than I planned, and while I like the practice and learned a lot, it’s a substantially slower process.

Outer plate burned in
D2CBEF74-1AD2-4566-A6F5-C73BC78656AC.jpeg


F8893A7E-F7C8-4A41-ACD6-F7BBA2DC5DEE.jpeg


Inner plate ready to tack
EF3DC5B0-A79E-473D-BCA2-AC434DF03ED6.jpeg


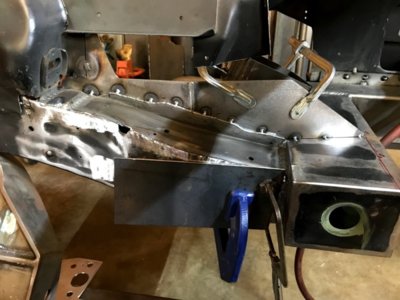
Lots and lots of blending original shapes to match the new overlay plates. The original steel doesn’t weld nearly as nicely as new A500 plate, so I’ve got to be careful with the current input and use a slight weave to maintain a consistent puddle.
8CFC1765-44AB-40CF-8FB5-2998C49ED13E.jpeg


This gobbles up the hours, but the result is worthwhile
B7762E20-D12E-4EBD-9CDB-8F9237A6CAA8.jpeg


I had some pretty radical tungsten stick-out to get to those corner welds
CFB5FDA5-5C42-495D-A57E-09E583749804.jpeg


More time tonight, and now that the front plate details are complete, I just need to start fitting the top plates and get the rear plates tacked.

Closing in.

David
3BD6AF0B-A7BE-4D2A-B653-B38C726AFB98.jpeg
 
One rail, fully welded internally, assembled, and tacked externally.

05F2EAA2-E49A-4126-A85B-506277A1FA09.jpeg


8D5D2FC8-7AFA-48ED-AB89-820CFC1617EC.jpeg


7EF04C1C-264B-4001-B1A8-CF160D917CA3.jpeg


Still quite a bit of finish welding and blending remains. This sub-project really chews up the hours.

David
 
Copy, and paste.

Passenger rail is welded internally and tacked externally. I’m planning to close up those open corner welds tonight and tomorrow. Parts for the MIG should arrive tomorrow, and I prefer to use that machine for plug welds.

393A6809-98FB-4A64-9FA5-39F37F618708.jpeg


5F082E05-4095-41A7-BB95-C116D30309F0.jpeg


67BCB209-9376-42D2-9284-8FB0EB5BE562.jpeg


I’m not yet a strong out-of-position TIG welder, so I’m leaving the overlay triangle welds until I can get the car on the rotisserie...unless I get brave.

David
 
Inner part of the rails are welded - plugs, seams, corners. All of it.

A6443378-2A29-4100-B3DF-FE6714C3B981.jpeg


9E7900EE-FCC6-4C60-B3D6-32DDB2690008.jpeg


Next is the outer plates.

David
 
I like what I’m seeing, but what’s the reason for the plating?
 
I like what I’m seeing, but what’s the reason for the plating?
The short answer is that the .120 overlay and expansion plates will make the factory 14ga rails better match the strength of the much stronger rocker and torque boxes. Without them, the rails would likely fatigue and possibly crack where they intersect the torque boxes.

The objective is to make the rockers and rails act together with the rest of the structure to be a rigidly framed unibody.

David
 
That sounds good to me! Weld on!!
 
Spent the early morning finishing welding the overlay plate. I still have to do the other side, but that will have to wait for several weeks.

00BE7D9A-570F-4B80-8365-6673D40B258F.jpeg


The Charger build is idled while I turn my attention and time to suburban prep in advance of its next adventure.

A45EC4DE-86FD-4CDB-97FC-A650F58D3A95.jpeg


I know exactly where I have to start - finish weld the other overlay plate and start building the floor support structure. If you look closely, you’ll see that 3x1 steel for the floor stored inside the car.

Until then.

David
 
The Trail to SEMA is done, and I’m back in the shop. Met a bunch of folks, and learned a lot, but it’s good to be home and getting back to building the car.

David
 
Back at it.

Passenger rail is welded and blended. I spent Saturday dialing in the welder, and getting back in the groove. It’s been 4 weeks since I’ve struck an arc.

3CAEA0EA-C98C-40AA-998A-FFE62E221199.jpeg


4403EAB0-01F6-4A58-863B-E82CEBB7A971.jpeg


And then there’s this. Working with some new contacts and partners I met at SEMA, there’s a real possibility I’ll be able to push the engine back a significant amount. In addition to recentering from the factory position, the weight balance should be much more favorable.

0C92FA97-797F-4F09-A547-98FA406C837B.jpeg


I’ve been working on a revised plan for the rear chassis and the front suspension, and hope to have some clear updates on that in the next couple of weeks. Again, I’ve learned a lot in the last few weeks, and it’s better informed my approach to the suspension design.

David
 
Oh HELL NO! That my friend is an LS.
It’s entertaining to see the responses to the LS but I think the purists need to accept that facet of this project and just appreciate the workmanship and engineering going into this. It’s just an engine... and below the heads, the G3 and LS aren’t all that different.
 
is that a new gen hemi?

still following along
It is not. There's a whole story, but I'm pretty far down the LS path.
Oh HELL NO! That my friend is an LS.
Yessir. It's a 6.0L iron block that will get some boost, and should be plenty happy in the 600-700 range. For that platform, it's nothing too radical.
It’s entertaining to see the responses to the LS but I think the purists need to accept that facet of this project and just appreciate the workmanship and engineering going into this. It’s just an engine... and below the heads, the G3 and LS aren’t all that different.
It's an extremely compact powerplant; more so than I initially imagined. I think it will fit extremely well, and have a decent amount of room for my header design. Following SEMA, plans for induction have changed slightly, and for the better. The 1.9L LSA supercharger is sold, and I'm working with the folks at Procharger on a D1SC that should be sized just right for this build and is also a significant weight savings. I'm still aiming for a 3500lbs dry weight with the iron block.

While I sort out the front and rear suspension details, I'll spend the next several nights and weekends sorting through the miscellaneous fabrication tasks - firewall cleanup, rocker weld and blending, rust repair on on the passenger door latch, and other random tasks.

David
 
That’s not right. There’s a lot of engineering that’s going into this car and I for one can appreciate that. Guess you’ll be heartbroken to hear the General Lee also used small block Chevy’s?
 
Last edited:
Oh HELL NO! That my friend is an LS.

I was checking out pictures and was like, wait... that's an LS! :rofl:

I appreciate the awesome work you're doing, I was waiting to see the backlash after that picture! I have a Gen 3 in my car but I also have an LS swap in my C-10 and will be doing many more LS swaps in the the future, and not just in GM cars! I am in the planning stages of an LS swapped Triumph Spitfire for my daughter. The Gen III is an awesome motor but the options for the LS are endless and soooo much cheaper! And they are nearly identical in architecture. Hide the valve covers and no one will be able to tell!

It's your car, you do you!
 
There’s a lot of engineering that’s going into this car and I for one can appreciate that.
Thanks man. I’m definitely pouring myself into it, as I’ve never taken something down this far.
Nice craftsmanship 1970RT.
Thank you. That’s my goal - to do the best work I know how.
I appreciate the awesome work you're doing...Hide the valve covers and no one will be able to tell!
Much appreciated. I like that idea - even simple coil covers clean up the look.

David
 
Auto Transport Service
Back
Top