• When you click on links to various merchants on this site and make a purchase, this can result in this site earning a commission. Affiliate programs and affiliations include, but are not limited to, the eBay Partner Network.

The Willomet Charger

Good stuff! I used butt and lap welds in different spots depending on what I felt best and/or easiest. You got/gonna use butt weld clamps?
 
Last edited:
You got/gonna use butt weld clamps?
I do and I will. The HF ones have worked well so far, and set the gap just right for a mig weld. Ive also come to like Eastwood’s super strong panel magnets, too. They’re handy.

David
 
Just some more patching and blending.
E5030B76-3DB7-4C09-BF79-875EB76E27C7.jpeg


CD9BF7AB-1AEE-44AC-80DC-0FC5C0BC91D9.jpeg


D0FD65B6-BE40-42B9-8E57-117859054AAE.jpeg


7769D2F8-E6D3-48CF-B72F-B09371F2BC3F.jpeg


I just have to finish the end cap, and I can start templating the inner rockers.

David
 
Front rocker end cap.
10716000-053A-4534-BF99-7B08F4CF39A8.jpeg


Still need to fit/file/trim the rocker before burning it in.
1ACD6B61-CAC2-4537-A5E5-7DAAD929A4A4.jpeg


David
 
A client’s truck is back in the shop, so I only had a little bit of time on the Charger.

Everything is prepped for the new inner rocker. Once I get this side templated, I’ll be able to transfer the pattern and build the other side. I’ll lock down this passenger rocker to the frame rails before starting any cutting on the driver side.
1CF3CD14-15DC-4AB5-93B4-6D2A8D399CFA.jpeg


David
 
Last edited:
After lots of measuring and trimming, I have an inner rocker.
7DC2FE8C-E16E-4793-A27A-5EE0E096DA3D.jpeg


I’ll get another couple of photos, but it sets up the envelope for the rest of the internal bracing, which is the next step.

David
 
Nice work, going to be pretty stiff with that new inner rocker!
 
I abandoned the previous rocker design - just couldn’t get it to work right. It was just too complicated.

Rev 1 is much simpler, and should be significantly more rigid. It just required a lot more trimming of the original outer rocker, and I’m kind of a baby about cutting original steel.

We’re well past that now.
8CC99013-C7A8-4DE5-A9B2-9A622D985B3A.jpeg


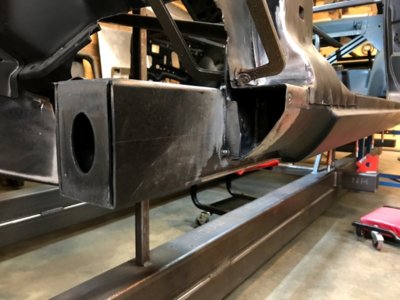
A full and uncut 4x3 section of rectangle tubing mates directly to the new inner rocker face.
DE156D6E-B5D4-449E-B65F-747AB73F308D.jpeg


I designed some gussets and reinforcements and had those cut on a plasma table, and those should be here soon. In the mean time, I’m mirroring for the other side.
D17F9DAE-F843-4E97-A353-5B4D3B299C76.jpeg


D89C42EC-106C-446A-9B70-11AAA1B6EA35.jpeg


I have a gap between client projects for just a few weeks, so I get to work on my own junk for a change.

David
 
Further along on the inner rockers.

Mirroring for the passenger side, there’s no way I could do this without the fixture table. This is the 1/8” offset for the rear 18” of rocker, making room for the rear quarter.
BB09D8D7-7447-42B0-9226-A644776FB112.jpeg


Lots of practice for the new TIG. You can see where I figured out I had too much torch angle.
724BBDB6-80A1-4EBE-828F-97998CB3F924.jpeg


Mirrored and marked for holes. The driver side has dimples in line with unibody pillars and other structural members.
FAC6026D-8DB0-4283-B428-D5B8B5FC9A6B.jpeg


A friend cut me some gussets on his plasma table for the internal reinforcements. 3/4”x3”
CCFE429A-54D4-474C-9CDF-5298611BBE51.jpeg


36A4D4E4-970A-4369-A3BB-82A5A57061BB.jpeg


Noticeable rigidity difference between the dimpled and gusseted version - good validation that small reinforcements can have a large impact.

That’s it for tonight. Mock-up tomorrow.

David
 
Further along on the inner rockers.

Mirroring for the passenger side, there’s no way I could do this without the fixture table. This is the 1/8” offset for the rear 18” of rocker, making room for the rear quarter.
View attachment 591340

Lots of practice for the new TIG. You can see where I figured out I had too much torch angle.
View attachment 591341

Mirrored and marked for holes. The driver side has dimples in line with unibody pillars and other structural members.
View attachment 591342

A friend cut me some gussets on his plasma table for the internal reinforcements. 3/4”x3”
View attachment 591343

View attachment 591344

Noticeable rigidity difference between the dimpled and gusseted version - good validation that small reinforcements can have a large impact.

That’s it for tonight. Mock-up tomorrow.

David
Very nice work David, your attention to detail will go a long way towards making the car a real standout.
 
Very nice work David, your attention to detail will go a long way towards making the car a real standout.
Thanks. It's all in the pursuit of chassis stability and predictable handling. While I lament the loss of time given to the Rev0 rocker design, I think it's ultimately pointed me toward a much more rigid assembly.

This car is a consistent reminder of the value being in the journey; not only the destination.

David
OH YES! The journey is 85% of the fun, except when your throwing tools and cussing anyway. :mad::mob::rofl:
 
Mock-up successful. Everything fits.

E1C5BF97-1CFC-4146-B8C4-73E5423A94A7.jpeg


4DA02817-F4C1-4312-BB18-C01D45F1EC22.jpeg


I took them to a buddy’s shop and ran them through his iron worker. Better to punch 102 7/16” holes than drill them.

E5D7D7FF-F1D0-4C2C-960D-E2F1F6FCBD82.jpeg


You can see the one spot where I didn’t have the punch centered correctly. Lots of hood time ahead.

David
 
It was cold in Dallas, so I shut the doors and worked in the shop.

More on the rockers. Gussets are welded, and the inner rockers are now tacked to the main rocker rails.
1C96C94E-EBB9-49E2-BA93-66A28CE2F7D4.jpeg


Internal reinforcements for the “rocker rail.”
13B76515-8B65-4352-8AA6-48B0BA2E6A25.jpeg


4F057225-B098-46EE-ACE1-B1A94A8AB095.jpeg


The mating faces are primed and coated in 3M weld thru. I’m going to put the assembly on the drill press and slug some holes for plug welds - along with a perimeter weld, it should all hold together nicely.

6DA3AA38-8DE7-4327-8BF6-824F02E7C725.jpeg


David
 
First install and fitment of the Rev-1 rocker assembly.
0D1BBEBA-DC84-498F-A858-9F131CB20B0A.jpeg


The rail extends to match the rear of the front fender opening, providing maximum opportunity for a big front torque box.
E862869F-3F5D-4425-887F-96224392BCD5.jpeg


The rear is inset 1/8”, as the rear most frame tie will plate all the way to the edge of the outer rocker.
B805CF92-D39F-4DD8-973B-B03C298BEE4E.jpeg


Still some trimming and fitment, but it fits well.
7C465BE0-F0F4-4AEF-BD4D-978B4532B88F.jpeg


BDC46E24-D1BD-4A3E-B921-6693B2B283D4.jpeg

David
 
Last edited:
I really like the reinforcement and gusset design.
This build will be very interesting to watch,
as it progresses from your mind to our eyes!
 
I really like the reinforcement and gusset design.
This build will be very interesting to watch,
as it progresses from your mind to our eyes!
Thanks. It’s only existed in my imagination up to this point, and I’m glad to start rendering it in steel.

David
 
I pulled down a fender, and checked the rocker beam was within the planned tolerance.

I was just a bit too long - about 3/4” visible from rear edge of the fender opening.
96F9A9FB-25EF-41D0-94F4-CE0D48480BD9.jpeg


D29C7B55-D4E3-428E-8151-3019B2D0075A.jpeg


263FE1A6-A9BD-4782-A70A-473F0EA528ED.jpeg


I trimmed 2.75”, which I think will be enough to give a small margin for scrub radius.
94CF90F4-89E0-4509-874B-32AB9CD46394.jpeg


This, plus lots more fitting and install prep. Hoping to burn it all in tomorrow.

David
 
Auto Transport Service
Back
Top